Fighting The Scourge Of “Screwdriver Mange”

We’ve all got our favorite hand tools, and while the selection criteria are usually pretty subjective, it usually boils down to a combination of looks and feel. In our opinion, the king of both these categories when it comes to screwdrivers is those clear, hard acetate plastic handles, which are a joy to use — at least until the plastic starts to degrade and exude a characteristically funky aroma.

But perhaps we can change that if these experiments on screwdriver “mange” hold up. That’s [357magdad]’s unappealing but accurate description of the chemical changes that eventually occur in the strong, hard, crystal-clear handles of your favorite screwdrivers. The polymer used for these handles is cellulose acetate butyrate, or CAB, which is mostly the same cellulose acetate that replaced the more explode-y cellulose nitrate in things like pool balls and movie film, except with some of the acetate groups replaced with a little butyric acid. The polymer is fine at first, but add a little UV light and over time the outer layer of CAB decomposes into a white flaky cellulose residue while the butyric acid volatilizes, creating the characteristic odor of vomitus. Lovely.

In the video below, [357magdad] takes a look at different concoctions that all allegedly cure the mange. TL, DW; it was a dunk in household ammonia that performed the best, well ahead of other common agents like vinegar and bleach. The ammonia — or more precisely, ammonium hydroxide — works very quickly on the cellulose residue, dissolving it readily and leaving the handle mange-free and looking nearly new after some light scrubbing. None of the other agents came close, although acetone did manage to clear up the mange a bit, at the cost of softening the underlying CAB in a process that’s probably similar to acetone smoothing ABS prints.

As for the funky smell, well, the results were less encouraging. Nothing really got rid of the pukey smell, even a roll in baking soda. We suspect there won’t be much for that, since humans can detect it down to 10 parts per million. Consider it the price to pay for a nice-looking screwdriver that feels so good in your hand. Continue reading “Fighting The Scourge Of “Screwdriver Mange””

Unusual Tool Gets An Unusual Repair

In today’s value-engineered world, getting a decade of service out of a cordless tool is pretty impressive. By that point you’ve probably gotten your original investment back, and if the tool gives up the ghost, well, that’s what the e-waste bin is for. Not everyone likes to give up so easily, though, which results in clever repairs like the one that brought this cordless driver back to life.

The Black & Decker “Gyrodriver,” an interesting tool that is controlled with a twist of the wrist rather than the push of a button, worked well for [Petteri Aimonen] right up until the main planetary gear train started slipping thanks to stripped teeth on the plastic ring gear. Careful measurements of one of the planetary gears to determine parameters like the pitch and pressure angle of the teeth, along with the tooth count on both the planet gear and the stripped ring.

Here, most of us would have just 3D printed a replacement ring gear, but [Petteri] went a different way. He mentally rolled the ring gear out, envisioning it as a rack gear. To fabricate it, he simply ran a 60° V-bit across a sheet of steel plate, creating 56 parallel grooves with the correct pitch. Wrapping the grooved sheet around a round form created the ring gear while simultaneously closing the angle between teeth enough to match the measured 55° tooth angle in the original. [Petteri] says he soldered the two ends together to form the ring; it looks more like a weld in the photos, but whatever it was, the driver worked well after the old plastic teeth were milled out and the new ring gear was glued in place.

We think this is a really clever way to make gears, which seems like it would work well for both internal and external teeth. There are other ways to do it, of course, but this is one tip we’ll file away for a rainy day.

Locate Faults With The Leakseeker-89R

Have you ever needed to hunt down a short circuit, but you’ve had no idea where it is or how it’s happening? As it turns out, there are tools to help in that regard. Enter the Leakseeker-89R.

The device is able to help hunt down short circuits that measure anywhere from 0 to 300 ohms. The device is typically used with two leads on a given pair of traces, and it has a display made up of red, yellow and green LEDs. As the leads are moved closer or farther from the short circuit, the display changes to indicate if you’re getting hotter or colder. There’s also a third lead that can be used to allow testing under more challenging conditions when there is a large capacitance in-circuit with the traces you’re testing.

Fundamentally, it’s basically a very accurate resistance meter, finely honed for the purpose of hunting down short circuits. We’ve featured similar tools before. They can be of great use for troubleshooting. Meanwhile, if you’re building your own test tools in your home lab, don’t hesitate to let us know! We’re always dying for hot tips on the best DIY lab equipment for saving time, frustration, and money.

Let The Solder Scroll Take Care Of Your Feed Needs

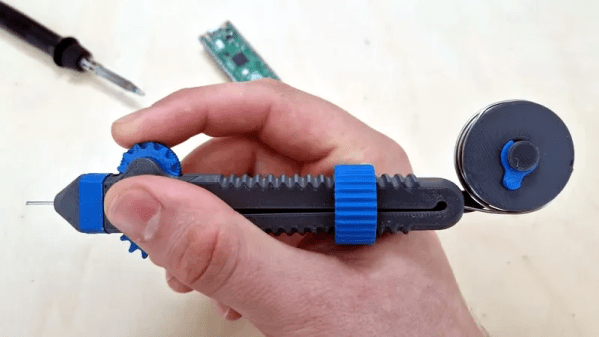
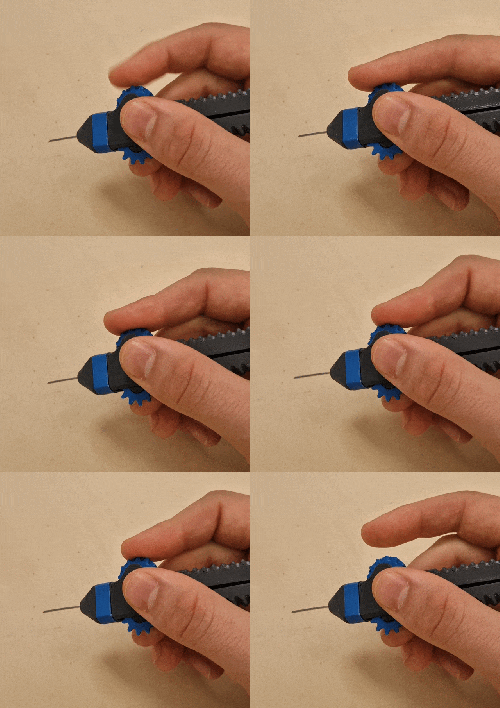
[Victor]’s nifty tool the Solder Scroll is a handheld device that lets one feed solder out simply by turning something a little like a scroll wheel. It looks like an intuitive and comfortable design that can adapt to a wide variety of solder thicknesses, and is entirely 3D printed.

One part we particularly like is the feed system. One rolls a wheel which feeds solder out using a mechanism a lot like extrusion gears in many 3D printer hot ends. Both wheels have ridged surfaces that grip and feed the solder; their gears mesh with one another so that moving one moves both in unison.

Solder feed tools like this have seen all kinds of interesting designs, because while the problem is the same for everyone, there are all kinds of different ways to go about addressing it. We love this one, and we have seen many other takes that range from a powered, glove-mounted unit to an extremely simple tool with no moving parts. We’ve even seen a method of hacking a mechanical pencil into a new role as a solder feeder.

Let Your Finger Do The Soldering With Solder Sustainer V2

Soldering is easy, as long as you have one hand to hold the iron, one to hold the solder, and another to hold the workpiece. For those of us not so equipped, there’s the new and improved Solder Sustainer v2, which aims to free up one of however many hands you happen to have.

Eagle-eyed readers will probably recall an earlier version of Solder Sustainer, which made an appearance in last year’s Hackaday Prize in the “Gearing Up” round. At the time we wrote that it looked a bit like “the love child of a MIG welder and a tattoo machine.” This time around, [RoboticWorx] has rethought that concept and mounted the solder feeder on the back of a fingerless glove. The solder guide is a tube that clips to the user’s forefinger, which makes much finer control of where the solder meets the iron possible than with the previous version. The soldering iron itself is also no longer built into the tool, giving better control of the tip and letting you use your favorite iron, which itself is no small benefit.

Hats off to [RoboticWorx] for going back to the drawing board on this one. It isn’t easy to throw out most of your design and start over, but sometimes it just makes sense.

Continue reading “Let Your Finger Do The Soldering With Solder Sustainer V2”

Spying On The ESP32’s GPIO

The ESP32 has been a go-to microcontroller platform for a while now, thanks to its versatile capabilities, integrated Wi-Fi and Bluetooth connectivity, and low power consumption. It’s ideal for a wide range of projects especially those revolving around IoT, partially because of all of the libraries and tools available for it now. The latest tool from [The Last Outpost Workshop] adds a feature we didn’t know we wanted until now: a webserver showing real-time updates of what all of the GPIO pins are doing.

The live GPIO pin monitoring library sets up the ESP32 to stream information about what all of the pins are doing in real time to a webserver, which displays the information as a helpful graphic. The demonstration in the video below shows and example troubleshooting a situation where the code is correct but there’s a mistake in the wiring, helping to quickly identify the problem and hopefully eliminating a wild goose chase for a bug in the software. The library can be quickly installed using the Arduino IDE and only requires the use of one other library and a few lines of code to get everything up and running.

As far as a debugging tool goes, something like this could save a lot of us a significant amount of time, especially with how easy it is to set up. A real-time look into the pins and their behavior, including those set up for PWM, is invaluable for plenty of situations. Of course if you’re building something like a real-time operating system that needs responses within a very specific interval you may want to look at more in-depth strategies for probing the GPIO.

Thanks to [Bob] for the tip!

Continue reading “Spying On The ESP32’s GPIO”

Plasma Cutting And 3D Printing Team Up To Make Bending Thick Sheet Steel Easier

Metalworking has always been very much a “mixed method” art. Forging, welding, milling, grinding; anything to remove metal or push it around from one place to another is fair game when you’ve got to make something fast. Adding in fancy new tools like CNC plasma cutting and computer-aided drafting doesn’t change that much, although new methods often do call for a little improvisation.

Getting several methodologies to work and play well together is what [tonygoacher] learned all about while trying to fabricate some brackets for an electric trike for next year’s EMF Camp. The parts would have been perfect for fabrication in a press brake except for the 4 mm thickness of the plate steel, which was a little much for his smallish brake. To make the bending a little easier, [tony] made a partial-thickness groove across the plasma-cut blank, by using a reduced power setting on the cutter. This worked perfectly to guide the brake’s tooling, but [tony] ran into trouble with more complicated bends that would require grooves on both sides of the steel plate.

His solution was to 3D print a couple of sacrificial guide blocks to fit the bed of the press brake. Each guide had a ridge to match up with a guide groove, this allowed him to cut his partial grooves for both bends on the same side of the plate but still align it in the press brake. Yes, the blocks were destroyed in the process, but they only took a few minutes to print, so no big deal. And it’s true that the steel tore a little bit when the groove ended up on the outside radius of the bend, but that’s nothing a bead of weld can’t fix. Good enough for EMF is good enough, after all.

The brief video below shows the whole process, including [tony]’s interesting SCARA-like CNC plasma cutter, which we’re a little in love with now. This isn’t the first time we’ve seen 3D prints used as tools in metalworking, of course, but we picked up some great tips from this one. Continue reading “Plasma Cutting And 3D Printing Team Up To Make Bending Thick Sheet Steel Easier”