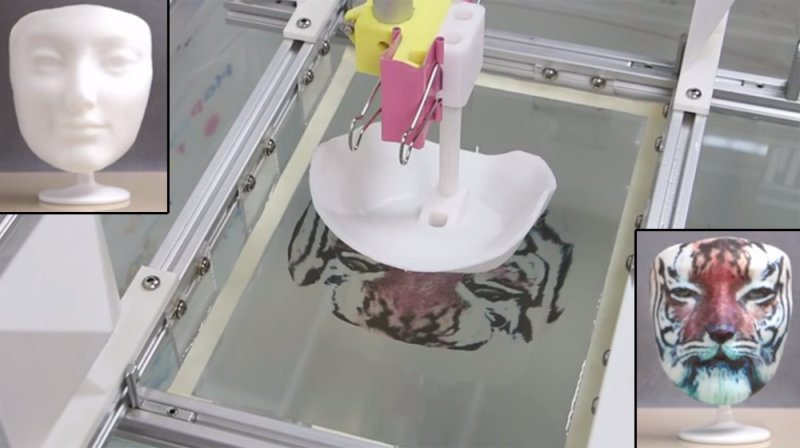
Hydrographic Printing is a technique of transferring colored inks on a film to the surface of an object. The film is placed on water and activated with a chemical that allows it to adhere to an object being physically pushed onto it. Researchers at Zhejiang University and Columbia University have taken hydrographic printing to the next level (pdf link). In a technical paper to be presented at ACM SIGGRAPH 2015 in August, they explain how they developed a computational method to create complex patterns that are precisely aligned to the object.
Typically, repetitive patterns are used because the object stretches the adhesive film; anything complex would distort during this subjective process. It’s commonly used to decorate car parts, especially rims and grills. If you’ve ever seen a carbon-fiber pattern without the actual fiber, it’s probably been applied with hydrographic printing.
 The physical setup for this hack is fairly simple: a vat of water, a linear motor attached to a gripper, and a Kinect. The object is attached to the gripper. The Kinect measures its location and orientation. This data is applied to a 3D-scan of the object along with the desired texture map to be printed onto it. A program creates a virtual simulation of the printing process, outputting a specific pattern onto the film that accounts for the warping inherent to the process. The pattern is then printed onto the film using an ordinary inkjet printer.
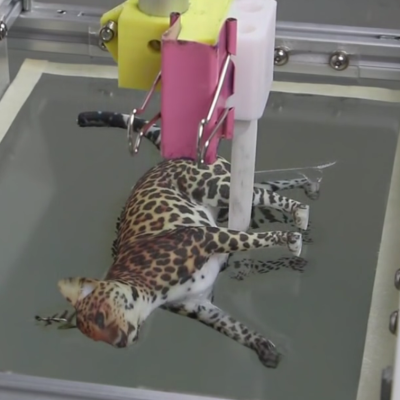
The tiger mask is our personal favorite, along with the leopard cat. They illustrate just how complex the surface patterns can get using single or multiple immersions, respectively. This system also accounts for objects of a variety of shapes and sizes, though the researchers admit there is a physical limit to how concave the parts of an object can be. Colors will fade or the film will split if stretched too thin. Texture mapping can now be physically realized in a simple yet effective way, with amazing results.
via [reddit]


Wow, there’s no reason we can’t do this at home. The colors are much nicer than a color 3d printed object.
My god. This is BIG.
China is steadily moving away from mass cheap labor, like the US did in the last several decades.
yeah, now china is looking at africa for cheap labour XD
Where can I get that printer?!
walmart…its just a printer
Specifically it’s a epson stylus 1390. Just a stock inkjet. Has a nice A3 printing mode though.
I thought I’d never buy another inkjet. If anything would convince me this would.
While Hackaday is always filled with cool projects, few of them are truly jaw-dropping. This is one of them.
This is an application of complex computation (cheap) to a simple process (also cheap) that has amazing results. It’s also something that appears to have no complex barriers that would prevent this from becoming a garage DIY process.
Man, living in the future ROCKS!
SIGGRAPH is often full of jaw-dropping demos. This is one of my favorite: https://www.youtube.com/watch?v=hmzPWK6FVLo
SIGGRAPH is often full of jaw-dropping demos that then spend years stuck in an odd mix of patent/proprietary limbo coupled with lower cost / “free” student researchers that move on every year who have no ability or desire to commercialize their findings. Combine that with a closed source nature and you often wind up with really neat things being published then not seeing the light of day and certainly not being available to the community at large. Is this useful? Easy to do? Yep. Open source? Nope.
Yup, tons of stuff gets done at universities then shelved and eventually lost. I’m looking for the QTC (Quick Turnaround Cell) CAD/CAM software Purdue University (Lafayette, not Calumet) did for the proLIGHT PLM2000 CNC milling machine near the end of their CAD-LAB program which ran from 1986~2000. The professor who oversaw it retired last year.
The software WAS publicly available to download but archive.org only saved some of the cadlab website, nothing from the FTP due to its *stupid* policy of not actually reading the contents of robots.txt files to see if they permit archiving. Archive.org simply ignores the directory with a robots.txt and everything below that level, even if the robots.txt file *expressly permits* archiving, indexing etc, which the one on the cadlab server did.
Hopefully someone downloaded it all years ago and has it buried in a box of old CD-R discs or on a backup tape.
This is where GitHub is going to save everyone. As long as they never close up shop. Projects can be left on a visible shelf, and picked up by other people.
Gerbmerge is a good example. It’s a well developed program that is of critically important function to lots of hobbyists and researchers, in a very enabling way. It is a tool that should easy and be easy to use for everyone … but it was entirely abandoned a number of years ago.
We needed to use it here in lab, so now we are effectively the stewards of the wayward code base. It’s back up on github, it’s been made to work with recent versions of Eagle output, etc.
I’m currently a student at Purdue (West Lafayette) in EET. If possible, I could help you?
I want my flying car!
I’ll work on it next year. Right now, it’s neurons. Now… to the lab, there’s science to be done!!!
“Man, living in the future ROCKS!”
That’s not true. Everybody knows things were better in the old days hence the term “the good old days”.
(c:
brilliant… now we just need someone with some math skillz to turn it into open source code.
How did they do the globe in one dip?
My guess is a star/flower shaped piece of paper that covers the entire thing without overlap
It should be said they make it out to be much easier then it is, like said in the article, the tech isn’t new, the reason you still don’t see it a lot these days is because there’s simply quite some work to it, for starters your gonna need a special kind of super thin laminated paper and some fancy chemicals, your gonna need to keep your floating image and 3d object perfectly aligned (to get best results ofc, you could do shoddy alignment if u wanted too) and for most objects you will have too cut odd shapes of material and submerge the object in a specific manner to get the best results. And then you still need the software from the article.
To summarize; Cool, but not as easy as they make believe.
The more impressive part is how she always places the paper aligned perfectly in the tank in the demo. :)
That the core of what she’s talking about. The frame in the tank is fixed and so is the vertical rod. The algorithm they’ve developed not only distorts the print to counter the film stretch, but it centers the print so that the object and print frame are perfectly aligned every time. There is nothing to the placement other than to line up some reference marks to the edge of the printed film.
I’m not sure, why use a kinect, so? Nothing seems to be motorized except the “dipper” (that’s a heater in the water, right?), but I don’t get what the camera is used for during the “dipping” in that case…
If you look at the actual paper, there’s a section devoted to how it’s aligned using a Kinect. She didn’t cover it in the video though.
The paper placement is manual and not drop down by a machine… So unless the object is aligned (X/Y + rotation) optically to *where* she place the paper, that is a source of error no matter of how much computations is done.
I had a tough time alignment those screen protector sheets on my laptop LCD…
+1 Exactly my thoughts! The origin alignment between the model and the ink becomes the most critical task.
Either this is already patented by someone else or you guys are gonna get rich ;-)
Well done!
PVA is pretty easy – it’s what white glue is made of. Any ideas how to make a film from it that can be put through an inkjet printer? And does anybody have a guess what they’re using for the adhesive?
Technically it doesn’t seem that difficult. The only thing that stumps me is how they got the albino cat to cooperate.
There are a number of sources for the film – just google water transfer inkjet film, or Hydroprinting. Lots of people are using this stuff for cars, motorcycles, gun grips, etc – so it’s become popular.
The PVA they are using would is Poly Vinyl Alcohol, rather than Poly Vinyl Acetate(the white wood glue). Dried PV-Acetate isn’t usually cleanly water soluble in my experience, whereas as PV-alcohol is, as (among other things), it is used as a release agent in moulding and casting applications (eg, fibre composites). It is readily available and when sprayed can form quite a thin film, so the potential for DIY is still there.
They’ve been doing this to firearms for some time: http://www.camodipkit.com/
http://www.ezdipkits.com/#
At the beginning of this video they talk about how the image transfer dipping already exists. Then they explain the short falls, primarily the fact you cannot hand dip something and have the pattern precisely map to the item you are dipping. Then they show off their addition to this existing technology, the ability to precisely map something to a 3d object.
Really glad to see this type of advancement in hydrographic printing. I have always felt that anyone who has a 3D printer should also have a hydrographic setup next to it!
While the use of computer calculations will make the printed graphics perfectly match the physical shape under water displacement, a friend of mine has been doing this for a couple years by manually tweaking graphics with photoshop. You can still see minute deformities on really complex shapes, but when he does masks, they look like they were formed from preprinted plastics. I believe his sculpting background allows him to tweak a graphic in photoshop by hand to match the physical piece without the aid of computation. He has the ability to see the deformity in his mind and implement it in photoshop. This solution will give everyone that artistic ability.
I’ve seen a hydroprinting video where someone dipped their hand into a carbon fiber print to show it was safe and went onto almost anything. Was really odd how well it turned out for something so simple. Still, like a few people have pointed out, alignment for specific details instead of just applying a pattern is really the trick to getting the jaw dropping result.
Soo OK, the consensus seems to be it’s worthwhile ans we all seem to want one. Is there a kickstarter in the future?
Amazing work but I’m sure you could do this much easier.
If you were to make a test pattern with lines and dots (or something) on it that you could overlay on your object. You could then photograph the object face on and you would effectively have a template of how to selectively morph your image to line up with the contours of the physical object. A GIMP plug in later and you could process and print your graphics without needing kinect or any fancy 3d moddeling. You would still want the stick for alignment but if you had a steady hand you wouldn’t even need to motorise it.