Hackaday Prize Entry: A 7805 Replacement

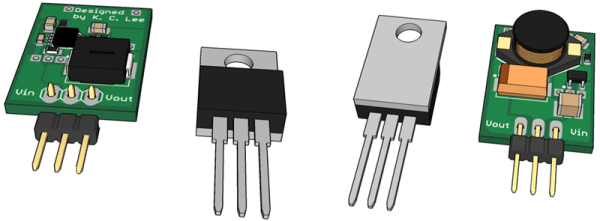
The 7805 voltage regulator is a great device if you want a simple way of bringing a voltage down to 5V. It’s a three-pin, one-component solution that puts out five volts and a lot of heat. Simple, not efficient. For his Hackaday Prize entry, [K.C. Lee] is working on a much more efficient drop-in replacement for the 7805.

Linear regulators like the 7805 are great, but they’re not terribly efficient. Depending on the input voltage you might see 50% efficiency. Going to a switch mode supply, that efficiency shoot up to about 90%.

For his drop-in replacement, [K.C. Lee] is using the LM3485, a switch mode regulator that only needs a few extra parts to turn it into a replacement for the 7805. You will need a cap on the input, but you should already be putting those in your circuit anyway, right?


The 2015 Hackaday Prize is sponsored by:

wave generator

DIY Wave Energy Reclamation, Not So Complicated After All

We humans are becoming more aware every day that we need to reduce our fossil fuel dependence and move to more renewable methods lest we make the earth a less-desirable place to live. The sun is here today, and it will be tomorrow, harness that energy is one solution. There are places that are commonly windy, we can harness that energy too. [Jonathan] and [Ellen] set out to harness that wind energy but not in the traditional wind-turbine way. Wind creates ocean waves and the pair set out to recover some of that wave energy. They built a proof of concept and they did it on a budget with a side of DIY-style, to boot!

The device consists of a raft, with magnets attached to a sheet metal ruler standing on end. As you would expect, this ruler is flexible and the mass of the magnets easily sways back and forth as waves pass. The magnets move through stationary wire coils and as they do, creating an electrical current in the coils. The output of the coils is AC, which is then rectified to pulsed DC using several diodes and smoothed even further by some capacitors. The two DC outputs are then connected in series to double the voltage to 5 with a max current of about 20mA.

For this experiment the generator powers a modified smoke alarm which keeps burglars away from a coral reef. But the team could see this powering lights on buoys or low-power sensors. What would you use it for?

An Amazon Dash-Like Button For The ESP8266

The Amazon Dash Button is a tiny piece of hardware that contains a single pushbutton, a WiFi module, and a nice, shiny corporate logo. Press the button, and products with that logo will be delivered to your house. An impressive bit of marketing, at least. With small, cheap WiFi modules like the ESP8266, it was only a matter of time until something an Amazon Dash clone was developed.

[deqing] created an ESP8266 Dash Button using the ESP-12 module, a button, a 3D printed case, and a pair of AA batteries. Electronically, it’s extremely simple; press the button, the ESP will wake up, request a URL, and put itself back to sleep. That’s all you need to do when you’re replicating the functionality of the Amazon Dash Button – the server will take care of the rest.

To configure the ESP8266, [dequng] is using the ESP-TOUCH app for Android, and setting up new functionality in this ESP button is as simple as putting a URL in the button’s Flash.

Not only is this a great build that has literally hundreds of different uses, it’s also not a breakout board for the ESP8266. It’s great that we’re finally seeing some builds using this cheap WiFi chip in the real world.

Obviously the actual Dash buttons include authentication that this one does not. We recently saw a teardown of the original hardware. We’re still waiting for in-depth analysis of the data squirted to the internet when an order is placed with it, though.

Arduino IDE Becomes More Open, Less Snarky

Version 1.6.4 of the Arduino IDE has been out for a little while now, and it has a couple of notable changes. To our eyes, the most interesting change makes adding support for non-standard boards and their configurations within the Arduino IDE a lot simpler. We’ll get into details below.

unnamed
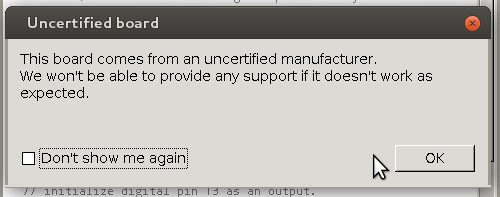
But before that, it’s time to bid farewell to the cheeky little popup window that would deliver a warning message when using a board bearing the USB IDs of their former-partner-turned-competitor. We absolutely agree with [Massimo] that the issues between Arduino SRL / Smart Projects and Arduino LLC are well-enough known in the community, and that it’s time for the popup to fade away.

Now on to the meat of this post. The new “Board Manager” functionality makes it significantly easier for other non-Arduino products to be programmed within the Arduino IDE. Adafruit has a tutorial on using the Board Manager functionality with their products, and it basically boils down to “enter the right URL, click on the boards you want, download, restart Arduino, bam!”

The list of unofficially supported third-party boards is still a bit short, but it includes some stellar entries. For instance, Adafruit has provided the files needed for the ESP8266, which recently received the Arduino treatment. This means that you can simply point your IDE at Adafruit’s URL, and it’ll set you up with everything needed to develop for the ESP8266 from within the comfy Arduino IDE.

Continue reading “Arduino IDE Becomes More Open, Less Snarky”

Direction Projection Is A Beacon In The Night

Navigating with your phone can be a hassle: the phone displays a tiny map that you’re never supposed to look at while driving, but of course you do. [Mikeasaurus] has the ultimate solution: Direction Projection! Mike has created an augmented reality system with no glass heads-up display, and no goggles ala Microsoft Hololens. The road ahead is his canvas. A standard projector mounted atop his car displays maps and turn indicators, all from his phone. Linking the phone and projection system would normally involve HDMI or analog video cables strung through the roof. [Mikeasaurus] simplifies that by using a Chromecast, which allows him to stream his phone’s screen over WiFi.

rooftop2
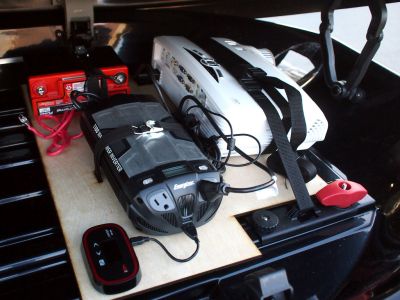
The projector itself is the HD25-LV, a 3500 Lumen model from Optima. the HD25-LV is capable of 1080p, though in this situation, brightness is much more important than resolution. [Mikeasaurus] mounted the projector along with a gel cell battery and 900 watt DC to AC  inverter to power it. A mobile WiFi hotspot fills out the rooftop kit. Leaving an expensive setup like that on top of a car is a recipe for disaster – be it from rain, rocks, or theft. [Mikeasaurus] thought ahead and strapped his setup down inside a roof mounted cargo box. A plastic covered hole in the front of the box allows the projector to shoot down on the road while protecting its lens. We’d want to add a vent and fan to ensure that projector gets a bit of airflow as well.

On the road, the system actually works. Understandably, it’s not going to work very well during the day, but at night the system really shines! Just don’t tailgate – you wouldn’t want the driver in front of you to know exactly where you’re going, would you?

Continue reading “Direction Projection Is A Beacon In The Night”

Printing Photorealistic Images On 3D Objects

Hydrographic Printing is a technique of transferring colored inks on a film to the surface of an object. The film is placed on water and activated with a chemical that allows it to adhere to an object being physically pushed onto it. Researchers at Zhejiang University and Columbia University have taken hydrographic printing to the next level (pdf link). In a technical paper to be presented at ACM SIGGRAPH 2015 in August, they explain how they developed a computational method to create complex patterns that are precisely aligned to the object.

Typically, repetitive patterns are used because the object stretches the adhesive film; anything complex would distort during this subjective process. It’s commonly used to decorate car parts, especially rims and grills. If you’ve ever seen a carbon-fiber pattern without the actual fiber, it’s probably been applied with hydrographic printing.

print_t
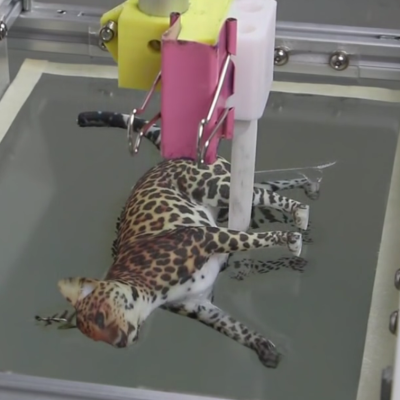
The physical setup for this hack is fairly simple: a vat of water, a linear motor attached to a gripper, and a Kinect. The object is attached to the gripper. The Kinect measures its location and orientation. This data is applied to a 3D-scan of the object along with the desired texture map to be printed onto it. A program creates a virtual simulation of the printing process, outputting a specific pattern onto the film that accounts for the warping inherent to the process. The pattern is then printed onto the film using an ordinary inkjet printer.

The tiger mask is our personal favorite, along with the leopard cat. They illustrate just how complex the surface patterns can get using single or multiple immersions, respectively. This system also accounts for objects of a variety of shapes and sizes, though the researchers admit there is a physical limit to how concave the parts of an object can be. Colors will fade or the film will split if stretched too thin. Texture mapping can now be physically realized in a simple yet effective way, with amazing results.

Continue reading “Printing Photorealistic Images On 3D Objects”

Racing The Beam With Super Hexagon

Early game consoles like the Atari 2600 had a very, very limited amount of RAM. There wasn’t even enough RAM for all the pixels on the screen; instead, pixels were generated by the CPU as they were being drawn. It’s playing with scanlines and colorbusts with code, something we’re now calling. ‘racing the beam’ for some reason.

[Sam] is in the middle of an EE degree right now, and for a digital design class he needed to write some Verilog. At the time he was addicted to the game Super Hexagon, and the game mechanics are simple enough for an FPGA. He built his own implementation, but not one with framebuffers. He’s using a pipelined approach where each pixel’s value is calculated just a few clock cycles before it’s displayed. It vastly reduces the memory requirements, on his Altera DE1 board compared to the framebuffer approach.

Video below.

Continue reading “Racing The Beam With Super Hexagon”