When most people think of 3D printing, they think of Fused Deposition Modelling (FDM) printers. These work by heating a material, squirting it out a nozzle that moves around, and letting it cool. By moving the nozzle around in the right patterns while extruding material out the end, you get a part. You’ve probably seen one of the many, many, many FDM printers out there.
Stereolithography printing (SLA) is a different technique which uses UV light to harden a liquid resin. The Chimera printer uses this technique, and aims to do it on the cheap by using recycled parts.
First up is the UV light source. DLP projectors kick out a good amount of UV, and accept standard video inputs. The Mitsubishi XD221u can be had for about $50 off eBay. Some modifications are needed to get the focus distance set correctly, but with that complete the X and Y axes are taken care of.
For the Z axis, the build platform needs to move. This was accomplished with a stepper motor salvaged from a disk drive. An Arduino drives the motor to ensure it moves at the right rate.
Creation Workshop was chosen as the software to control the Chimera. It generates the images for the projector, and controls the Z axis. The SLA process allows for high definition printing, and the results are rather impressive for such a cheap device. This is something we were just talking about yesterday; how to lower the cost of 3D printers. Obviously this is cheating a bit because it’s banking on the availability of cheap used parts. But look at it this way: it’s based on older technology produced at scale which should help a lot with the cost of sourcing this stuff new. What do you think?


While it’s great to see quick hacks like this, SLA parts are really not directly comparable to FDM parts.
And this does require having some rather expensive parts on hand.
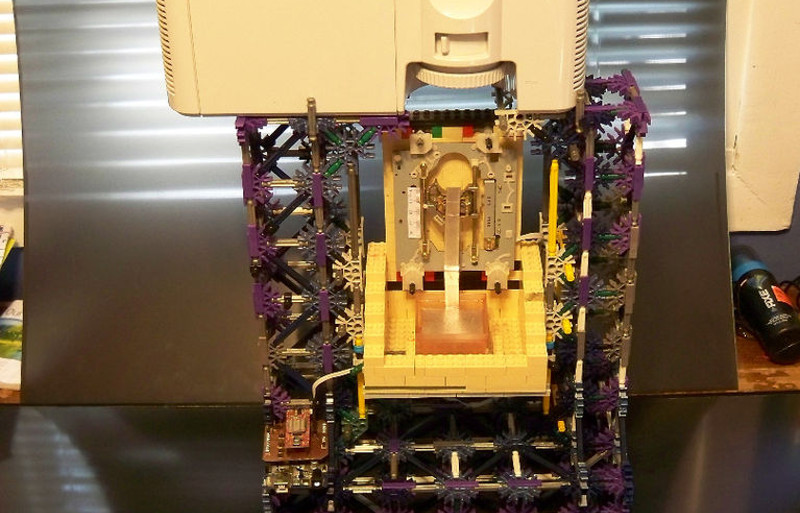
Yeah, like legos, and k’nex (in matching colors!) That kind of building toy inventory is not to be had for cheap.
@eray
They’re not matching. There’s at least three different colors of post. The only reason the joint sections match is because they’re color-coded–the same joint will always be the same color.
Not true if you shop thrift stores. I see huge bags of K’nex and Legos there going for $3-10 all the time (and usually pick up the Legos).
This is like saying “you can build a $500 car” if you have the chassis, gas tank, transmission,….. and you buy a $500 used engine.
http://en.wikipedia.org/wiki/24_Hours_of_LeMons
Not quite! The $60 price point includes the frame, controller, and everything else. More like a $600 car if you buy a $400 used engine and some scraps, and have a couple screws and a wrench.
The ebay parts at this time are all Buy it now prices which totals up to $55.5, the only other things you need a scrap computer drive free-$3.00 thrift store, a jar for the resin tank-free-$.50, scrap aluminum for the build platform- the first one I made was from a soda can, it worked but it was too flimsy for repetitive use – free. The platform can be anything from scrap circuit board, which I have seen done and want to try next, to old heatsinks which I tried and it worked. add in the misc wires-free, Plus the a frame design I am working on that can be made out of a single $10 24″x48″ sheet of MDF. So in total the machine can be built from nothing for less than $70.
PLUS THE TIME TO ASSEMBLE IT ALL. Also the projector bulb isn’t cheap. And what’s the total build volume of this again? Tiny.
If 3D printing is your hobby you’re not gonna file time spent doing that under ‘billable hours’. Even if you did, your hourly rate isn’t the same as everyones.
“Plus the time to assemble it all?” Really now, this is HAD. Assembling and building things is what we’re interested in. When you’re doing something at the enthusiast level you could just as well subtract the cost of the time spent assembling because you were having so much fun.
You nailed it perfectly, where is the like button. I don’t know why people are always ready to criticize a hack. When you are enjoying it doing it for yourself, you can’t bill it.
Remember folks that we also have to factor in the costs to pay wages to Waterjet for writing these angry comments on the stupidly time consuming projects on HAD. Waterjet ain’t commenting for free!
comparing this directly to a $400 assembled printerbot play is a bit silly. this is not a $60 printer. you need to pay shipping on parts from ebay. You cant say the price of the printer is the bom cost… It is like saying “how to get a $150 apple watch…. then posting the bom. It is not the same as when they posted the $100 peachy printer. it is just a wrong title.
Great job! It wouldn’t be the internet without keyboard commandos crapping on it.
Hey man…my $500 car still runs great with a broken odometer at 700k miles.
I’m fairly certain the K’nex alone cost around $60…
I am working on a frame design that can be made out of a single $10 24″x48″ sheet of MDF. The ebay parts at this time are all Buy it now prices which totals up to $55.5, the only other things you need a scrap computer drive free-$3.00 thrift store, a jar for the resin tank-free-$.50, scrap aluminum for the build platform- the first one I made was from a soda can, it worked but it was too flimsy for repetitive use – free. The platform can be anything from scrap circuit board, which I have seen done and want to try next, to old heatsinks which I tried and it worked. So in total the machine can be built from nothing for less than $70.
Shipping?
It’s an AMAZING build and all but this is sadly clickbait hyper inflated article Thats easily 100 dollars worth of k-nex, 50 dollar used projector, 100 dollars for SLA resin, Stepper motor nearly free.
Can this print nylon? hmm seems for 250 it is cheap but definitely not better. Maybe a more accurate title would be that it will produce finer detail?
The peachy printer will do this well I believe. For 100 dollars so yes we are seeing this happen.
The machine only cost $60, i only spent $39.99 total. I am working on a frame design that can be made out of a single $10 24″x48″ sheet of MDF. the resin is $35. if you have any of the parts already it can be made much cheaper plus the DIY aspect
> The peachy printer will do this well I believe. For 100 dollars so yes we are seeing this happen.
That was announced in September 2013, and there have been a lot – a *lot* – of problems in the development. The Peachy Printer is going to have a tough time getting consistent ‘steps’ on the z axis.
Like, I get that the idea is really cool, and the machine itself is really clever. I don’t see the Peachy as being used for anything productive – like prototyping, jewelry, or fine scale modelling, for example. At best, it’s a $100 toy that prints trinkets out of resin. I’m okay with that, and I’ll probably pick one up myself, but I’m not seeing the peachy as being this huge, game changing machine.
The Peachy will need far more consistent control of the water level before it can be used to make anything that requires precision dimensions.
I agree Brian I hardly think its useful for prototyping but for bottom dollar 3d printing it will suffice. However I really think the drop wise mechanism has more potential for greater z-control than any other system that I know of.
Definitely something that can be a huge commercial success based on their use of Lego and K’nex. Don’t all commercial 3D printers contain these materials?
Waste of time! Price is all off.. im not rich and now you cost me time ? lol
The price is not off, the specialty components are only $65.5 from ebay including the projector. the rest of the parts are free or can be had for less than $5. except the frame which can be made from a $10 sheet of MDF.
typo, $55.5
There are no such thing as free parts. Those parts costed money at some point.
The projector is most likely 2nd hand, and thus costed someone else money. The drive system was a scrap piece but those are limited in availability, and now can not be used for something else (so the cost was 1 drive, not “free”)
And there is no printing material included in that price. No shipping. And no time.
By that accounting, I can build a printer for $0. And we’re actually doing this right now with some people at the office. All we are using is “out of spec” parts at Ultimaker, they where regarded as trash, and free for us. Will require a time investment, but, time is free right. Will require tools and discarded materials from Ultimaker. But those are also free.
(Note, not saying that it’s not a very nice hack. But putting a price on it is a bit silly. I would say “3D printer build from mostly scrap and 2nd hand parts)
Title aside, this is a really impressive hack thats worthy of the category! Repurposing surplus tech, hacking the mismatched components together, and holding it all together with lego and knex :) perfect hack
Well, if you actually read through the instructables you’ll see that the support frame needed is just a horizontal base and a vertical board to hold the motor assembly and projector. You don’t need k’nex or legos, a few pieces of scrap wood should suffice.
Great job [mastermind], easy to build and truly low cost. Might not be a solution to everyone’s printing needs, but it can sure be a great introduction for the curious.
Thanks, that kind of what i was going for.
If it can be done this cheap with scrap parts there is no reason (assuming a cheap UV source was found) that you couldn’t do a similar kit or kickstarter or commercial product for somewhere in the neighborhood of $200-$250 which is a cheap for what it is.
This title reeks, like Reek.
While this is pretty much a toy, it does point the way towards making a more useful version; although given the cost of resin this is a Gillette solution to 3D printing :-)
Or inkjet printing to 3D printing. $20 printer $1000 in ink over its life of 2 years.
i already have a FDM 3D printer, which I’m very happy with, but i also have plenty of junk lying around to build a setup like in this article if it yields higher quality or faster prints.
I’m wondering how much the difference in build quality is compared to FDM printers.
In the article, he is using a 0.1mm layer height, just like my FDM printer.
And in the XY plane, the resolution of the projector at that distance is probably going to be worse than micro-stepping steppermotors to move an extruder around.
And what about the material ?
PLA costs around €20/kg, which is plenty cheap. Doing a quick google to find local(ish) suppliers for SLA Resin suggests the price is around €135 for 1000ml.
I don’t know the weight of material that can manufactured with this, so i can’t compare it to filament.
But unless unless this one-liter bottle weighs at least 6.75kg (~15lbs) it is going to be more expensive. And since that doesn’t seem likely I’m guessing it is going to be lot more expensive.
Then for speed, he speaks about 10 seconds of exposure time per layer.
The build surface he is using is 50x50mm, I can see my FDM printer pull that off in 10 seconds per layer, although it might be close for a complete fill. But the size of the projected image is probably larger than 50x50mm so it seems SLA is potentially faster.
You forget that you cannot have voids in the print as you can with FDM. So the prints will be more heavy for the same print size.
Resins are about 1 liter per kg.
Resins require special handling. (gloves and stuff, as they irritate the skin and will build up to an allergic reaction)
thx for the feedback. do i understand correctly that SLA prints are always solid ? So no variable infill ..
Can someone tell me if it is possible to print bridges/overhang on SLA printers ? Because that would also be a big plus compared to FDM.
If you search a bit harder, there’s resin that is on par with the price of pla (~$30/ kg or l)
I imagine i will find some cheaper if i search around more.
Thanks to the author for putting in all the research & experimenting, it would really be a piece of cake to build a setup like this. All I need to do is find a source for some cheap resin.
I think this is really cool and is clearly a “hack” worthy of the site. I personally think optics driven 3d printing is the future anyway so its cool to see a creative solution to the uv light source problem in the form of a dlp projector.
Good Work :)
I really like this build. Look like it can be done as a weekend project (ie quick and simple to build). The author certainly sold me on the submerge SLA print. I’ve been looking at bottom up (or top down?) design which pulls the part out of the resin slowly, but I’ve been worried at the cost of the vat and the special anti-sticking material at the bottom of the vat. The quality & detail of the print sure beats that of the regular ABS/PLA print (for small parts).
I still have hard time printing overhang or bridges on a FDM printer. Wonder if SLA would solve it.
SLA printers work very well with bridges and overhangs because when the overhang is cured it is “floating” on the surface of the resin below it. depending on your cure times, resin viscosity, and size of the overhangs you may suffer from shrinkage and warping, but its usually not a problem.
that really sounds great. Thanks very much Mastermind. Now I just need to get started. Hope my DLP projector works
:-) Thanks guys, this one cracked me up!
OP: Here’s a $60 SLA printer I built.
Grumpy Internet Guy: There’s no way that cost $60.
OP: No really, here’s what I spent.
GIG: But you didn’t consider all these costs.
OP: Umm, I really did, and I explained them in the article.
GIG: That pink part is expensive, it costs $50 on it’s own
OP: True, but you could just use a piece of wood, I just used the pink part because I had it.
GIG. AHA! so you admit the pink part is expensive and you, this post and your belief system are a complete fraud!
OP: You can just use a piece of wood.
GIG: By refusing to argue with me you confirm that the $60 SLA printer is a fraud and your cat is, in fact, a dressed up rat! Now, to my next conquest…..
OP: ……I have a printer…..It works and cost $60…….anyone?
+1
My thoughts entirely! Well done OP – I think it’s a great hack. Don’t all hacks repurpose scrap parts? Otherwise, they’re not really hacks, just engineered projects(!)
Look at the comments on the original instructable – excited readers, delighted by the build. Compare to the hackaday comments – angry know-it-alls trying to show off in front of what they think are their peers.
I think this is a great project and am looking forward to having time to build one and try it out. This website is called hack-a-day not turn-your-project-into-a-commercial-project-and-you’re-an-idiot-for-not-costing-in-your-time.com
The $60 ClickBait in title turned the learned HaD readers against this post – insulting. Did the Instructables post you reference with the glowing comments have a title touting a (false) $60 cost too? I would look for myself instead of asking, IF only you would have been nice enough to provide a link.
@Drone
Why don’t you click the link to the instructibles your-fucking-self?
His time isn’t free, duh.
???? Really?
This is a cool hack and people are nickle and dimeing it to death.
Instructables has paid astroturfers. Please don’t give hackaday any ideas. They are already getting worse about the clickbait headlines and trying to expand to the reddit crowd.
The project is nice, but the majority is still better off ordering from shapeways or the like.
It must be the alignment of the planets, or school being out, but the Internet has been especially volatile the last couple of days.
OP, keep it up. HaD is primarily about learning from and celebrating others’ accomplishments, and anyone who gets in the way of that is wasting bits.
Never done nothing – knows nothing noob here.
Read this article – made happy. Read comments – made sad.
From the title, article, etc – it sounds like what it says on the tin:
If you’re thrifty and clever, you can piece together a 3D printer for $60.
That’s what it advertised, and that was what I read.
Am I that thrifty or clever? Hell no.
So thanks HaD for pointing out some tricks to consider and setting a lower cost to entry.
All the naysayers need post their own <=$59 3D printer designs, or just shut the hell up and move on to trolling some other place.
This site should consider moderation options for comments… including mine.
Some of these commenters give geeks, nerds, engineers, and makers a bad name.
Other than the pinhead commentary from the cant-do-better-so-criticize-crowd, great article and great site.
Articles like this are why I visit Hackaday. I found his project to be resourceful, creative and inspiring. I also think it’s great that he took the time to write up a nice tutorial so other people could replicate his work.
If people don’t like what he did then by all means do better for less and document it so everyone else can critique it.
Another build: http://3dprint.com/51459/diy-sla-3d-printer/
It doesn’t have the nice write up with detail instructions as that of the OP
How is the layer height maintained in this DLP top down design?
I understand that the build plate is moved down submerge into the resin a little matching the layer height, but when the layer is cure, does it expand or contract and cause the level of the resin in the tank lower or higher?
Thanks