Hackaday Prize Entry: Teaching OpAmps

TI makes some great chips, and to sell those chips, they’re more than willing to put together some awesome tutorials, examples, and online classes to get engineers up and running. This isn’t limited to $5 Launchpads; TI has a great video and lab series for their precision OpAmps. These tutorials come with an evaluation module that costs about $200. Yes, that’s two Benjamins for a few OpAmps and a PCB. Of course no engineer would ever pay this; their job would. But what about someone who wants to learn at home?

That’s where [SUF]’s project for The Hackaday Prize comes in. He’s building a replica of a $200 lab board, and even without researching the cheapest solution for each individual component, [SUF] reckons he can build this kit for about $50. Like I said, the TI board is a business purchase.

The complete lab and tutorial TI offers uses NI’s virtual lab. This, again, isn’t something a random electron hacker could afford, but anyone who wants to go through this teaching module would probably use their own tools anyway.

As far as projects to teach electronics go, [SUF] has knocked it out of the park. He’s already relying on excellent tutorials, but bringing the price down to something a little more sane and amenable to checkbooks that aren’t tied to the corporate account.


The 2015 Hackaday Prize is sponsored by:

IOT Lawnmower

World’s First Internet Connected Lawnmower

Okay so this IOT is getting a bit out of hand. Introducing the world’s first(?) tweeting, internet connected, lawnmower.

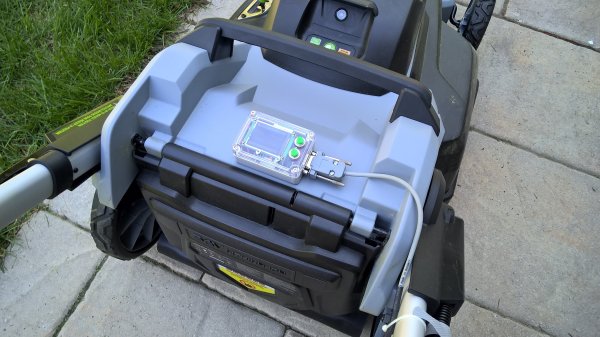
[Michel] recently bought one of those new-fangled cordless lawn mowers by EGO. It runs off a 56V lithium ion battery pack, and apparently, works pretty well. Since it has plenty of on-board power, he decided to strap a 64MHz PIC18F25K22 to a ESP8266 and connect it to the internet. That part number has been taking the world by storm and it’s totally freaking awesome. The ESP8266 is a tiny WiFi module that is controllable over a serial port — and it only costs $5. Hello IOT-everything.

Anyway, to avoid voiding his warranty, [Michel] using non-invasive sensors to collect data — A series of hall effect sensors and magnets to be exact. One detects when the cutting system is engaged, and another magnet and sensor pair counts wheel revolutions. In the end, this gives you data on how far you pushed the mower, how long you spent cutting, and how long you were out there. When the job is done, you have the option to push a tweet with your stats. Woo!

He does admit, the tweeting feature is more there just to annoy his friends.

Astoundingly Great $60 3D Printer Called Chimera Bests Your Printer

When most people think of 3D printing, they think of Fused Deposition Modelling (FDM) printers. These work by heating a material, squirting it out a nozzle that moves around, and letting it cool. By moving the nozzle around in the right patterns while extruding material out the end, you get a part. You’ve probably seen one of the many, many, many FDM printers out there.

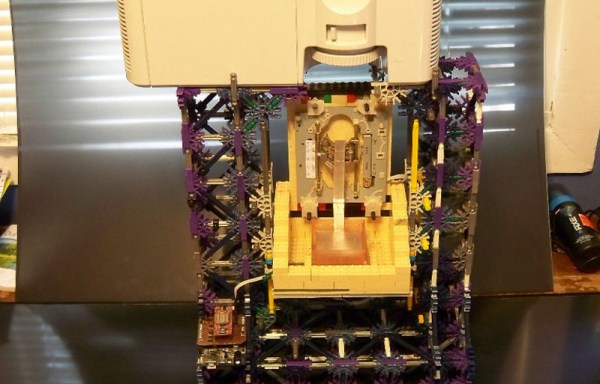
Stereolithography printing (SLA) is a different technique which uses UV light to harden a liquid resin. The Chimera printer uses this technique, and aims to do it on the cheap by using recycled parts.

First up is the UV light source. DLP projectors kick out a good amount of UV, and accept standard video inputs. The Mitsubishi XD221u can be had for about $50 off eBay. Some modifications are needed to get the focus distance set correctly, but with that complete the X and Y axes are taken care of.

For the Z axis, the build platform needs to move. This was accomplished with a stepper motor salvaged from a disk drive. An Arduino drives the motor to ensure it moves at the right rate.

Creation Workshop was chosen as the software to control the Chimera. It generates the images for the projector, and controls the Z axis. The SLA process allows for high definition printing, and the results are rather impressive for such a cheap device. This is something we were just talking about yesterday; how to lower the cost of 3D printers. Obviously this is cheating a bit because it’s banking on the availability of cheap used parts. But look at it this way: it’s based on older technology produced at scale which should help a lot with the cost of sourcing this stuff new. What do you think?

DNA Lamp

DNA Lamp Adds Some Science To Your Room

Lava lamps had their time, but that time is over. Perhaps a spinning, glowing, DNA helix style lamp will take their place?

Inspired by the ever mesmerizing DNA helix, a member of the eLab hackerspace decided to try making it into a lamp. It’s almost entirely 3D printed, with the helix made out of glow in the dark filament.  A series of UV LEDs fade in and out as a small geared motor from a microwave turntable spin the helix round and around.

[João Duarte] designed the assembly using TinkerCAD and has shared all the files on the Instructable in case you want to make one yourself. It is a lot of printing though, so you might want to recruit your own hackerspace’s 3D printer to do some of the work. He ended up using his own Prusa i3 as well as the LulzBot TAZ4 from the space to speed things up.

Continue reading “DNA Lamp Adds Some Science To Your Room”

Quadrotor Control Systems And Kerbal Harriers

Kerbal Space Program, the game that teaches engineers at JPL and SpaceX the basics of rocket design and orbital mechanics, recently had a giant update. There are now science contracts that require you to fly Kerbals all over their tiny globe, collect data, and transmit it back to the Kerbal Space Center. As would be expected, this is a grind for XP, and the contracts sometimes don’t make sense – you need to collect data from cliff faces and mountain tops. Landing a Kerbal jet at these places is hard.

[Matt Thiffault] wanted to do these science contracts more efficiently. The best way to get to a remote location without a landing strip would be a helicopter, but a harrier jump jet would do just as well. This isn’t supported in the stock game, so [Matt] wrote a complete control system for four engines to control a hovering Kerbal jet.

[Matt]’s work is built on kOS, a scriptable autopilot mod for Kerbal that was originally intended to be something like the Apollo Guidance Computer. People have been using it to make computerized skycranes and automated rendezvous and docking programs, but these are actually relatively simple examples; there’s far more math involved in flying a quadcopter than there is getting into orbit.

To build his automated hovering harrier, [Matt] needed an aircraft. His Kerrier has parts from the Kerbal Aircraft Expansion, B9, and Infernal Robotics mods for KSP, but this is only half the problem. Anyone can put four tilt jets on an airplane, and it takes a real wizard to force a control system to hover. Hover control of the Kerbal harrier is accomplished with a complete control system for a four-engined aircraft, with proper PID control loops and code updating at 20Hz.

With kOS, the proper plane, and the right software running on this emulated guidance computer, [Matt] is able to park his plane in mid-air, have a Kerbal descend the ladder, perform some science, and return to base. It’s an impressive amount of work for a video game. A good thing, too: [Matt] is looking to get into controls engineering professionally. Whether this will go on his resume is another question entirely.

PiClock

PiClock – Time And Weather Information Overload

[Kevin] wanted a display where he could take a quick glance and get all the current environmental information he uses throughout the day. That information includes, of course, the time and date as well as weather information. We’re not just talking the current weather information but the forecast for the upcoming week as well as a map showing current weather patterns. To do this, [Kevin] came up with a unique system he’s calling the PiClock.

[Kevin] did some serious programming to get this clock project off of the ground. The weather data comes via the Weather Underground API and the map data from the Google Maps API. The main program is written in Python and will run on any OS running Python 2.7+ and PyQt4. If you’re interested in doing something similar, check out the source at github.

From the project’s name, it is no surprise that a Raspberry Pi is the brains here. A USB WiFi adapter allows access to the internet but an Ethernet connection would do just fine. Having the RaspPi hanging out with wires everywhere would be a little lazy, so [Kevin] opened up his 19″ LCD monitor and mounted the RaspPi inside the case. He tapped 5vdc off of the monitors power supply and used that to power the RaspPi, no external wall wart necessary! And if the PiClock’s background isn’t cool enough, some RGB LED strips were mounted to the back of the monitor to give an Ambilight effect.

Part Finder, Vacuum Attachment

Super Cheap Vac Attachment Helps Find Small Dropped Parts

It’s pretty much guaranteed that when working with small parts, you will drop at least one. This phenomenon is just how the universe works, there is no avoiding it. Digging though a carpet or dirty shop floor usually results in frustration and subsequent scrambling for a replacement part. Tired of crawling around on his knees looking for runaway parts, [Frank] decided to do something about it. He made a vacuum attachment that helps with the search… and it’s made from stuff he had kicking around the house.

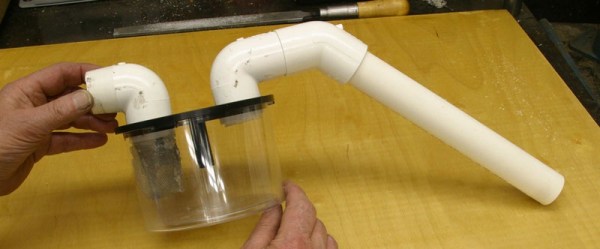
The idea here is to suck up and contain the part without having it making it’s way into the vacuum. To do this there would have to be an intermediate chamber. For this, [Frank] used a multi-pack CD container. This was a great choice because it is clear, allowing him to see what enters the container, and it unscrews quickly making it easy to retrieve the tiny part. The inlet and outlet connectors are made from PVC and are attached to the CD container’s base with adhesive. To keep the debris from getting past the CD container, an old kitchen strainer was cut up and the screen material was used to only let air pass. Once a shop-vac is connected to the outlet pipe, the sucking can begin. [Frank] shows that he has to sift through a bunch of shop-floor crud to find his dropped screw, but it works!