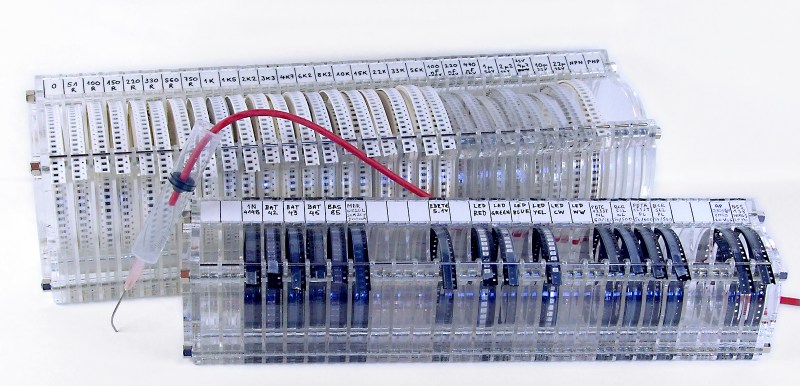
Have some plexiglas (acrylic) leftovers lying around? Well, they could be put to good use in making this SMD organizer. It comes in handy if you deal with a lot of SMD components in your work. No longer will you waste your time trying to find a 15K 1206 resistor, or that BAS85 diode… or any other component you can think of soldering on the PCB. The basic idea is fairly straightforword, which helped keep this short.
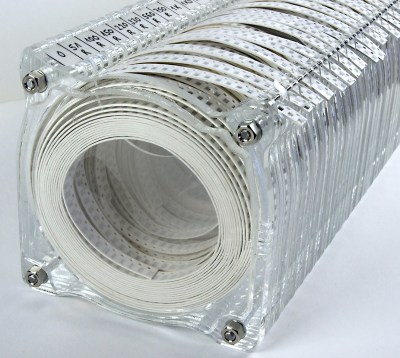 SMD resistors are packed in thick paper tapes that don’t bend easily, and thus need larger containers than other components, which are packed mainly in flexible PE tapes. The first version of this organizer was built with a 96mm diameter space for resistors and 63mm diameter for other components, but it seems that there is no need for such large compartments. If I were to make it again, I would probably scale everything down to about 80% of it’s current size.
The best way to join all plexiglass parts is to use four M4 threaded rods. There is also a 1.5mm steel rod which holds SMD tape ends in place and helps to un-stick the transparent tape which covers the components. At the top of the organizer there is a notch for paper, used for components labels. Most SMD components are packed in 8mm wide tapes, making the optimal compartment width 10mm. It is not easy to cut the 10mm thick acrylic and get a neat edge – instead, you could use more layers of thin sheets to make the spacers. Using 5mm acrylic you can combine more layers for any width of tape, which contains wider components, like SMD integrated circuits. The only thing that you have to be careful about, is to keep the distance between the thin steel rod and acrylic, which is marked as “2-4mm” on the drawing. It is good if this space is just a few tenths of a millimeter wider than the thickness of SMD tapes.
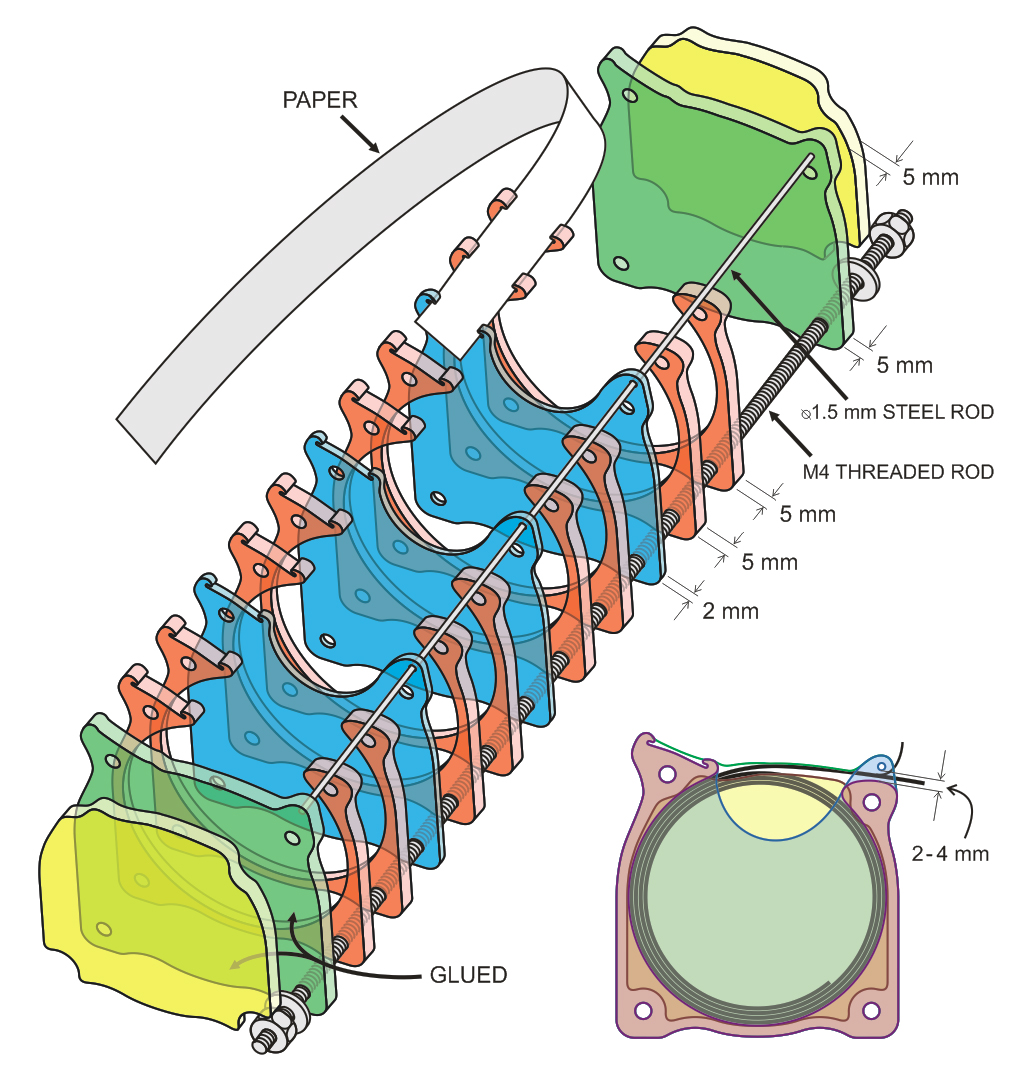 The CorelDraw file that can be used for laser cutting the acrylic parts, is available for download. If you scale the profiles, don’t forget to readjust the hole diameters and some other dimensions which have to remain intact. If you have 5mm acrylic pieces, you should probably use two layers of acrylic for every tape (red parts on the drawing). The barrier layers would be made of thin acrylic — for instance 2mm (the blue parts). Edge layers (green) are once again 5mm thick, and there are also the end pieces (yellow), glued to the previous borders and used to “round up” the whole construction and to protect your hands from the threaded rods and nuts.
While you’re building this for your bench, make a vacuum picking tool for SMDs out of a dispensing syringe with a thick needle. It’s a common trick for hackers to use an aquarium air pump, just turn the compressor unit by 180°, so that it creates vacuum instead of blowing the air outside. This process is described by R&TPreppers in the video below.


Love it! But I still like the SMD “sample books” better. Much more compact. Although with this technique you can hold far more of a particular part.
Very professional looking for sure.
That’s sweet
What about a solution for hookup wire too, I hate all the little loose spools hanging off a single rod.
http://www.amazon.com/22AWG-Black-Green-White-Yellow/dp/B00E4WTX0I/ref=sr_1_143?ie=UTF8&qid=1455224003&sr=8-143&keywords=Solid+Hook-Up+22awg
Yeah we have something similar
https://www.google.com/search?q=best+hookup+wire+holder&espv=2&biw=1680&bih=989&site=webhp&source=lnms&tbm=isch&sa=X&ved=0ahUKEwjtgsGv2fDKAhUGUZQKHeFbCuQQ_AUIBygC#imgrc=d_c1lPSHj3E4lM%3A
It’s ok, but only fits certain spools, isn’t really modular/extendible.
that was idiotic, I sent you a link to the google search. This is the holder: http://www.rapidonline.com/cables-connectors/alpha-wire-hook-up-wire-kit-71071
Great vacuum pick for simple parts! When you do trickier ULGA/BGA pieces with solderpaste even lifting the finger off the hole moves the syringe enough to screw up placement. For that one I suggest that you put the hole on the tube and open/close with the other hand. If you want to go fancy use a solenoid valve and a footpedal
I did this some time with a DC pump, probably from car central door lock. At 12V it would not have sustained continuous operation, but at 6V it had still enough suction.
For this tricky components I adjusted the voltage more downwards, so the suction was enough to hold the component, but it was weaker than the stickiness of the solder cream. So I did NOT have to open the hole to place a component. That was very nice.
Add some QR codes for component datasheets ?
I prefer these flip boxes: http://www.licefa.de/de/produktseiten/smd-leitfaehig/
They comes in a variety of colors and sizes (black ones are ESD safe), and they have a tongue/groove system to attach them together. I assemble them into trays of 12×5 units (one tray is enough to keep all E12 resistors from 10R to 1M). The smallest 1×1 boxes hold between 1000 and 2500 of 0603 components. They are easy to open one handed, and components can be taken out with tweezers.
http://aidetek.com/mm5/merchant.mvc?Screen=PROD&Store_Code=A&Product_Code=BOX-ALL&Category_Code=Encl I have three of those… they are awesome!
Thanks for that link. I think that’s a future purchase for me now too. I like the article’s concept, and it looks far cooler than anything else I’ve used/seen but I think it would be inconvenient to replenish. Today mine are in cases identical to what I keep my PTH resistors and caps in, and they’re taking up twice the real estate for the same series.
Im not a fan of these. Always a pain trying to fish out a single 0402 resistor with a pair of tweezers
Just take out a couple, drop them on your desk, pick one, and wipe off the rest. They’re only $5 per reel of 10000 anyway.
$60/10000 reel
$12/10000 for many 1% resistors at Digi-Key in single reel quantity, or only 0.12 cents a piece. And if you’re using so many that it matters, you’d put the boards in a panel, and use several at a time, reducing the waste.
Thats the reason you need a vacuum tool. But I avoid 0402 for manual work, 0603 is tiny enough.
This looks exactly like the solution I’ve been looking for. I’m tempted to get one cut using various colours of acrylic to represent different components.
This definately needs more LEDs! Maybe in combination with a piece of software that highlights the next part you need?
http://hackaday.com/2012/03/18/storagebot-finds-all-your-components-makes-your-storage-drawers-feel-inadequate/
Voja,
I love your solutions.
Is there any chance you could post what your workshop looks like? I imagine this wonderfully neat and efficient space. Everything neat and organized.
Thanks, RandyKC
Well, it’s just an ordinary workspace. You can see it at http://www.voja.rs/PROJECTS/my_workspace.htm
(yes, that’s the Hackaday Belgrade Conference badge PCB project on the screen :)
There’s also a part of my table on the second photo. A lot of stuff (cables, power supplies, routers) is hidden under the cover. That’s the only well organized detail.
Awesome. Just what I was looking for. I ordered a spool of EVERY 1% resistor below 100k, I was so sick of paying $60 of overnight shipping for 10 cents worth of resistors. thanks
Problem is, that when you do’t use them up within some time, the top-foil tends to fall off and you get a mess of components on the bottom of the box…
Neat idea. I like the idea of building 3D structures using 2D parts especially acrylic.
Looks similar to pick-and-place feeders.
Any ESD problems with the paper rubbing onto the acrylic?
That’s what I’m wondering as well.
I didn’t notice any extra ESD discharge. There are no rapidly moving parts, so it acts like any plastic box.
certainly makes it easier for a pick and place arm to get the parts.
This would actually not be too hard to 3d print, the dividing walls would be on the bottom of the print bed and the height would be the wall plus the width of the tape(and a gap space) then you have one separate flat piece without a rim around it that goes on the open end, voila it’s modular. Also you could maybe even add edges so you can unstack them and the tape doesn’t pop out in single slices.
If I were redesigning this I’d avoid U-shaped pieces to maximize use of raw materials. Cutting the lower part would allow us to hinge the back to make changing tapes easier.
You can achieve a good optimization with this shape, if you place pieces so that every U-hole contains two sides of it’s neighbors turned by 180°.
Yeah, as Voja says, you can pack them fairly tightly in your cutting software. I made a 7-section box for resistors out of 22″ widescreen LCD acrylic piece (3mm thick, so 3 pieces for each compartment), making spacers from 1mm acrylic from a laptop LCD.
I have been thinking about this for a past month. And i don’t know how, it just appeared on my screen. Ha ha. The one thing that’s missing IMHO, if you are planning to do some small short run hand PCBa, than it would be nice to have the tape go out in the level of the table or some kind of a “plate” which is fixed and hard. So you peel the 15x10k 0603 resistors, it fails on that “plate”, picke them up with a tweezers or what ever else, place them on 5 boards, and continue with another part.
You don’t need to chase 15 resistors around the table. They would be right “down” on the place where it’s stable and easy to pick and place them.
OMG i have been thinking about the same thing for a month now. And somehow it just appeared on my screen :D
Great construction, almost exactly what i was looking for. The only thing that is missing IMHO is the way to safely get certain amount of some component type. Like, if i’m assembling 5 boards and i have 3×0603 10K resistors on each, i need a safe way when i peel the tape to get all 15 resistors, so that they don’t go all around the table. Perhaps, if the design is little bit rotated forward so that the tape is going down close to the table, that can be achieved.
Thnx anyway for sharing.