The 8mm film look is making a comeback, but distributing it is an issue. [Heikki Hietala] wanted an easy way to digitally capture the 8mm movies he made. So, he built an 8mm digitizer from an Arduino, a cheap Canon camera and the guts of an old 8mm film camera. When you throw in a few 3D printed components and some odd electronics, you get an impressive build that captures 8mm film with impressive speed and quality.
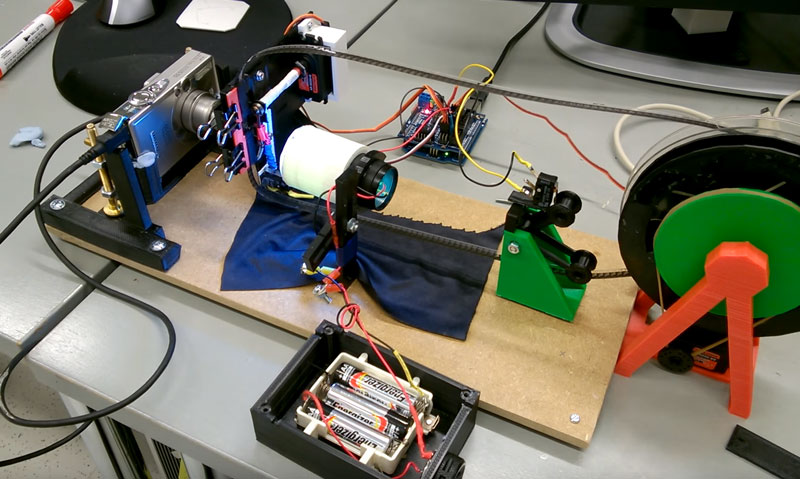
This build started with a Canon Ixus 5 camera running CHDK (the Canon Hack Development Kit) to lock the settings down. This points at the film strip through a macro lens so each frame of the strip fills the frame. An Arduino then triggers the camera to take a photo using a USB cable. The same Arduino also controls a motor that winds the film and triggers the film gate from the camera that he salvaged. By reversing the function and triggering it with a servo motor, he can easily blank off the edges of the frame so no stray light shining through the film material causes any problems. Once the camera has captured every frame on the strip, he feeds the captured images into Blender, which processes them and spits out the final movie.
This is a very impressive build overall. [Heikki] has obviously put a lot of thought into it, and the whole thing looks like it runs very efficiently and quickly. The captured video looks great, as you can see from this sample. The decision to use a salvaged film gate was a smart one: there is no point in reinventing the wheel if engineers of previous generations have solved the problem. Kudos to [Heikki] for also documenting the process in a lot of detail: he has produced a 5-part series on his blog that shows how and why he made the decisions he did. This series goes over the overall view of the project, using CHDK to control the camera, 3D printing parts, wiring the Arduino and writing the code that controls the system.
This sits nicely alongside the 8mm to video camera hack that we wrote about recently. This one doesn’t involve taking apart the camera (except for the sacrificial one that supplied the gate), and you still get that wonderfully grainy, jumpy look of 8mm film.


Hey, thank you so much for posting my project, Richard!
This is great work Heikki! One thing I was wondering about is your choice of Blender to put these images back together into digital video. Is there a reason you chose Blender for this, or was it the tool you’re most familiar with? I wondered if the framing needed adjustment and Blender was good at that.
I might have gone with ImageMagick for brightness/contrast and ffmpeg for creating the video. But that is only because I’m already familiar with using those.
Again, great work on this scanner!
Blender has a VSE that allows you to adjust frame size, hue, contrast, and many other features as you go, using adjustment strips. I used it because I teach Blender at the Haaga-Helia University of Applied Science, where I work.
My blog has articles on video editing with Blender too.
Heikki — I haven’t used Blender, but you might want to check out avisynth. it is also open source, although its development has been stagnant for a while. There are a lot of filters which are specific to film processing and can take advantage of temporal redundancies to improve the image quality.
A few years ago I had my family films digitized, but I asked them to just give me raw frame data and did the post processing myself. When I was done I wrote it up:
http://thebattles.net/video/8mm_restoration.html
If you want to get to the conclusion quickly, here is part of a regular 8mm film from 1968 with split screen before/after processing.
https://www.youtube.com/watch?v=sNQy36hcTNU
My restoration techniques were based on those developed by a great guy, videoFred. He has some impressive results to show for his own home-made telecine equipment:
http://www.super-8.be/index.htm (Dutch)
http://www.super-8.be/s8_Eindex.htm (English)
It’s interesting to see how much of the “look” of old home movies is from the “unsteadycam” jitters, coming from both hand shake and the vibration of the camera itself.
Jeff NME, part of it is I doubled the frame rate too, from 15 fps up to 30 fps. avisynth very sophisticated (but not perfect) way to tween frames — it isn’t just doing a 50/50 blend of the two adjacent frames. That is part of what makes the restored bit less like film and more like video.
Nice work on the restoration, absolutely! I did look into avisynth, when I was beginning this project, but I came to the conclusion I would stick with Blender, because it can also do colors, hues, contrasts, cropping, overlays and image stabilization. I was also well versed with it beforehand.
Before Blender I worked with Pinnacle Studio, but its fully random crashes nearly drove me mad.
First, let me say that this is really hack, and I mean that in the best possible way. Heikki did an awesome job. I think it’s a great example of doing enough to get the job done without getting distracted by details that really don’t add a lot (except, perhaps, some polish). Heikki may be an English major, but he’s a hacker at heart.
I had the same question you did and knew zero about Blender. Did a little looking around and found the video below. In it, a guy walks through stabilizing and otherwise adjusting (color, contrast, brightness, etc.) the captured image and then saving the final product. I was blown away by what can be done in Blender — I had no idea. I can easily see now how it is a huge improvement over ImageMagick in this use case. Definitely worth a look for anyone that’s interested.
https://www.youtube.com/watch?v=Y5o09uRTzdU
It is processing images collected by Kinograph (http://kinograph.cc). Kinograph is impressive. But it’s also at the other end of the spectrum in terms of complexity. I get their goal — design a telecine that anyone can build from scratch cheaply ($3,000+). To meet the goal, they do everything from scratch (e.g., they can’t rely on recycled film gates because it would be impossible for everyone to get the same one). Heikki was able to avoid a lot of that by doing things like re-using an old film gate — brilliantly effective given his goal.
Thanks very much once more! I am all flabbergasted with the reception here.
I think Blender packs an awful lot of punch, when you look into it – open source, but with 3D, materials, physics, inverse kinematics, very good quality rendering with Cycles and a game engine on top of everything. It’s definitely worth a look.
And yes, the film gate is from a 1961 Bolex that came from eBay for 15 euros, complete with a half-shot roll of film. As I use my late father’s 1962 Bolex every summer, I got a nice stack of spare parts on the side.
Great project! A while back, I used CHDK to do some simple timelapse shots. The problem I had – and maybe this was specific to the particular camera (a PowerShot SD1000, if I recall) was that every time it autofocused, the zoom would change very slightly, causing the combined video to wobble in and out. Curious if you encountered any similar problems.
Hi John, thanks very much for your comment! The script that is written for my application by the CHDK people actually locks the focus at the start of the script, and the zoom can be locked too (it wasn’t necessary for my needs). CHDK is amazingly versatile.
Cool project but needs more Pi. ;-)
For those that are interested, many professional film scanners actually use a linear imaging scanner, effectively just one line of CCD/CMOS pixels, and a laser runs across the film to capture the picture line by line as the film passes.
e.g. https://hackaday.io/project/9829-linear-ccd-module
Funny you should mention line cameras, as I started my career in IT writing case reports for a Finnish company that sold line 4,800 pixel line cameras and adapted them to a million projects. That was in 1986, but now it is really interesting to see your link and how these once rare cameras are coming into use in hacker projects, so thanks very much for mentioning them.
“that wonderfully grainy, jumpy look of 8mm film.”
That’s got to be the most disgusting thing I’ve ever heard about film.
Back in my day we played with sticks and a rock. We had to share the rock.
Heikki
I like the project, and I applaud your success with it! And I know what you’re going through, because I struggled through a lot of similar things.
A decade ago I decided to digitize my father-in-law’s thousands of 35mm slides as a Christmas gift, and put them on DVDs for him, and to share with family. (It was a much-appreciated gift, by the way!) I tried many different ways to capture the images. I first tried a slide projector on a large screen, but that resulted in dim, keystoned, and off-color images. I then tried using a desktop projection unit built for slide photography. In both cases the projector’s illumination was uneven resulting in dark corners, which I recognized in your sample film. The projector’s tungsten bulb also imparted an ugly orange tint to the images. Back then, I found no good way to solve those problems, so I ended up purchasing an actual USB film scanner.
As your setup is so much nicer than mine ever was, I’m wondering if you have the ability to solve that which I could not solve? Perhaps you can move the backlight screen closer to the film so the corner dropoffs are not as visible? You may also want to measure the color spectrum of your LED flashlight; if it’s not properly distributed, you will get uneven colors.
Anyway, great job!
Thank you for your kind words. I went for the quick and dirty approach with the backlight, by purchasing a 7 LED flashlight (six in a ring and one in the center) and dissecting it. In Finland we have Clas Ohlson, kind of like Radio Shack, and it set me back 3.95€.
The table tennis ball in front of it is acting as a diffuser, but as you mentioned, I should put in a little more effort and get it more even. My original diffuser was a piece of white paper at the end of the tube, but the ball works a little better.
This is still a WIP, and I hope to even out the final wrinkles soon with a movable backlight stand; the current one is bolted to the bottom board, but I plan to print parts so I can move it in the X, Y and Z.
Cheers!
Oh hey one more thing – this test video I posted for the final scan actually has the shadow of the film gate arm moving in the top left corner. It has since been eliminated by moving the lamp.
It cost $80 just this week for my buddy to have 6 reels of 8mm shot in the late Fifties digitized and burned to a CD. He tells me there’s another 25 odd reels left. I’m forwarding this page to him.
My dad left us 40 rolls, varying from 4 to 20 minutes, and totaling 6h40 minutes of film. I had these done professionally and got the lot into AVI for 660€, around 700 USD. My machine is very slow, so I wouldn’t use it on a mass conversion, but as I shoot one roll a year, this will meet my needs.
Nice work, great job. I’ve considered doing the same with a Raspberry Pi camera and stepper motors
Thanks! I tried to think of steppers, but as the film frame is 4.5mm x 3.3 mm, I didn’t think it’d work. The film gate ripped from a junked camera did the trick and I could just use full rotation servos. Easier to time it too.
Meanwhile, Kodak aims to revive 8mm film. http://www.gizmag.com/kodak-super-8-movie-camera/41237/ I predict this will fail as hard as the Polaroid Polavision did over 30 years ago. Kodak’s film packs aren’t even self-developing.
I get my stock from Wittner Kinetech in Germany – 4 minutes of 2x8mm for 96€ development included. I am very much interested in Kodak’s re-entry, so let’s see what happens.