Improved Graphics-to-Drawing Tablet Conversion

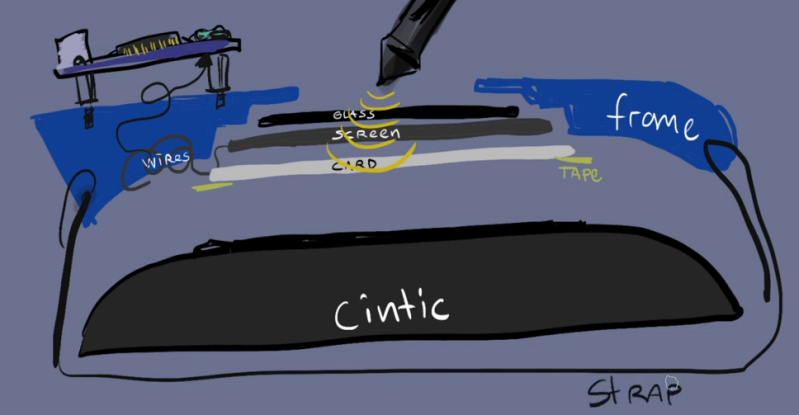
[Akaki Kuumeri] had an old Wacom Intuos digitizing graphics tablet collecting dust, and figured out how to non-destructively transform it into a drawing tablet. He was inspired by an old Hackaday post of a similar hack, but it required literally hacking a big hole into your Wacom tablet. Not wanting to permanently ruin the Wacom tablet,  [Akaki] instead designed a 3D printed frame which he holds in place with a pair of straps. The design files are available on Thingiverse. He names the project, incorrectly as he later points out, WacomOLED (it rhymes with guacamole, we think).

As for the screen, he buys an old third-generation iPad and removes its Retina display panel and the foil backing, which would otherwise block the stylus’s connection to the tablet. Toss in an HDMI driver board to connect the display to your computer, and presto — you have made your own a drawing tablet. Even if you don’t need a drawing tablet, [Akaki]’s hack is still interesting, if only to remind us that we can put custom HDMI displays into any project for $65 using this technique.

In the end, [Akaki] notes that unless you already have a non-graphical digitizing tablet laying around, it’s probably cheaper to just buy a iPad. This is not [Akaki]’s first go at user input devices — we wrote about his Smash Brothers game controller and flight controller yoke project last year.

Do any of you use a graphics tablet in your day to day workflow? Let us know in the comments below.

Continue reading “Improved Graphics-to-Drawing Tablet Conversion”

Film Negative Viewer Has Many Positives

Not so long ago, taking pictures was a much more sacred thing. Film and processing were expensive compared to the digital way, and since you couldn’t just delete a picture off the camera and get your film back, people tended to be much more selective about the pictures they took. Even so, for every roll of film, there was usually at least one stinker. If you’ve made it your quest to digitize the past, you’ll quickly realize that they’re not all gems, and that some can be left to languish.

[Random_Canadian] recently found himself knee-deep in negatives, but wanted an easy way to weed out the mediocre memories. With this film negative viewer and converter, he can step through the pictures one by one on a big screen and decide which ones to keep.

The Pi uses the negative image effect to turn the negatives positive, and then outputs them to the TV. If [Random_Canadian] finds one worth bringing into the 21st century, he pushes the green button to take a picture with the Pi camera and save it to that awesome cryptex USB drive. When he’s tired of walking down memory lane, he pushes the red button to exit the program.

We especially like that [Random_Canadian] made his own light panel by edge-lighting a piece of 6 mm Lexan. Fresh out of flat-topped LEDs, he made his own by grinding down some regular ones on a belt sander.

Got some old 8mm film you want to digitize? Check out this beautiful automated film scanner.

High-Quality Film Transfers With This Raspberry Pi Frame Grabber

Untold miles of film were shot by amateur filmmakers in the days before YouTube, iPhones, and even the lowly VHS camcorder. A lot of that footage remains to be discovered in attics and on the top shelves of closets, and when you find that trove of precious family memories, you’ll be glad to have this Raspberry Pi enabled frame-by-frame film digitizer at your disposal.

With a spare Super 8mm projector and a Raspberry Pi sitting around, [Joe Herman] figured he had the makings of a good way to preserve his grandfather’s old films. The secret of high-quality film transfers is a frame-by-frame capture, so [Joe] set about a thorough gutting of the projector. The original motor was scrapped in favor of one with better speed control, a magnet and reed switch were added to the driveshaft to synchronize exposures with each frame, and the optics were reversed with the Pi’s camera mounted internally and the LED light source on the outside. To deal with the high dynamic range of the source material, [Joe] wrote Python scripts to capture each frame at multiple exposures and combine the images with OpenCV. Everything is stitched together later with FFmpeg, and the results are pretty stunning if the video below is any indication.

We saw a similar frame-by-frame grabber build a few years ago, but [Joe]’s setup is nicely integrated into the old projector, and really seems to be doing the job — half a million frames of family history and counting.

Continue reading “High-Quality Film Transfers With This Raspberry Pi Frame Grabber”

Using Missile Tech To See Like Predator

[Artem Litvinovich] wanted to see by heat vision like in the Predator movies. He not only succeeded but went on to see in color, medium-wave IR, short-wave IR, and ultraviolet using a very unique approach since his effort began back in 2009.

He started with a box based on the basic pinhole camera concept. In the box is a physical X-Y digitizer moving a photodiode to collect the thousands of points needed to create a picture. First all he got, due to the high signal amplification, was the 60 cycle hum that permeates our lives. A Faraday cage around the box helped but metal foil around the sensor and amplifier finally eliminated the noise. Now he had pictures in the near infrared (NIR). Continue reading “Using Missile Tech To See Like Predator”

Home Made 8mm Digitizer

The 8mm film look is making a comeback, but distributing it is an issue. [Heikki Hietala] wanted an easy way to digitally capture the 8mm movies he made. So, he built an 8mm digitizer from an Arduino, a cheap Canon camera and the guts of an old 8mm film camera. When you throw in a few 3D printed components and some odd electronics, you get an impressive build that captures 8mm film with impressive speed and quality.

This build started with a Canon Ixus 5 camera running CHDK (the Canon Hack Development Kit) to lock the settings down. This points at the film strip through a macro lens so each frame of the strip fills the frame. An Arduino then triggers the camera to take a photo using a USB cable. The same Arduino also controls a motor that winds the film and triggers the film gate from the camera that he salvaged. By reversing the function and triggering it with a servo motor, he can easily blank off the edges of the frame so no stray light shining through the film material causes any problems. Once the camera has captured every frame on the strip, he feeds the captured images into Blender, which processes them and spits out the final movie.

This is a very impressive build overall. [Heikki] has obviously put a lot of thought into it, and the whole thing looks like it runs very efficiently and quickly. The captured video looks great, as you can see from this sample. The decision to use a salvaged film gate was a smart one: there is no point in reinventing the wheel if engineers of previous generations have solved the problem. Kudos to [Heikki] for also documenting the process in a lot of detail: he has produced a 5-part series on his blog that shows how and why he made the decisions he did. This series goes over the overall view of the project, using CHDK to control the camera, 3D printing parts, wiring the Arduino and writing the code that controls the system.

This sits nicely alongside the 8mm to video camera hack that we wrote about recently. This one doesn’t involve taking apart the camera (except for the sacrificial one that supplied the gate), and you still get that wonderfully grainy, jumpy look of 8mm film.

Continue reading “Home Made 8mm Digitizer”

Back To The Drawing Board

Ever try signing your name with a mouse or a trackball? Not so easy. You could buy a graphics tablet with a pen. [Rahul Ramakrishnan] has a different approach. He took two 10-turn pots, and attached some strings and a washer. A pencil goes through the washer, and a BeagleBone Black reads the pots to determine what it is drawing on the paper. A couple of retractable badge lanyards keep tension on the string.

This ingenious design would be easy enough to replicate with any microcontroller that can read the two pots. The only awkward part is the need to press a button down when you want the device to treat the pencil as down (see the video below). It would probably be easy to rig up some switch on the pencil to make operation a little smoother.

Continue reading “Back To The Drawing Board”

An Open Source, DIY Digitizer

When you look at the current methods of scanning 2D and 3D objects available today, you’re basically looking at an imaging process. Either you take a picture of a 2D object, or you grab a blob of point clouds with a 3D scanner and make a 3D object that way. It wasn’t always like this – real, hardware 3D digitizers were used all the way back in the 70s, and touch probes are standard equipment on high-end CNC machines.

[Nikolaj Møbius] needed a way to record points in physical space, and not wanting to deal with the problems of images, he made an open source DIY digitizer. It’s basically a laser cut arm with rotary encoders at each joint. By reading the rotary encoders with an Arduino, [Nikolaj] can digitize a few points on a workpiece – just enough to make a bracket, or find the critical dimensions of a part.

It’s a great tool for when you need a little more information than a set of calipers can provide, and a great example of some ancient tech made useful again.

Continue reading “An Open Source, DIY Digitizer”