If you just want to prevent your garden from slowly turning into a desert, have a look at the available off-the-shelf home automation solutions, pick one, lean back and let moisture monitoring and automated irrigation take over. If you want to get into electronics, learn PCB design and experience the personal victory that comes with all that, do what [Patrick] did, and build your own ESP8266 based irrigation controller. It’s also a lot of fun!
[Patrick] already had a strong software background and maintains his own open source home automation system, so building his own physical hardware to extend its functionality was a logical step. In particular, [Patrick] wanted to add four wirelessly controlled valves to the system.
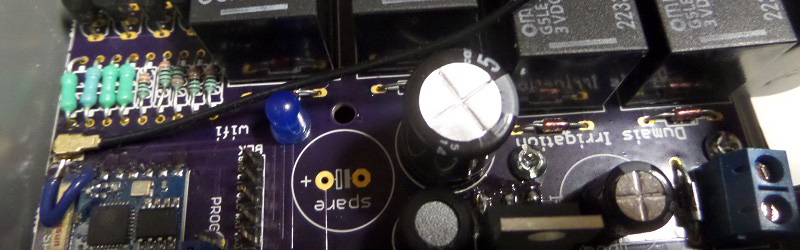
He started by designing the circuit that would do the job using EAGLE. An interface circuit from transistors and relays would help the ESP8266 to drive the electromechanical valves. Because these require 24 V AC to open, a clean and simple switched mode power supply circuit based on the LM2596T was employed to convert the already present 24 V AC supply voltage down to 3.3 V DC for the ESP8266. A few status LEDs were added to check the system status at a glance. One could’ve wasted a few optocouplers on the relay part – but in case of the ESP8266, why bother to spend more on protection circuitry than on the µC, right?
 [Patrick] was crafty enough to avoid a few of the common pitfalls when starting with building hardware projects. He knew the EPS8266 boots with the GPIOs set high, so he used PNP transistors in the relay circuit to avoid sprinkling his lawn every time the device starts up. Also, he added footprints for some optional components to the board, just in case something wouldn’t work as expected, which turned out to be very helpful in the end.
The board layout was then sent to a manufacturer. After assembling the retrieved PCBs, [Patrick] noticed the RX/TX pins on the programming header were reversed, so a pin-re-reversing adapter would be required. Also, the chip antenna on the ESP-03 turned out to be rather weak. Luckily, an optional U.FL connector footprint was present, so an external antenna could be added easily.
On the firmware side, [Patrick] uses his own “DWN” protocol, which allows new devices to notify the home automation server about their presence and type. The firmware also prevents overwatering by limiting the maximum ON-time for a valve to 30 minutes. Eventually, the controller board went into a rugged enclosure and not only the finished build but also the schematics, layout and firmware have been released into the wild. We’re sure you’ll find this well-documented project a great resource for your next home automation project!


This looks really nice. Systems like these prevent waste of precious water and improve both growing conditions and user/gardner comfort :). Which valves are used in this system (brand/model)? Within a few weeks I’m going to design/setup a system for my own garden, so I’ll have to make some choices. Knowing what (and why) others chose always helps!
I’m using the Orbit 3valve manifold. It’s gonna be their 4th summer and they work great
Thanks, they look allright. I’ll see whether I can buy these probably, not sure if they are readily available here in Europe. Most common brand seems to be Rainbird.
I use used washing machine solenoid valves. Cheap and 12V, which suits my battery application just fine.
@Matt: does it needs continous power when the valve is open? (like a standard solenoid valve)
Or it needs power when opening and closing? (which suits battery application better).
Something like this project: https://hackaday.io/project/1871-reactron-energizer-water-valve
(however don’t know what is the valve it uses)
Yep, needs constant power while the valve is open, but its only for 30 mins, solar panel is more than enough to recharge the batt…
Do you have any link about your setup? I would like to replicate your setup I think.
(how big battery, where it is located, etc)
One of the bugaboos of nearly all of these systems is getting a soil moisture meter that won’t drift/degrade with corrosion/mineralization – any suggestions?
Been looking for this as well.I came to the conclusion that a pluviometer is an acceptable plan B: don’t water if it has rained x amount in the last x days.
I gave up on that search, just water for 30 mins/day now. Its in a polytunnel, so no rain there. There are solutions, but they are above my rats and mice budget.
One solution is to use capacitive soil moisture sensors, i.e. like these: https://www.tindie.com/products/miceuz/chirp-plant-watering-alarm/. Capacitive moisture sensors do not need direct contact of the metal to the soil so they can be insulated. Hence a lot less problems. I know it should also be possible to measure other soil properties by using different frequencies, i.e. nutrient availability.
Have you seen these sensors? http://www.pycno.co.uk
I own this one: http://www.vegetronix.com/Products/VH400/
You happy with it? Is it durable outside?
was crafty enough to avoid a few of the common pitfalls: RX/TX pins on the programming header were reversed
lol’d
Haha! He didn’t say he avoided _all_ of the common pitfalls!
That’s the great thing about common pitfalls — there’s always one more.
Nice project. I’ve seen another one in here http://myesp8266.blogspot.ro/2015/11/irrigation-controller-with-esp8266.html witch it has 4 valves.
Do you have any source code? It is supporting OTA? It has a cron function or a mobile app?
can u provide souce code for temperature and soil moisture sensor for automatic irrigation system using microcontroller please mail it.
Nice project, [Patrick]! I’m currently doing my research into all of the different automated tech available to me this Spring of 2017, and I came across this article. Very interesting work!