[Netzener] received a Radio Shack P-Box one tube receiver as a gift. However, at the time, his construction skills were not up to the task and he never completed the project. Years later, he did complete a version of it with a few modern parts substitutions. The radio worked, but he was disappointed in its performance. Turns out, the original Radio Shack kit didn’t work so well, either. So [Netzener] did a redesign using some some old books from the 1920’s. The resulting radio — using parts you can easily buy today — works much better than the original design.
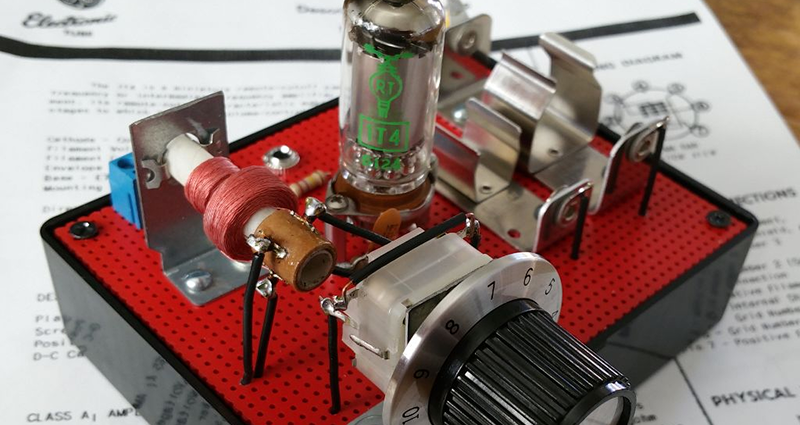
The most expensive part of the build was a 22.5 V battery, which cost about $25. However, you can get away with using three 9 V batteries in series if you want to save some money. The battery provides the plate voltage for the 1T4 vacuum tube. A more conventional AA battery drives the tube’s filament. The original Radio Shack design relied on a variable inductor for tuning. These are difficult to find now, so [Netzener] uses a more conventional adjustable coil and a common tuning capacitor.
As an extra touch, [Netzener] painted the perf board to look as much like the original Radio Shack kit as possible. You can see from the pictures, it came out looking very good. If this isn’t challenging enough for you, maybe you want to roll your own tube. Or maybe you should just settle for the socket.


What and excellent project with such attention to detail and done by someone that has been willing to do the research.
This makes me so tempted to do something similar but there is one thing holding me back.
Aesthetics are important to me so I would first build a rechargeable battery that looked exactly like the batteries on the original portable valve receivers which had three pins: ground, low voltage for the cathode heater and a higher voltage for the anode.
Can anyone remember these batteries and send some links to information or pictures about them? I can’t even remember what they were called.
They were about 2 1/2 inched wide 1 1/4 inches thick and about 4 or more inches long, just from memory so just approximately.
I would also look for an air gap metal tuning capacitor.
http://s1247.photobucket.com/user/electricalengineer1958/media/ge675-678radiobatteries.jpg.html
?
They are all marked as “transistor batteries :-) What should a transistor circuit do with the second (filament?) voltage? If I want a rechargeable “dual voltage battery”. Perhaps to put a rechargeable cell and a voltage converter into it. current draw on the filament supply activates the step up for the plate supply via a coil on a reed contact.
Of course for a 1,2V plate supply you can not use a LiIon cell with this methode. If you use a step down for the filament supply then you need an on/off switch.
They were available in many different sizes, for different radios.
Here’s a simple approach: http://www.batpack.com/
And a teardown of an original: http://antiqueradio.org/tobatt.htm
More info: http://www.zenithtrans-oceanic.portabletubes.co.uk/power.htm
I know I have seen a site with artwork for many different batteries, but I can’t seem to find it right now. A lot of links seem to be dead, so maybe the wayback machine is the way to go.
That batpack website has a great list of brands and models, thanks!
“…or any other radio that would use a Bright Star- 66-03, Burgess- G6B60, Eveready- 752, Funken 939, General- 343, Hallicrafters- P999, Olin Bond- 0616, Ray-O-Vac-AB995, RCA- VS047, Sears- 6401, Usalite- AB677, Willard- WZ-3 or Zenith- Z-985 battery. Providing an “A” output of 9 volts DC and a “B” output of 90 volts DC.”
Great list to put into Ebay. :D
Could you buy one of the batteries – maybe even a dead one – cut one end off, gut it, and fill it with smaller rechargeable cells?
I might have found some useful links.
(I’m too young to have actually seen ‘A’,’B’, or dual-voltage batteries.)
https://antiqueradio.org/bsupply.htm
I still haven’t found what I was curious to see but I did find several other dual voltage batteries.
There too old to buy to use as a case so I will just find/make the artwork for a new build. I will use 16650 or 18650 cells directly (parallel series) for the heater and an inverter for the anode HT and make it USB rechargeable.
Thank you all for the help.
This might make a good kit, well if kids are interested in Radio nowadays (iPhone kit would be a bitch!)
I am not sure it would be so hard to make an iPhone kit. Take one iPhone, rubber case, charger plus charge cable and wired headphones (pairing Bt headphones may be outside a Millenial’s capability). Come’s with a participation trophy and badge.
yes very good thank you dear
And of course there will be no failing grade, even if they do nothing. Can’t hurt anyone’s feelings nowadays.
https://cdn.meme.am/instances/500x/64993536.jpg
Yeah, keep on criticizing millennials while we clean up the complete mess of an economy and climate your generation made. You’ll be remembered fondly.
That 22.5V battery reminds me of when I came across a deal for 95p 12 packs of 3V lithium coin cells. So naturally I stacked up 120 of them. [ don’t put your fingers on both ends at the same time. Tingles lots. ] It was quite a useful power supply, all be it in short bursts so it didn’t get too warm. Lithium has a habit of making you jump.
One of the projects I have rattling around in my feeble mind is a 1920s style ham radio receiver using some of the old tubes and other vintage parts in my collection. This just might make a very good stepping stone toward that project, and I have almost all of the parts I would need on hand already. The battery could be replaced with a power supply, as I have no intention of spending $25 on a primary battery, yikes!
Thank you, [Netzener], for sharing this good project with the rest of us.
If this does not push you over, nothing will (watch part 2 also):
https://www.youtube.com/watch?v=YFzxi-9S998
Thanks!
My real take home from this article is about batteries.
I knew there was a series that in more recent times had types of batteries (or technically cells) such as “C”, “D”, “AA” and “AAA”.
Now I have discovered that the series started Type “A” for heating the cathode of a valve that was (I think) 1.5 Volts and Type “B” which was the anode supply and was about 45 Volts.
I still haven’t found info on the dual voltage battery that had bot the cathode and anode supplies. I guess they would have been called a Type “AB”. They were built like older nine volt batteries with the flat cells except the flat cells were about 1″ by 1.5 – 2″ and about a 1/4″ thick. many cells were paralleled for the cathode and other cells were series for that anode.
I had one of these when I was a teenager! Very frustrating if you lived in a rural area with no strong stations nearby. Maybe I’ll give it another shot.
That probably was due to bad propagation. Try listening during the night; for medium to short waves it is the best choice.
Here’s some data: http://www.short-wave.info/?feature=propagation
In the video it show the radio, amp and receiver all connected. I am buying these parts as a kit for my 82 year old dad to make. He is very handy, understands electronics, and will have no problem putting this together as well as understanding what he is doing way more than I do. (He’s just older and slowing down, so I want to have all of the parts and instructions at hand for him.) I see the instructions and parts lists for both the AM and the SW receiver. However, I can’t seem to find the schematic, instructions, and parts lists for the next two box’s that I see in in the video (the utility amplifier and speaker project (to be featured soon on Instructables.com). I have looked on Instructables.com, but I am not sure I am finding the right thing. Can anyone help me to find the instructions, parts and schematic for the rest of this project? I can gather the parts, etc. for only the SW or AM receiver, but I would like to make this project more complex as it will make for a more interesting project for him. Thanks in advance! Rose