The project itself is very simple: getting push notifications via MQTT when a wireless doorbell sounds. But as [Robin Reiter] points out, as the “Hello, world!” program is a time-honored tradition for coders new to a language, so too is his project very much the hardware embodiment of the same tradition. And the accompanying video build log below is a whirlwind tour that will get the first-timer off the ground and on the way to MQTT glory.
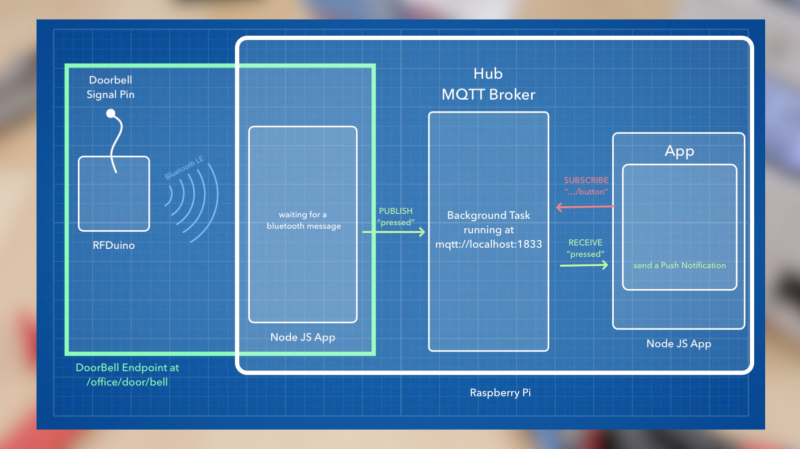
The hardware [Robin] chose for this primer is pretty basic – a wireless doorbell consisting of a battery-powered button and a plug-in receiver that tootles melodiously when you’ve got a visitor. [Robin] engages in a teardown of the receiver with attempted reverse engineering, but he wisely chose the path of least resistance and settled on monitoring the LEDs that flash when the button is pushed. An RFduino was selected from [Robin]’s ridiculously well-organized parts bin and wired up for the job. The ‘duino-fied doorbell talks Bluetooth to an MQTT broker on a Raspberry Pi, which also handles push notifications to his phone.
The meat of the build log, though, is the details of setting up MQTT. We’ve posted a lot about MQTT, including [Elliot Williams]’ great series on the subject. But this tutorial is very nuts and bolts, the kind of thing you can just follow along with, pause the video once in a while, and have a working system up and running quickly. There’s a lot here for the beginner, and even the old hands will pick up a tip or two.


Very slick tracking annotations on the video. What editor does that?
You could easily make that using Blender (blender.org)
Thanks. Thats just a plugin for FinalCut.
Its one of the callouts from mCallout.
That is very sharp, indeed. Any idea if there’s something similar available for the PC using Camtasia or Pinnacle Studio?
Easier to intercept the 433mhz code that is sent with a 433tomqtt bridge
That’s a very nice video, however, if you have a similar project, I would encourage you to simply use an Rf433ToMqtt bridge like the one proposed by 1technophile:
https://1technophile.blogspot.de/?m=1
You won’t have to modify the ringing bell using this way and can connect any 433MHz sensor.
Well yes, that would also be a nice solution.
As always there isn’t just one way of doing it.
In my case I also was curious how they made that unit. Additionally I wanted to use something out of my already existing box of controllers instead of buying something new.
But nice idea!
Very nice and similar to my solution ,my videophone was not wireless, so I added an esp8266 that connects to the backlight led of the LCD in the videophone.
The esp8266 gets powers on by a mosfet 2n7000 (gate attached to backlight led) and sends a pushingbox notification to my email & thingspeak update, then it goes to OTA firmware update, in case I have to upgrade it without opening the case.
In spanish https://www.youtube.com/watch?v=fAvr9MwGi2M
Even though I do not speak Spanish it seems to be a very neat project.
Especially the OTA updates. That’s a topic I may cover in another video someday!
Robin, 2 thumbs up (+2) I enjoyed this project and I have some ideas. Hopefully I’ll add it to my home soon :-)