In the comments to our recent article about Wimshurst machines, we saw that some hackers had never heard of them, reminding us that we all have different backgrounds and much to share. Well here’s one I’m guessing even fewer will have heard of. It’s never even shown up in a single Hackaday article, something that was also pointed out in a comment to that Wimshurst article. It is the Lord Kelvin’s Water Dropper aka Lord Kelvin’s Thunderstorm, invented in the 1860s by William Thomson, 1st Baron Kelvin, the same fellow for whom the Kelvin temperature scale is named. It’s a device that produces a high voltage and sparks from falling drops of water.
A Brief Overview
Lord Kelvin’s Thunderstorm is build around the concept of water droplets falling through inductors. Two streams of water fall from small holes in reservoirs at the top. Those streams fall through two metal cylinders, called inductors, not making contact with them. A stream of falling water will change from a continuous stream into individual drops at some point, if it falls far enough.
The inductors are vertically positioned such that this change from continuous stream to individual drops happens as the water is falling through the inductors. To see these drops, the photo on the right, above, was taken with a fast shutter speed. Finally, the drops fall into metal cans, called receivers, at the bottom.
The receiver on the left is electrically connected to the inductor on the right, and the receiver on the right is electrically connected to the inductor on the left. You can see this in the photo above in the form of the crossing yellow and red wires.
Also, a wire is connected to each receiver and goes to either side of a spark gap. Every now and then, a spark crosses the gap. Magic. Or is it?
How It Works
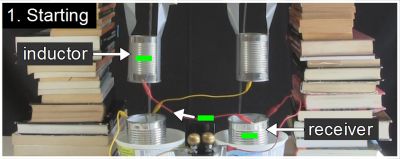 To begin, there has to be some excess electric charge somewhere, either positive or negative. And there usually is. Let’s say that the right receiver has a slight net negative charge. Since it’s wired to the left inductor, the left inductor also has a slight negative charge.
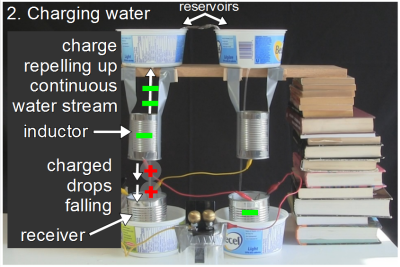 Here is where the real magic happens. Remember that the inductor is vertically positioned where the continuous stream breaks up into drops. Since the left inductor is negatively charged, it repels negative charge in the water. The continuous water stream from the reservoir to the inductor acts like a wire and that negative charge is repelled up that stream to the reservoir. But that leaves the drops falling below the inductor with a net positive charge. And since they are individual drops, they stay positive, all the way to the left receiver below them.
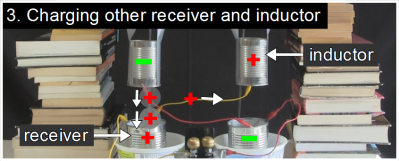 The left receiver is a metal can and is in electrical contact with the water in it, and so the left receiver is made positive by those positively charged drops.But the left receiver is wired to the right inductor. That means the right inductor also becomes positively charged.
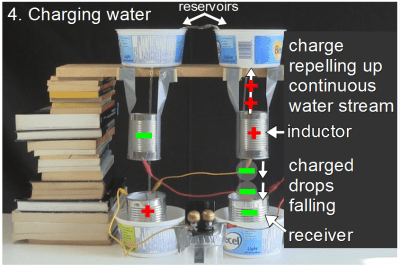 That right inductor also has a stream of continuous water entering it from above and drops leaving it below. Since the inductor is positively charged, it repels positive charge up the solid water stream to the reservoir above. Meanwhile, the drops leaving it are left with a net negative charge and fall into the receiver below them.
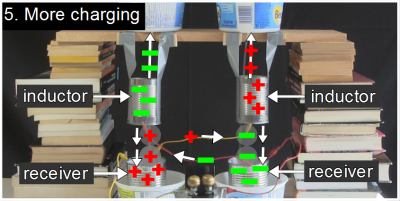 If you recall from step 1, the right reservoir was the one we started with, and was slightly negative. Now, as a result of the negatively charged drops falling into it, that receiver becomes even more negative.And since that right receiver is wired to the left inductor, that makes the left inductor more negative, which repels negative charge up the left stream, while the drops below it are made positive, and fall into the left receiver, making the left receiver more positive, and so on.
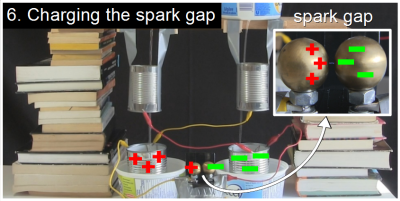 So the right receiver becomes more and more negative while the left receiver becomes more and more positive. But remember, the two receivers are wired up to opposite sides of a spark gap. The electrodes at the spark gap also become more and more negative and positive. That is, until the voltage across the spark gap becomes so strong that it breaks down the air between them, and a spark crosses the gap, discharging the whole thing. But of course a little net charge is left somewhere and the whole process repeats.
Fanning Drops And Electroscopes
Besides watching the sparks, there are some additional fun ways to observe this repeated charging and discharging. One such way is to watch the drops fanning out as they fall, and then suddenly falling straight again.
Why does this fanning-out happen? The drops coming out of the inductors have the opposite charge of the inductors. For example, the drops falling below the left inductor are positive, while the left inductor is negative. Note also that the bottom lip of the inductor is to one side of the drops. Since unlike-charges attract, there’s a horizontal attraction between the inductors and the drops falling below them that imparts some sideways movement to the drops.
The result is a visible fanning-out of the drops. This fanning-out gets wider and wider as the inductor becomes more and more charged. That is, until the spark occurs and discharges everything. At that time the drops fall straight down again only to start fanning out as the charge builds back up.
Another fun way of observing the charging and discharging in action is to place the terminal of an electroscope near an inductor or receiver. As the charge builds up, the electroscope leafs will spread apart. But when the spark occurs, the leafs fall back together
Going Big
Rather than have just one stream falling through each inductor, some builders use something like a shower head to have multiple streams fall through. Below is a video from science YouTube channel, Veritasium, showing a large and very sci-fi looking Lord Kelvin water dropper that uses shower heads.
It also has a pump to keep the water flowing continuously. You might wonder what would happen if you did use a pump, since you’d be electrically connecting the two receivers. To avoid that, the receivers are just meshes through which the water drops fall. As the drops falls through, the mesh takes their charge. So I guess you can say these receivers receive the charge but not the water.


Fascinating topic. Thanks for providing the details of how the apparatus works, I had always been a bit confused by it. I suppose there are easier ways to generate high voltages, but few that look more interesting and fun to watch than one of these.
So he’s using water droplets to create a high voltage. Looks like the “thunderstorm” part was quite literal.
Water droplets during rain are charged, and have a lot of kinetic energy relative to their charge.
I’ve often wondered how much energy you could gather during a rainstorm with a similar setup, using earth ground as one of the conductor references.
Supposing a grid of interleaved wires (screen with a very large mesh) set out on posts covering, say, an acre of land, I wonder how much energy could be recovered from rain droplets falling through the mesh?
Just have to do something about the wind.
Sounds like an interesting experiment to do. Insulate the supports to the mesh and and protect them from getting wet. Connect the mesh to the ground through a capacitor and spark gap I guess, or maybe just the spark gap would do?
It’s one of those ideas even a third-world country could build.
Build yes, employ for anything useful for more than a couple of days no… some areas don’t have power and phone not because it hasn’t been tried a dozen times, but because the copper keeps getting stolen.
Or instead of a rainstorm, mount it near (or in) a waterfall.
Near would catch the spray and be simpler (I think), but inside the falls might be more effective.
If you have a waterfall, you’d be better off placing a real-generator. Even an array of old car alternators would be more beneficial than a Kelvin Thunderstorm. Plus the voltage level would not be dangerous.
I prefer to play with scotch tape in the dark. It’s just easier.
I do my scotch taping at night,
So I can, So I can
See your spark while I’m in the dark
And I do my scotch taping at night,
So I can, So I can
See the light that’s right before my eyes
Beautiful! +1!
This is why i’m still reading the comments :)
Great, a true work of art!
Thats not an inductor, or at least, this effect has nothing to do with it’s inductive properties. This is all about electrostatics (well, fairly static), magnetism doesn’t come into play – the metal can is just a metal can.
It’s electrostatic induction (https://en.wikipedia.org/wiki/Electrostatic_induction) as opposed to electromagnetic induction (https://en.wikipedia.org/wiki/Electromagnetic_induction), which I think it’s fair to say more people would be familiar with here. Not everyone plays with electrostatics. With sensitive electronics most try to avoid electrostatics.
Glad it works, but description is wrong. The cans are cans, not inductors, not receivers, the cans act as charge plates, nothing more
Also from the article:
Since like-charges attract, there’s a horizontal attraction between the inductors and the drops falling below them that imparts some sideways movement to the drops.
Good catch. “like-charges” should have been “unlike-charges”. Fixed. Thanks!
The inductors are so called because they induce a redistribution of charge in the falling water (https://en.wikipedia.org/wiki/Electrostatic_induction). The receivers, well, they receive the charge from the charged drops.
Not my terminology though. Googling “kelvin water dropper inductor” and “kelvin water dropper receiver” show plenty of such usage. I’ve known about this one for so long though, that I don’t recall where I originally learned the terminology.
They induce a charge, the description is not wrong
i personaly find the word induce missleading because of the following reason.
for example if a neutron decays into (a proton an electron and an antineutrino) you wouldn’t say there is anthing induced so that the electron gets negativ and the proton gets positive. Its more like you just seperate it and in the case of a neutron minus or plus decay there is this “thing” (antineutrino) which is released.
You need to read Faraday’s experiments, where he “induces” a charge. This is the basis for calling the cans inductors. BTW, even straight wires exhibit the property of inductance.
@BNBN — Induction is a strong enough concept to cover both electric charge and magnetism. The key aspect is absence of actual contact between carriers.
You can also connect a neon lamp (like one of the little hot-side testers) across the Kelvin generator spark gap. A neon lamp will fire at about 90V and then act as a negative resistance (as discussed here the other day) down to about 60V. There are some hackworthy projects at . You can make a very simple relaxation oscillator from a neon lamp.
I found that adding a little (~2%) salt to the water enhances the operation of the generator.
… and probably unenhances the operation of everything electronic in the room when tiny salty droplets get everywhere.
The ocean is 3.5% salt so 2% is more than “a little”. :)
Well, that’s at http://www.bristolwatch.com/ele/neon.htm. Guess it thought I was trying to sneak in some HTML.
Tried doing this way back when I was 15. After a week I gave up. Never got a spark or even a tingle from the thing.
Rubber band Van De Graft worked like a charm.
https://en.wikipedia.org/wiki/Kelvin_water_dropper
https://www.youtube.com/watch?v=s-7_HR62Pcc
You can probably get a similar result using wind blown droplets between grids as it is all about using kinetic energy to setting up a charge separation across a space.
I have to hand it to the illustrator, that is a very subtle use of negative and positive space, LOL, you pulled that off perfectly.
Yeah, that’s actually proposed as a method of extracting power from wind.
Aye that wizard guy mentioned some video of a project in Brazil?
I’ve not watched the video (as I’m at work and can’t access it), but are there any stats on flow rate vs spark rate? I’m wondering for example how many sparks would I get for a litre of water in each upper reservoir.
I’ve also wondered about other variables. Things like distance between inductors and receivers, diameter and length of the inductors, effect of the drops being in air vs other gas or indeed a vacuum. Funny thing is that while I was reading this a thunderstorm started outside.
I used slomo footage to find the droplets in my well optimised set up were giving up to 1/3 of their energy to the electrostatic generator. Use m.g.h to work out input energy, and then you have to suss out energy per spark and estimate charge leakage and you’d have yourself a figure. I’d estimate 1 decent spark every 5 seconds for 4-5 minutes based on our setup.
Another question. Any benefit to be had in increasing the conductivity of the water by adding salt? It might make for a better charge transfer up the continuous column of water….?
As I remarked earlier, I found that adding about 2% salt improved the action. Also note that there should be electrical continuity all the way back to the water source. I think that there’s a wire between the two top containers in the photo above, but I can’t be sure. I used a copper Y-tube (upside-down) to supply the water, so that there was continuity. I also adjusted the flow rate so that there was a solid stream through the upper tubes, breaking into drops between the upper and the lower tubes. I believe that I based my generator on an Amateur Scientist article in Scientific American in 1961-62. I’ll see if I can narrow down the date.
I think that the electrical energy is derived from a decrease in kinetic energy in the falling water, but I’m at a loss to supply the details of the conversion.
Yes, what you see in the photo above is a strip of aluminum foil whose ends are sitting in the two water reservoir’s, electrically connecting them. However, I’ve read that some have found that it isn’t necessary. On thinking about it, I can see that being the case. There isn’t a heck of a lot of charge involved here so I can imagine the reservoirs each collecting whatever charge goes up the water stream and still having plenty of capacity for more charge.
Ah yes, sorry, I should have read the comments properly.
You talk about shorting the two reservoirs together. I’d have (naively) thought that that would cancel out the differential charge that should exist between the two. Clearly my understanding of this isn’t quite there yet.
The inductor on one side is repelling negative charge up the water stream and the other inductor is attracting negative charge down the stream, so they’re working together. You could instead say that the other inductor is repelling positive charge up the stream, but that’s the same thing as saying it’s attracting negative charge down the stream. The two are equivalent.
There is some question as to whether it’s ions or electrons that are moving, so I stick to talking about charge, which covers both cases.
In order to charge up the metal, there would need to be electron transfer from the charged water (since metals dont transport ions except via atomic diffusion at high temperatures). This makes me very curious as to what are the charge carriers in the falling water. Initially I supposed this would be hydronium and hydroxyl ions, which you might be able to test by adding some ph indicator to the water to see the color change. However, there still would need to be some redox reactions at the metal surfaces to convert these ions to electron charges…
Actually I take it back… There is no need for redox reactions to occur. The conversion of ionic charge in the water to electron charge in the metal can be explained by capacitive charging of the double layer at the metal-water interface. That is, on one of the bottom electrodes, positive charges (Na+,H+ etc) accumulate and attract electrons to the surface of the metal,which in turn induces a positive charge on the top electrode on the opposite side. This positive charge attracts negative ions (OH-, Cl-) in the water reservior on top . The opposite occurs in the other pair of electrodes. When the spark gap discharges, this double layer polarization is released. This should also set a limit on how large of a voltage this can achieve, since the polarized double layer should start repelling additional ions eventually (this happens in a DC electrolytic cell at low voltage after a long time… It basically acts like a capacitor and has an exponentially decaying current). It would still be interesting to add some pH indicator, and also monitor the current over time through each discharge cycle,in the wire connecting the upper.and lower inductors.
The Amateur Scientist original article was in Scientific American, June 1960, p. 175. While I was fossicking around I came upon an interesting site, apparently now abandoned: amasci.com/emotor/kelvin.html The discussion indicates that the author did quite a lot of experimenting with the generator.
Hi all,
I’ve done a fair bit of optimising of Kelvin’s thunderstorm and have some insight that might interest.
First of all as most people will know, amounts of energy are low. Add a Leyden jar and they can be fatal, but nothing useful for any tasks. You can actually estimate the power based on the gravitational energy of the water flowing through. Mass flow times g times height. From slomo footage I found an effective set up can extract up to a third of this (you can watch the drops slow down as it charges, and this is also audible here https://youtu.be/WBRCeNXhjSk ). Unfortunately a mass flow in grams per second isn’t going to give anything useful.
Shower heads are all well and good but in order to extract energy you need the voltage to decelerate the drops, and if they are off centre they will be flung out sideways. A single stream is better.
Add enough voltage and the droplets can orbit the rings (see https://youtu.be/L9MQuPS_hfY )
The best shape for the rings is toroidal, and these should be placed where the jet breaks into droplets. The shorter height is more sensitive to position but minimises lateral acceleration of drops.
Whatever you do, stray droplets will escape and they are electrostatically guided to short between the sides. Given the operating principal requires open containers at voltage, judicious use of hydrophobic materials and a hair dryer are your best option. Also if you get too close, as a relative earth you get sprayed with charged drops.
Once you have maximised separation, and optimised set up geometry, there are three key limits on achievable voltage:
Scale – the bigger you can go the better separation you can give, minimising droplet crossover and shorts.
Roundness – avoiding sharp corners minimises air ionisation.
Quality of jet – a high velocity jet that breaks up uniformly into large droplets means the drops can resist the field better and go straight on into the container below against stronger repulsion. Small droplets go and find somewhere to antisocially ruin things.
With our system built in a cheap set of plastic shelves we got to 50,000V! You don’t need a Leyden jar to make a good crack at that voltage. In the orbit video I think it was under 10,000V,
What can you do with it? Well I intend one day to make an atmospheric pulsed UV laser like this guy: http://www.sparkbangbuzz.com/tealaser/tealaser7.htm – the Kelvin Thunderstorm would power it pretty well. They use atmospheric Nitrogen as the lasing medium.
Also if you want to remove water from the receiver without losing charge, there is a much better arrangement than the last video. If you use pots with holes in the bottom situated in metal tubes that extend beyond the breakup point of the water streams leaving these holes, the water loses continuity in the middle of an effective faraday cage. Because the like charge in the receiver repels it moves to the edges of the conductive tubes, leaving the water in the middle uncharged. Once the droplets break off they cannot gain charge as they move to the edge, and assuming they have enough weight to overcome the electrostatic attraction they fall away without taking precious charge.
One last thing to mention… anyone wanting to get sparks quickly I recommend the following:
Get a supply of two streams of water that are electrically connected. This can be a plastic trough with two holes in, a fancy pipe arrangement with two nozzles or two pots with holes and a wire between. Raise this supply up and place a big piece of expanded polystyrene packing material below and behind it. Make two rings of tin foil and get two bits of wire and two drawing pins (thumb tacks). Pin the rings two the polystyrene under each stream, pinning through the wire leaving ~15cm of wire one side of the pin and 30-40 the other side. Strip a couple of cm each end of the wire. Place glasses/jars/vases under each stream and route the long ends to the opposite glass. Make sure the wire is separated as the insulation is unlikely to work at kilovolts. Position, using tape or pins, the short ends so the bare ends curl away from each other and nearly touch. This is your spark gap. Taping the pointy ends so the point touches back on the wire will minimise air ionisation but is not essential. The gap wants to be 1-2mm. Let the water flow and move the rings to the height where the streams break up (where they catch the light). Let go and you should hear a click every few seconds and the water noise keep changing. Look for a spark. Once running you may be able to separate the spark gap a little. My first Kelvin Thunderstorm was made in about 20 minutes this way and we got about 8kV which is a few mm gap. After 10 mins you’ll need to get a hair dryer out to dry everything or the water will short out your fun. If it helps a picture of ours is near the bottom of this page: http://jellyandmarshmallows.co.uk/blog/projects/kelvins-thunderstorm/
you use brass balls for the spark gap. are there any other things that can create a spark which are easier to buy or to find?