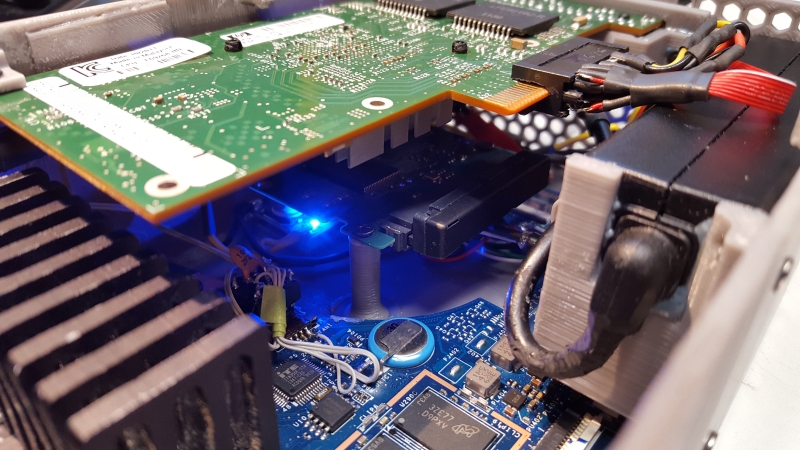
It seems the older I get, the density of broken and/or old laptops on my garage grows. That’s one of the reasons it’s interesting to know which projects are being made to bring back to life these things. [zigzagjoe] sent us an interesting project he made out of a Lenovo Yoga 2 motherboard: a pfsense router/firewall.
The laptop was damaged, but the main board was functioning just fine. What started as adding an old Pentium heatsink to it and see how good it would work, escalated to a fully working, WiFi, 4 port gigabyte NIC, 3D printed case firewall. The board had PCI-E via an M.2 A/E key slot for the WiFi module but [zigzagjoe] need a normal PCI-E slot to connect the quad-port NIC. He decided to hand solder the M.2 A/E (WiFi card) to have a PCI-E 1x breakout since his searches for an adapter came out empty or too expensive. For storage, he chose 16GB SanDisk U100 Server half-slim SSD for its power efficiency. Once again, the SSD cable had to be hacked as the laptop originally used a super-slim HDD with a non-standard connector. The enclosure was then designed and 3D printed.
But [zigzagjoe] went further to optimize his brand new router/firewall. On the project documentation, we can see a lot of different modifications went into building it, such as bios modification for new WiFi modules to work, an Attiny85 fan driver for extra cooling, a 45W PSU inside the case and other interesting hacks.
This is not your typical laptop to firewall hack, that’s for sure.


Wow, that’s impressive. I did some laptop mods, but not as extensive as this – and I’m wondering what this one might have cost =)
The github page says it cost $96.23 not including reused components. Probably one of the most complex and expensive laptop mods ever, involving everything from 3D printing to BIOS hacking and custom fan controllers.
But I bet it was also the most rewarding laptop mods ever. :-)
I did a somewhat similar mod a few years ago. I had an broken dell latitude with a bad screen, damaged case and bad power jack. I put it into a 2U HP case that I had gutted, wired the PSU directly to the board along with 2 80mm case fans (sharing the 20v connection in series so set at 10v each), installed PCI full height card Network card, used the onboard 10M connection and a USB Wifi B (WiFi G had come out but was still very pricey)
Everything was held together with double sided foam tape, and it ran for about 4 years before failing. Without the LCD being on It pulled 38 watts and only cost me time and half a roll of foam tape. I used parts that I had onhand from my junk bin (wall??)
Seems like this cable would work…
https://www.amazon.com/PCI-E-Express-Extension-Adapter-Riser/dp/B01FVPITN8
Still have to cut the back out of it though.
However, for either this or the method used, “works” is a little relative, since one is connecting a 4 port Gigabit NIC which was intended to use 4 lanes to a single lane interface. In theory, even just one lane should support concurrent operation of 2 Gigabit ports, and this might be how this is used, WAN in, out to Switch, the other 2 ports left unused.
If only…. But, that’s a miniPCI-E adapter, not M.2. Would have been a much shorter affair if that would have worked.
Given that It’s PCI-E 2.0 – explicitly checked in the controller datasheet before purchasing – in theory, there’s enough bandwidth (barely) for all 4 ports. In application, I’ve tested 3 ports maxed without issue.
The length and shielding on the PCIE really can affect accuracy and speed, Those ribbons not so good.
They have shield core cable on some of the other Chinese extensions there was something about the capacitance of those that caused accuracy problems.
These three should do the job nicely;
http://www.bplus.com.tw/ExtenderBoard/P4SM2.html
http://www.bplus.com.tw/ExtenderBoard/P14S-P14F.html
http://www.bplus.com.tw/ExtenderBoard/P11S-P11F.html
Although only the last one has the right m.2 keying (A&E). Gives 2x PCI-E x1 slots.
Only the last one would work, due to the keying, and the price is highway robbery. Undesirable form factor, too. Best I can tell, bplus exists to mark up that which other vendors make available for a tenth of the price. However, since there was no demand for an a/e adapter, they are now the only choice. A us vendor sells m.2 breakout boards for various keys, that breaks out every signal, but that was $80.
Luckily, I found that m.2 adapter for hackintoshes, which made a perfect breakout board, for $12. Just took a month…
Wow, that’s a very nice looking case!
Fantastic build. Broken laptops make the best (performance/price) platforms for small form factor computing.
Iv been using bare motherboards from Lenovo X220/X230 ($20/$50 for 100% working board) for a while now. Its hilarious how much they beat all the competition when it comes to computing power and IO per $. PCIE, USB 3.0 and ~3-4x CPU at the price of Pee.
Thanks for the tip! I’ve been considering doing something like this after I disassembled my laptop and realized how easy it would be to modify it.
Also, what do you use to power your devices?
laptop powersupplies + resistor if its not a lenovo one, lenovo uses 3 pin plug to sense wattage