New to astrophotography, [Jason Bowling] had heard that the Raspberry Pi’s camera module could be used as a low-cost entry into the hobby. Having a Raspberry Pi B+ and camera module on hand from an old project, he dove right in, detailing the process for any other newcomers.
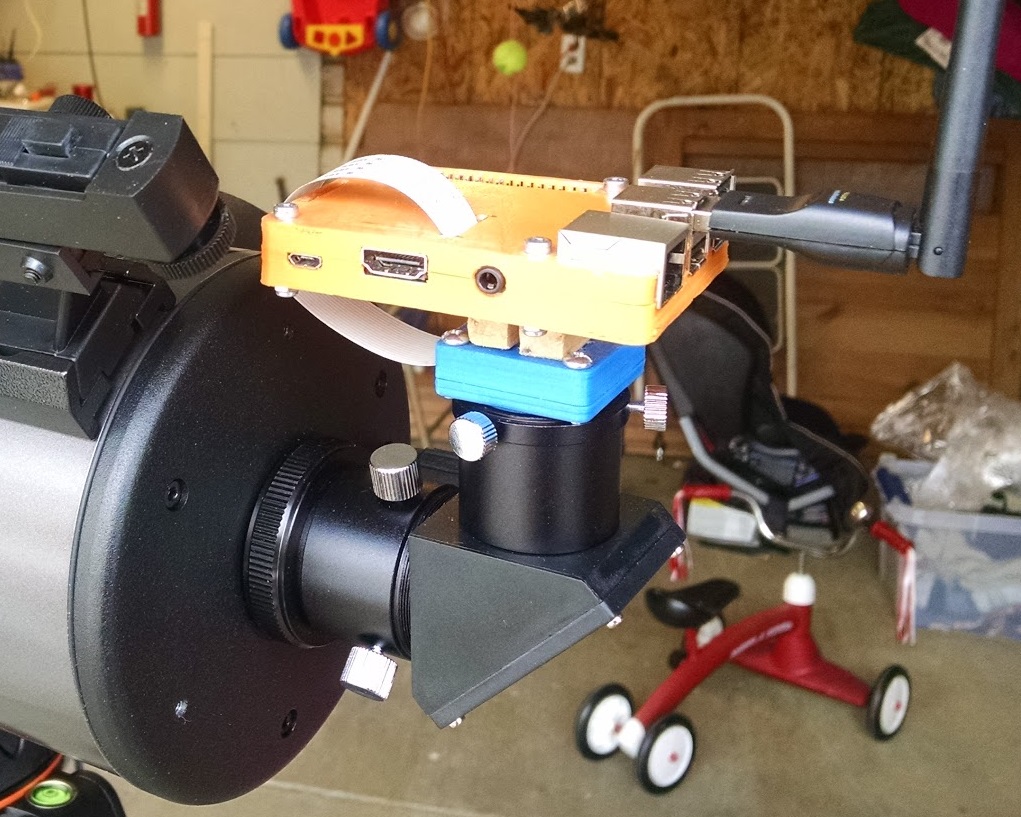 Gingerly removing the camera’s lens, the module fit snugly into a 3D printed case — courtesy of a friend — and connected it to a separate case for the Pi. [Bowling] then mounted he camera directly on the telescope — a technique known as prime-focus photography, which treats the telescope like an oversized camera lens. A USB battery pack is perfect for powering the Pi for several hours.
When away from home, [Bowling] has set up his Pi to act as a wireless access point; this allows the Pi to send a preview to his phone or tablet to make adjustments before taking a picture. [Bowling] admits that the camera is not ideal, so a little post-processing is necessary to flesh out a quality picture, but you work with what you have.
If you want to dive further into astrophotography, we’ve featured backyard setups for detecting exoplanets, as well as tips for long-exposure photography, and even custom cameras to do the job.
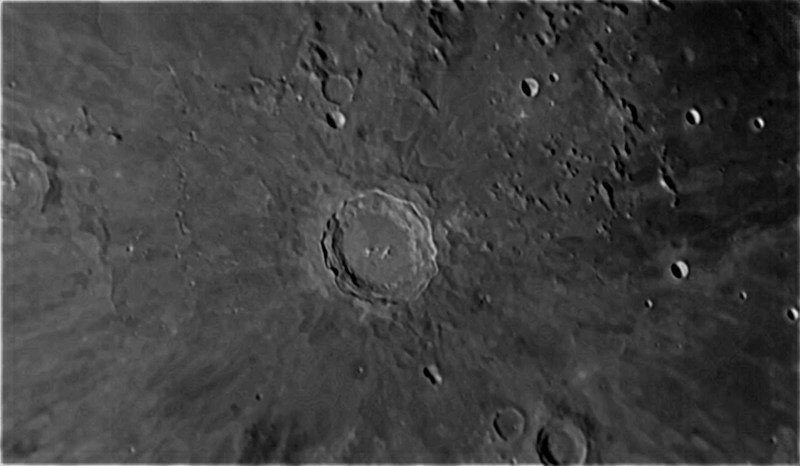
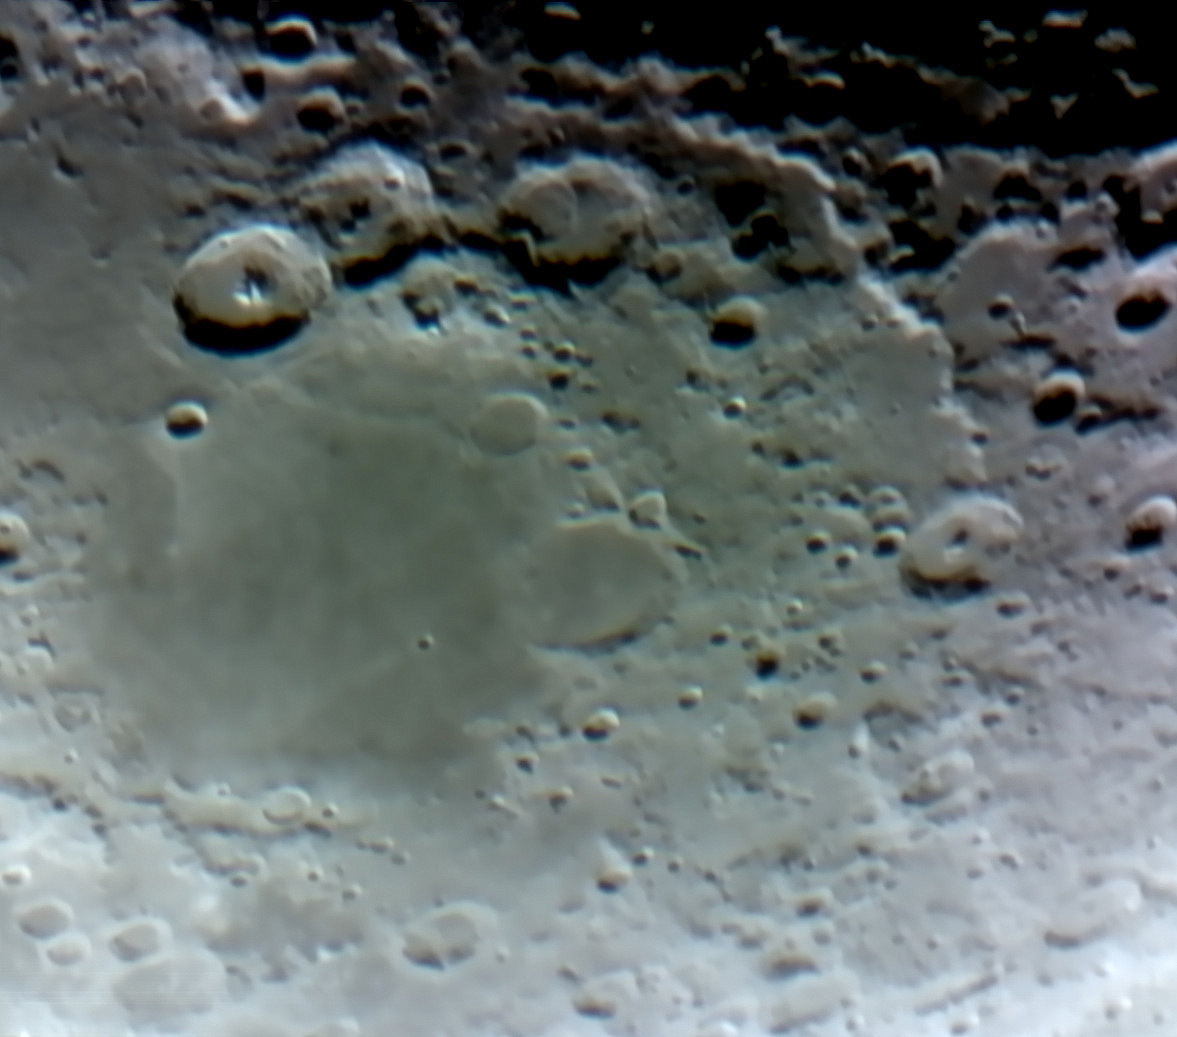
It’s quite impressive the amount of detail he has been able to capture!


I seem to remember that eyeball shaped webcam that came out in the mid noughts has a grounded pin inside that would give it a “bulb” setting, that is “shutter open till …”. Perfect for astro-photography. Crappy res, and probably no better than what is in a Samsung phone camera shooting video.
Ah, the old BW Quickcam. They were real CCD devices with printer port connection (no USB) and with no color filter on the chip. Hobby astronomers were doing long exposures with them in Peltier cooled machined housings. Low res and noisy if not cooled to -20 C, but some guys stitched amazing color composites (with manual filters) and multiple exposures of planets and nebulas.
There’s really no need for a longer exposure. Just take lots of shorter exposures and stack them in software. This has the added benefit of making up for less accurate tracking.
No. Every time you add exposures you will also be adding read noise in each exposure. The fainter details will be lost. Why do you think astrophotographers are spending $1000s on their mounts to get longer and longer exposures?
Only recently CCD cameras appeared (ASI1600) which have read noise small enough so stacking lots of shorter exposures becomes viable. And by shorter I still mean 1min or so but this strongly depends on the target/scope/etc.
Edit: I meant only recently CMOS cameras appeared…
Stacking actually increases the SN ratio, it’s a very commonly used practice in astrophotography to reduce noise and increase the detail you see in your images, even on the $75k+ telescope/camera systems I use. Google Registax for software to do it and an explanation of why it works.
Stacking actually increases the SN ratio, it’s a very commonly used practice in astrophotography to reduce noise and increase the detail you see in your images, even on the $75k+ telescope/camera systems I use. Google Registax for software to do it and an explanation of why it works.
“When away from home, [Bowling] has set up his Pi to act as a wireless access point; this allows the Pi to send a preview to his phone or tablet to make adjustments before taking a picture.”
Hopefully that IoT is fully secured.
o noes they stole my picture of the sky!
IoT (Internet of Telescopes)
Was that comment necessary?
Reading his project details and seing what he did to build this project I think he is well aware of the issues of security and attaching things to the internet.
It’s not connected to the internet, though I’ve given that some thought :-) Acting as an AP just makes it easy to connect to if I take it out to a dark place, so that you don’t have to manually set network parameters on the device you are connecting from.
That’s good. I’m sure there are some interesting things that can be done when one networks telescopes together. Not to mention sharing the fun with those who can’t afford a telescope.
Awesome – love projects like this – making the most of what you’ve got lying around
Looks like this is still using the old 5MP camera. The new (V2) 8MP camera would be a nice upgrade, not only because of the higher resolution but also for the improved image quality.
You’d have to know exact sensor specs to determine that, if your slab of silicon is a quarter the area, obviously you’re going to catch only a quarter of the photons you did with the old one. Not a problem for bright images, problem for dim ones.
Yes, as both sensors are rougly the same size, the 8MP one will have smaller pixel. The difference is 1.25 um^2 verus 1.96 um^2 which gives you ~ 50% bigger pixels for the 5MP sensor. But the 5 MP sensor (Omnivision OV5647) is a rather old design while the 8MP version uses the relatively new Sony IMX219 sensor which should be superior in many aspects. Unfortunately, there are not too much “hard data” from the datasheets that could actually be directly compared between both sensors but a lot of people who have tried both sensors report improved low-light conditions and better signal to noise ratio for the new camera module.
There has to be some way around that limt, anyone?…
This isn’t film so surely one long exposure is no benefit to the image sensor in the camera.
In film you get an accumulation of photons giving more detail over time.
But i didnt think an image sensor worked like that.
I thought it just kept taking images and summing them up.
Basically merging multiple images.
So you can increase your “exosure” by just taking more images and processing them to produce a single overlayed composite. Giving you an exposure as long as you like.
Is that about right?
That sounds better than what I was imagining. I think I’ll do some research on how exactly CCDs capture, unless someone posts a link by the time I wake up…
Did find this though: https://sites.google.com/site/meteotuxpi/home
Basically what you said, combining several short exposures into one.
With an ideal sensor with no noise, yes. However there will always be some noise floor, below which you can’t recover any usable signal. Since most objects in space are pretty dim (other than planets/moon), you aren’t capturing many photons. You need to ensure your individual exposures are long enough to bring the faintest part you want to image above that noise floor. Then, like you said, you can merge or ‘stack’ multiple exposures together to increase your signal-to-noise ratio and bring out those beautiful galaxies and nebula that would otherwise never be seen!
That’s the best explanation of stacking I’ve seen yet. Thanks!
Real astrophotography cameras are cooled to about -30C to reduce the noise ( http://diffractionlimited.com/product/stt-8300/ ). You also take dark frames to compensate for pixels which are noiser than others, and flat frames to compensate for the uneven illumination of the image across the sensor. And you stack hours of exposures, using some pretty nifty software that can automatically realign the images after the inevitable drift of the image on the sensor due to imperfections in the telescope mount’s polar alignment and guide motor speed. You then spend hours processing the image trying to pull faint signals from the mounds of background noise.
It is really quite an involved process, which I used to do until I found that I have a better life when I get some sleep.
That’s only part of the story and the simplification can in some cases be misleading and actually lead to lower quality measurements.
You don’t have to “recover the signal from below the noise floor”, it’s always just a question of signal to noise. Generally:
Signal = Isignal * texp * Nexp,
Noise = \sqrt(Idark *texp *Nexp + qread * Nexp)
So you have SNR = Isignal * texp * Nexp / \sqrt(Idark *texp *Nexp + qread * Nexp)
In other words, your detector doesn’t care whether you integrate dark current or signal, or you integrate 1x 100s or 100x 1s – the integrated signal is Isignal x 100s and the integrated noise charge is Idark x 100s electrons in both cases.
What’s different though is the read noise: in a non-spherical-cow-in-vacuum detector you incur some extra electrons of noise every time you read out, hence in our example you will have the same signal in both cases but a noise of \sqrt(Idark x 100s + qread) in the one case, \sqrt(Idark x 100s+ 100x qread) in the other.
*That’s* why it usually pays to expose longer rather than more often.
However, things are complicated e.g. by the fact that detectors can’t hold an arbitrarily large signal, so that you can’t integrate arbitrarily long. There are cases where this is so limiting that the detector will saturate from dark current very quickly, so you will want to read often, not long! On the other hand, you can often cool detectors to levels where dark current becomes negligible (a few or even below one e- per exposure), and play tricks with readout (eg avalanche amplification stages or ping-pong readout) to the level where read noise becomes negligible. Both come with an increase in complexity and also with their own sets of caveats that limit performance in some areas.
So, while stacking webcam images in a hobbyist astrophoto setup is not as good as long exposures with a cooled CCD, in the end the best measurement -as always- depends on your exact measurement problem and setup…
That’s not right.
Both film and electronic benefit from longer exposures. Sensors’ photosites produce a linear response (the intensity of the image at each pixel will be proportional to the number of electrons that hit them). The fundamental difference with film is that emulsion grains have (naturally) a logarithmic response except when the image is under- or over-exposed.
The key word you need is “stacking”. https://www.google.com/search?q=astrophotography+stacking
I think ~6 seconds is about the longest you can leave the shutter open on a non-moving (immobile) tripod, without getting star trails and motion blur from Earth’s rotation.
Oops post too fast. One workaround is a tracking mount, e.g. a barn-door tracker, which runs counter to Earth’s rotation and keeps the object fixed in the frame.
Depending of course on pixel size (or circle of confusion), focal length and declination of the imaged field…
Cool project, been wanting to do something like this for some time. Nice to see that it works so well.
I do wonder what budget you are working with. Only that telescope costs 400+ USD.
Sorry for the lack of clarity – my intent was that the “budget” aspect referred to the camera. A camera designed for astronomy starts at $200 and goes up. I wasn’t sure if I wanted to invest that much, so the Pi cam was a fun way to experiment and try the stacking/processing software out. I replaced the Pi cam with a ZWO camera, which I’m very happy with. I’m currently playing with using the Pi cam as a sky camera with a wide angle lens, to check sky conditions and hopefully catch meteors. Astronomy is a great hobby for hackers. :-)
We have a telescope and a decent camera but I haven’t figured out how to get the camera lens in the right place to get a good focus.
Sometime you can’t, especially if you are trying to do prime focus photography.
This might help you…. http://dannysdigiscoping.com
Photoshop® Astronomy, R.Scott Ireland, 978-0-943396-85-9, Willmann-Bell, Inc.. Includes CD.
Great project! If this is possible just imagine what will be possible tomorrow.
In case it’s of interest, I’ve written a followup article detailing what I’ve learned over the last five months of practice doing planetary imaging with my 127SLT and a dedicated astronomy camera. The results are significantly improved. If you’re interested in how that can be done and what results you can expect with a small telescope, it should be a useful introduction. It gathers up a number of topics that a beginner will need to know, including planning, the use of a Bahtinov mask, setting exposure, stacking and sharpening, and a sample workflow for capture and processing. It also touches on powering your telescope and dew control. The idea was to combine pointers to all of these topics into one concise article, so that the beginner was aware of them, with pointers to more detailed information.
I hope you find it useful. Thanks!
http://shortcircuitsandinfiniteloops.blogspot.com/2017/06/a-beginners-guide-to-solar-system.html