Budget Astrophotography With A Raspberry Pi

New to astrophotography, [Jason Bowling] had heard that the Raspberry Pi’s camera module could be used as a low-cost entry into the hobby. Having a Raspberry Pi B+ and camera module on hand from an old project, he dove right in, detailing the process for any other newcomers.
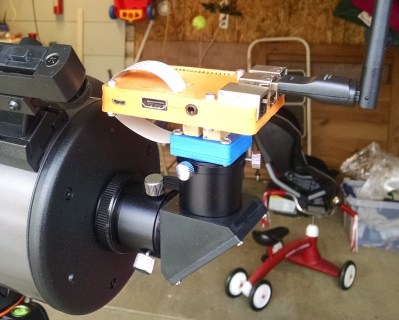
Gingerly removing the camera’s lens, the module fit snugly into a 3D printed case — courtesy of a friend — and connected it to a separate case for the Pi. [Bowling] then mounted he camera directly on the telescope — a technique known as prime-focus photography, which treats the telescope like an oversized camera lens. A USB battery pack is perfect for powering the Pi for several hours.

When away from home, [Bowling] has set up his Pi to act as a wireless access point; this allows the Pi to send a preview to his phone or tablet to make adjustments before taking a picture. [Bowling] admits that the camera is not ideal, so a little post-processing is necessary to flesh out a quality picture, but you work with what you have.
Continue reading “Budget Astrophotography With A Raspberry Pi”

FlowCode Graphical Programming

If you’ve ever been curious if there’s a way to program microcontrollers without actually writing software, you might be interested in FlowCode. It isn’t a free product, but there is a free demo available. [Web learning] did a demo of programming a Nucleo board using the system. You can check it out below.

The product looks slick and it supports a dizzying number of processors ranging from AVR (yes, it will do Arduino), PIC, and ARM targets. However, the pricing can add up if you actually want to target all of those processors as you wind up paying for the CPU as well as components. For example, the non-commercial starter pack costs about $75 and supports a few popular processors and components like LEDs, PWM, rotary encoders, and so on.

Continue reading “FlowCode Graphical Programming”

New Part Day: Very Cheap LIDAR

Self-driving cars are, apparently, the next big thing. This thought is predicated on advancements in machine vision and cheaper, better sensors. For the machine vision part of the equation, Nvidia, Intel, and Google are putting out some interesting bits of hardware. The sensors, though? We’re going to need LIDAR, better distance sensors, more capable CAN bus dongles, and the equipment to tie it all together.

This is the cheapest LIDAR we’ve ever seen. The RPLIDAR is a new product from Seeed Studios, and it’s an affordable LIDAR for everyone. $400 USD gets you one module, and bizarrely $358 USD gets you two modules. Don’t ask questions — this price point was unheard of a mere five years ago.

Basically, this LIDAR unit is a spinning module connected to a motor via a belt. A laser range finder is hidden in the spinny bits and connected to a UART and USB interface through a slip ring. Mount this LIDAR unit on a robot, apply power, and the spinny bit does its thing at about 400-500 RPM. The tata that comes out includes distance (in millimeters), bearing (in units of degrees), quality of the measurement, and a start flag once every time the head makes a revolution. If you’ve never converted polar to cartesian coordinates, this is a great place to start.

Although self-driving cars and selfie drones are the future, this part is probably unsuitable for any project with sufficient mass or velocity. The scanning range of this LIDAR is only about 6 meters and insufficient for retrofitting a Toyota Camry with artificial intelligence. That said, this is a cheap LIDAR that opens the door to a lot of experimentation ranging from small robots to recreating that one Radiohead video.

Half Baked IoT Stove Could Be Used As A Remote Controlled Arson Device

[Pen Test Partners] have found some really scary vulnerabilities in AGA range cookers. They are connected by SMS by which a mobile app sends an unauthenticated SMS to the AGA to give it commands for instance preheat the oven, You can also just tell your AGA to turn everything on at once.

The problem is with the web interface; it allows an attacker to check if a user’s cell phone is already registered, allowing for a slow but effective enumeration attack. Once the attacker finds a registered device, all they need to do is send an SMS, as messages are not authenticated by the cooker, neither is the SIM card set up to send the messages validated when registered.

This is quite disturbing, What if someone left a tea towel on the hob or some other flammable material before leaving for work, only to come back to a pile of ashes?  This is a six-gazillion BTU stove and oven, after all. It just seems the more connected we are in this digital age the more we end up vulnerable to attacks, companies seem too busy trying to push their products out the door to do simple security checks.

Before disclosing the vulnerability, [Pen Test Partners] tried to contact AGA through Twitter and ended up being blocked. They phoned around trying to get in contact with someone who even knew what IoT or security meant. This took some time but finally they managed to get through to someone from the technical support. Hopefully AGA will roll out some updates soon. The company’s reluctance to do something about this security issue does highlight how sometimes disclosure may not be enough.

[Via Pen Test Partners]

Hackaday Prize Entry: DIY ARM Scientific Calculator

What does a hacker do when he or she wants something but can’t afford it? They hack one together, of course. Or, in the case of [Ramón Calvo], they thoughtfully plan and prototype. [Ramón Calvo] wanted a scientific calculator, but couldn’t afford one, so he designed and built one himself.

[Ramón] started off with Arduino but upgraded initially to Freescale’s Freedom KL25Z development board upgraded to an ARM Cortex-M0+ programmed using mbed. The display is an Electronic Assembly DOGL-128 128×64 pixel LCD. [Ramón] did a couple of iterations on the PCB, going from a large DIY one in order for the Arduino version to work, to the current, smaller version for the ARM chip with hand soldered SMD components. After that, [Ramón] looked into the algorithms needed to parse mathematical input. He settled on the shunting-yard algorithm, which converts the input into Reverse Polish Notation (RPN), which is easier for the software to work with.

[Ramón] has a ton of features working, including your standard add, subtract, multiply and divide operations, square root, nth root and exponentiation, trigonometry, log and log10, and factorial(!) There are a few things still on the to-do list, such as low power and a graphing mode, and there are a couple of bugs still in the system, but the overall system is up and running. [Ramón] has put up the schematic and KiCAD files up on his Hackaday.io project page along with the bill of materials.

We’ve had a few Hackaday prize entries in the form of calculators, such as this one with Nixie tubes and this one that emulates 70’s HP calculators.

Pi Network Attenuators: Impedance Matching For The Strong Of Signal

If you catch a grizzled old radio amateur propping up the bar in the small hours, you will probably receive the gravelly-voiced Wisdom of the Ancients on impedance matching, antenna tuners, and LC networks. Impedance at RF, you will learn, is a Dark Art, for which you need a lifetime of experience to master. And presumably a taste for bourbon and branch water, to preserve the noir aesthetic.

It’s not strictly true, of course, but it is the case that impedance matching at RF with an LC network can be something of a pain. You will calculate and simulate, but you will always find a host of other environmental factors getting in the way when it comes down to achieving a match. Much tweaking of values ensues, and probably a bit of estimating just how bad a particular voltage standing wave ratio (VSWR) can be for your circuit.

Continue reading “Pi Network Attenuators: Impedance Matching For The Strong Of Signal”

Giant Solderless LEGO NES Controller Gives Everyone Tiny Hands

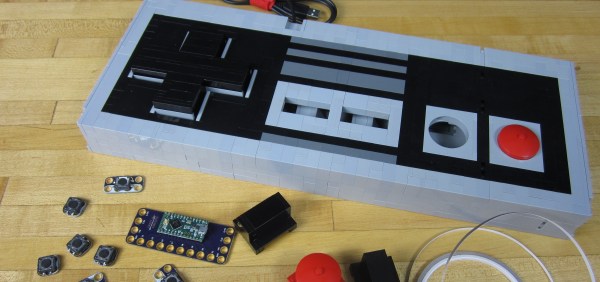
If you were thinking “I should spend $130 on LEGO bricks and build a giant USB NES controller just to see what that would be like,” but you were afraid of spending that much money, [BrownDogGadgets] has you covered. He built a giant NES controller out of LEGO. The controller is designed in LEGO Digital Designer, which lets you create a virtual model, then get a full list of parts which can be ordered online.

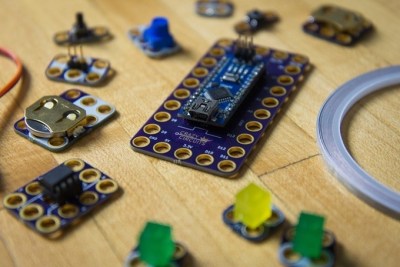
The electronics are based on a Teensy LC programmed to appear as a USB keyboard, and the buttons are standard push buttons. The insides are wired together with nylon conductive tape. LEGO was an appropriate choice because the Teensy and switches are built on top of LEGO compatible PCBs, so components are just snapped in place. The system is called Crazy Circuits and is a pretty neat way to turn electronics into a universal and reusable system.

If that controller is too big, they’ve also used the same circuit with some laser cut parts for your own controller. If you do want to go even bigger, take a look at [Baron von Brunk’s] LEGO NES controller, which used the electronics from a real controller.

Continue reading “Giant Solderless LEGO NES Controller Gives Everyone Tiny Hands”