When the Monoprice MP Select Mini 3D printer was released last year, it was a game changer. This was a printer for $200, yes, but it also held a not-so-obvious secret: a 3D printer controller board no one had ever seen before powered by a 32-bit ARM microcontroller with an ESP8266 handling the UI. This is a game-changing set of electronics in the world of 3D printing, and now, finally, someone is reverse engineering it.
[Robin] began the reverse engineering by attaching the lead of an oscilloscope to the serial line between the main controller and display controller. The baud rate is weird (500 kHz), but apart from that, the commands readily appear in human-parsable text. There is a web server built into the MP Mini printer, and after inspecting the web page that’s served up from this printer, [Robin] found it was possible to send G-code directly from the controller board, get a list of files on the SD card, and do everything you would want to do with a 3D printer.
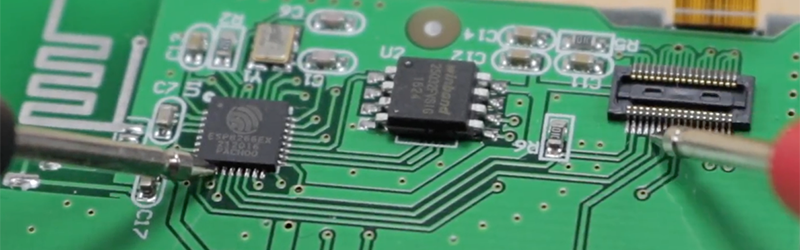
After deconstructing the circuit on the display board, [Robin] found exactly what you would expect from such a simple board: an SPI display driven by an ESP, and a big flash chip sitting off to the side. [Robin] found the the model of the display, and quickly built a project on Platform.io to draw text to the LCD. This isn’t the end of the project – there’s still a lot that must be done before this printer is squirting out parts with custom firmware.
While this isn’t a hack of the driver board inside the MP Mini, that’s not really a problem. The motor driver board in this printer doesn’t really need any changes, and was already ahead of its time when this printer was released last year. As with most things, the UI is the weak point, and upgrading the firmware and built-in web server for this printer is the best way forward.
[Robin] put together a truly phenomenal video of how he reverse engineered this display controller. You can check that out below.


Very cool.
Great work.
Thank you.
I wish I had more time to look into the 3D printer.
I was looking at getting another little printer for my son to play with.
But sadly I never got around to it.
To many other things to do.
But my son is smart. (little Bast#$%d.) hacked and set up the printer so he can do everything from his room.
But now we are yelling back and forth when he starts printing.
My Printer is in a case and on wheels. My thought was when ever anyone wanted to use the printer it was to be wheeled over there there area or room.
But back to you.
The video you did was very good. Wait. I think all the videos you have put together are not to bad.
Mind you one day I should watch your channel.
Thanks again for all your work.
Keep it up…….
Thanks!
Well I fully understand your son wanting to print 24/7
So do I :)
“But now we are yelling back and forth when he starts printing.” Walkie talkies?
http://hackaday.com/2016/09/07/raspberry-pi-walkie-talkie-mumbles-to-friends/
Glad to see someone finally doing this. I’ll be following this project with great interest. I purchased an MP based on Brian’s review last year and have done a handful of mods but stopped midway through the glass bed upgrade a few months back due to a busy schedule. Maybe this project will give me the motivation to complete my own to-do list of things for and from this printer. Two thumbs up!
Actually Brian also motivated me to purchase this as my very first 3D printer.
And boy am I glad to have this. Such an incredible value for $200..
Well the reverse engineering was just the first step to a new firmware.
But I have a couple of really nice features planned.
So stay tuned :)
The closed-source firmware is what made me not buy a MP printer. It’s probably its best asset, but most other “generic” Prusa clone printers can most likely made better using open source firmware, possibly with a custom controller board. It’s just a matter of time before it happens… There’s lots of super cheap 3D printers around nowadays (Tevo Tarantula, Anet A8, etc) but I don’t really have the time to invest, and I’d rather be printing ABS (works better with printers out of my price range) than PLA, mainly to smooth out parts with acetone vapors.. Oh well.
I started with ABS for the same reasons as you but i was frustrated with the warping issues and bed adhesion, then I found DMC which is a very good solvent of PLA, now everything i do is in PLA :-)
DMC = dichloromethane methylene chloride
Easily one of the best engineering video’s I’ve watched on youtube in a while (and the usual quality is quite high!). I love how he helps you see the logic as he goes. No big jumps, but technical enough that I don’t snooze.
One dumb question though, the IDE he’s using looks lovely. I love the “scrolling” on the right hand side. Is that a standard feature in IDE’s these days? Is there a windows version? ;)
Hey Dafydd,
I really appreciate your nice comment on my video!
As far as platformio goes. Yes, you can get 100% of that on windows.
I made a video about how to setup that tool just like you saw it on my video.
Just scroll through my channel and you’ll find that.
Cheers,
Robin
The text editor is Sublime Text. They do make a windows version.
Not it probably isn’t…. its the Atom Text editor assuming he is using stock PlatformIO and there really isn’t any reason not to do so….
You can integrate platformio with Sublime Text but it’s a 3rd party plugin…
It is Atom with PlatformIO.
Here’s my video about how to set that up: https://www.youtube.com/watch?v=EIkGTwLOD7o
The “preview-scrollbar” must be an extension for Atom – but I could not find it ;(
It’s not yet a standard feature, I know only KDE’s kate and kdevelop that have a similar bar. But definitely an idea that will spread.
Notepad++ does it, at least my installation does. I can’t remember if I installed a plugin for it or not :)
It does not by default
Hm, I don’t see a plugin in the manager, but I do see a checkbox by “document map” in the “view” menu.
It is a package called “minimap”.
Thank You!
I have one of these little guys. It’s a relatively durable first printer, but the heater FETs tend to blow, sometimes in a short. Until you put a RAMPS board in or hack the firmware like this (you eventually will), don’t print unattended.
Currently I’m running ABS through it with about a 1 in 5 success rate with known working designs. RAMPS saved the little thing, but it’s not perfect and probably never will be.
Forgot to mention, the reason I say you shouldn’t print unattended without replacing or modifying the stock setup…
This printer doesn’t come with any kind of thermal shutdown or alarm, it will happily run amok if the heater FET shorts, and not shut down.
Correct. This is because it has no hardware monitor of the current going to the heating elements. If the board is powered on, the ‘FETs see voltage and the STM is what controls the PWM PID control. Without redesigning the board, there is no pragmatic fix at the moment.
You could make a thermal shutoff flip a relay or breaker open if you wish…
To the ‘OP’:
Depending on your approach, feel free to check out my past work here when it comes to the control board.:
https://hackaday.io/project/12696
I know that project. You’ve truly done an amazing job there!
I’ll follow that
Just a nitpick but in the picture somebody is using regular size DMM probes on fine pitch components. That isn’t going to work for obvious reasons.
I only have these probes for my multimeter.
It’s not perfect, I fully agree. But if you pay attention to not touch multiple pins at once it’s alright to do at least some continuity testing while everything is powered off.
Probemaster.com
You’ll never want any others again after you buy their’s.
Works fine when I do it. Maybe it’s your technique.
perhaps the odd baud rate was selected to pass EMI testing and certification
I would not think so, with the motors being a much higher source of EMI.
What is more plausible is that you can easily get 500k from crystals with frequencies that are multiples of 1MHz, which are cheaper.
No further work seems to have taken place since. Wifi is almost useless.
My V2 has a different display and UI PCB with two SPI-to-parallel ICs and a fast bus speed I am not equipped to capture (I guess it’s 80 MHz).
V1 UI boards: https://www.mpselectmini.com/parts/ui_controller_board
V2 UI board: https://gigdigit.com/ui-controller-board-with-display-mp-select-mini-v2/
The STM32F070C8T6 on the “motion” board (“M2-V3.0-170721”) is code protected.
Sorry, it has to be STM32F070CBT6 (B, not 8).
It seems that we are close to an open motion board firmware (Marlin):
https://hackaday.io/project/158263-monoprice-mini-marlin-20-support