Long Range Wireless Internet

While most of you reading this have broadband in your home, there are still vast areas with little access to the Internet. Ham radio operator [emmynet] found himself in just such a situation recently, and needed to get a wireless connection over 1 km from his home. WiFi wouldn’t get the job done, so he turned to a 433 MHz serial link instead. (Alternate link)

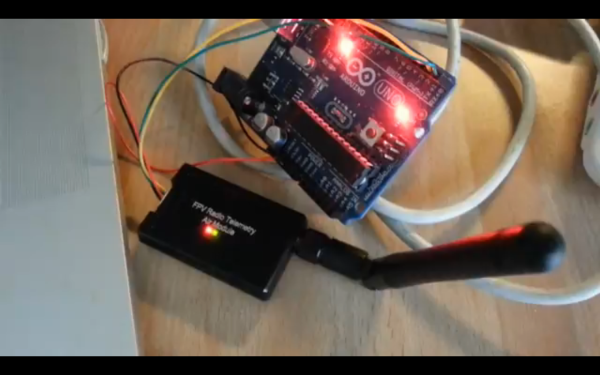
[emmynet] used an inexpensive telemetry kit that operates in a frequency that travels long distances much more easily than WiFi can travel. The key here isn’t in the hardware, however, but in the software. He went old-school, implemending peer-to-peer TCP/IP connection using SLIP — serial line Internet protocol. All of the commands to set up the link are available on his project page. With higher gain antennas than came with the telemetry kit, a range much greater than 1 km could be achieved as well.

[Editor’s note: This is how we all got Internet, over phone lines, back in the early Nineties. Also, you kids get off my lawn! But also, seriously, SLIP is a good tool to have in your toolbox, especially for low-power devices where WiFi would burn up your batteries.]

While it didn’t suit [emmynet]’s needs, it is possible to achieve extremely long range with WiFi itself. However this generally requires directional antennas with very high gain and might not be as reliable as a lower-frequency connection. On the other hand, a WiFi link will (in theory) get a greater throughput, so it all depends on what your needs are. Also, be aware that using these frequencies outside of their intended use might require an amateur radio license.

Continue reading “Long Range Wireless Internet”

Kill The Exhaust, Not Your Lungs With The Fume Coffin

As if slinging around 40 watts of potentially tattoo-removing or retina-singeing laser beams wasn’t anxiety-inducing enough, now comes a new, scary acronym – LCAGs, or “laser-generated airborne contaminants.” With something that scary floating around your shop, it might be a good idea to build a souped-up laser cutter exhaust fan to save your lungs.

We jest, but taking care of yourself is the responsible way to have a long and fruitful hacking career, and while [patternmusic]’s “Fume Coffin” might seem like overkill, can you go too far to protect your lungs? Plywood and acrylic, the most common materials that come across a laser cutter’s bed, both release quite a witch’s brew of toxins when vaporized by a laser beam. The Fume Coffin clears the air in your shop by venting it to the outdoors after giving it a good scrubbing through an activated charcoal pre-filter and a HEPA polishing element. Both filters are commercially available so replacements won’t be an issue, and the entire thing is housed in a wooden box that gives the device its name.

Since it’s ejecting 200 cubic feet per minute, you’ll have to provide at least that much make-up air, but other than that the Fume Coffin should be a welcome addition to the shop. We’ve seen a few other attempts to handle LCAGs effectively before, including a DIY charcoal and automotive air filter design.

Writing A New Game For The Game Boy Color

If you’re bored with the Game Boy Color’s offerings, it’s understandable: it’s been around for nearly 20 years, and doesn’t get a lot of new releases these days. [Antonio Niño Díaz] spent over a year coding a game for the GBC: µCity, a Sims City style game. He designed the graphics and even wrote his own music.

[Antonio] did all the programming in Assembly Language, creating modules for managing traffic and the power grid, building creation and destruction, as well as disaster simulations. He has extensive notes in his GitHub page detailing each module and describing how it all works together. He’s given it a GPLv3+ license, so hack away.

The ROM works on emulators, but [Antonio] has verified it works on the original hardware; it just reduces the number of saved cities to accommodate the handheld’s lesser stats.

Hackaday loves our GBC: we’ve written up DIY coprocessors for the GBC, adding an audio amp, and even making a solar-powered Game Boy.

Continue reading “Writing A New Game For The Game Boy Color”

Reverse Engineering The Monoprice Printer

When the Monoprice MP Select Mini 3D printer was released last year, it was a game changer. This was a printer for $200, yes, but it also held a not-so-obvious secret: a 3D printer controller board no one had ever seen before powered by a 32-bit ARM microcontroller with an ESP8266 handling the UI. This is a game-changing set of electronics in the world of 3D printing, and now, finally, someone is reverse engineering it.

[Robin] began the reverse engineering by attaching the lead of an oscilloscope to the serial line between the main controller and display controller. The baud rate is weird (500 kHz), but apart from that, the commands readily appear in human-parsable text. There is a web server built into the MP Mini printer, and after inspecting the web page that’s served up from this printer, [Robin] found it was possible to send G-code directly from the controller board, get a list of files on the SD card, and do everything you would want to do with a 3D printer.

After deconstructing the circuit on the display board, [Robin] found exactly what you would expect from such a simple board: an SPI display driven by an ESP, and a big flash chip sitting off to the side. [Robin] found the the model of the display, and quickly built a project on Platform.io to draw text to the LCD. This isn’t the end of the project – there’s still a lot that must be done before this printer is squirting out parts with custom firmware.

While this isn’t a hack of the driver board inside the MP Mini, that’s not really a problem. The motor driver board in this printer doesn’t really need any changes, and was already ahead of its time when this printer was released last year. As with most things, the UI is the weak point, and upgrading the firmware and built-in web server for this printer is the best way forward.

[Robin] put together a truly phenomenal video of how he reverse engineered this display controller. You can check that out below.

Continue reading “Reverse Engineering The Monoprice Printer”

Hackaday Prize Entry: 3D Printed Linear Actuator Does 2kg+

The rabbit hole of features and clever hacks in [chiprobot]’s NEMA17 3D Printed Linear Actuator is pretty deep. Not only can it lift 2kg+ of mass easily, it is mostly 3D printed, and uses commonplace hardware like a NEMA 17 stepper motor and a RAMPS board for motion control.

The main 3D printed leadscrew uses a plug-and-socket design so that the assembly can be extended easily to any length desired without needing to print the leadscrew as a single piece. The tip of the actuator even integrates a force sensor made from conductive foam, which changes resistance as it is compressed, allowing the actuator some degree of feedback. The force sensor is made from a 3M foam earplug which has been saturated with a conductive ink. [chiprobot] doesn’t go into many details about his specific method, but using conductive foam as a force sensor is a fairly well-known and effective hack. To top it all off, [chiprobot] added a web GUI served over WiFi with an ESP32. Watch the whole thing in action in the video embedded below.

Continue reading “Hackaday Prize Entry: 3D Printed Linear Actuator Does 2kg+”

MRIs: Why Are They So Loud?

My dad was scheduled for his first MRI scan the other day, and as the designated family technical expert, Pop had plenty of questions for me about what to expect. I told him everything I knew about the process, having had a few myself, but after the exam he asked the first question that everyone seems to ask: “Why is that thing so damn loud?”

Sadly, I didn’t have an answer for him. I’ve asked the same question myself after my MRIs, hoping for a tech with a little more time and lot more interest in the technology he or she uses to answer me with more than the “it’s the machine that makes the noise” brush-off. Well, duh.

MRI is one of those technologies that I don’t feel I have a firm enough grasp on, and it seems like something I should really be better versed in. So I decided to delve into the innards of these modern medical marvels to see if I can answer this basic question, plus see if I can address a few more complicated questions.

Continue reading “MRIs: Why Are They So Loud?”

Testing The Outernet Dreamcatcher SDR

What do you get when you cross an ARM-based Linux PC and an RTL-SDR? Sounds like the start of a joke, but the answer is Outernet’s Dreamcatcher. It is a single PCB with an RTL-SDR software defined radio, an L-band LNA, and an Allwinner A13 processor with 512MB of RAM and a 1 GHz clock speed. The rtl-sdr site recently posted a good review of the $99 board.

We’ll let you read the review for yourself, but the conclusion was that despite some bugs, the board was no more expensive than pulling the parts together separately. On the other hand, if you uses, for example, a Raspberry Pi 3, you might expect more support and more performance.

Despite the L-band hardware, there is a bypass antenna jack that allows you to receive other frequencies. There’s also two SD slots, one to boot from and another for storage. Several pieces of software had trouble running on the somewhat sluggish CPU, although some software that is optimized for the particular processor used fared better. You can read the details in the review.

The board is interesting, although unless you have a special packaging problem, you are probably as well off to combine a Pi and a dongle, as we have seen so many times before. If you have more horsepower you can even make the Pi transmit, although we’d suggest some filtering if you were going to do that for real.