The phrase “They don’t make them like they used to” is perhaps best exemplified by two types of products: cars and consumer electronics. Sure, the vehicles and gadgets we have now are so advanced that they may as well be classified as science-fiction when compared to their predecessors, but what about that style. Our modern hardware can rarely hold a candle to the kind of gear you used to be able to buy out of the “Sears, Roebuck and Company” catalog.
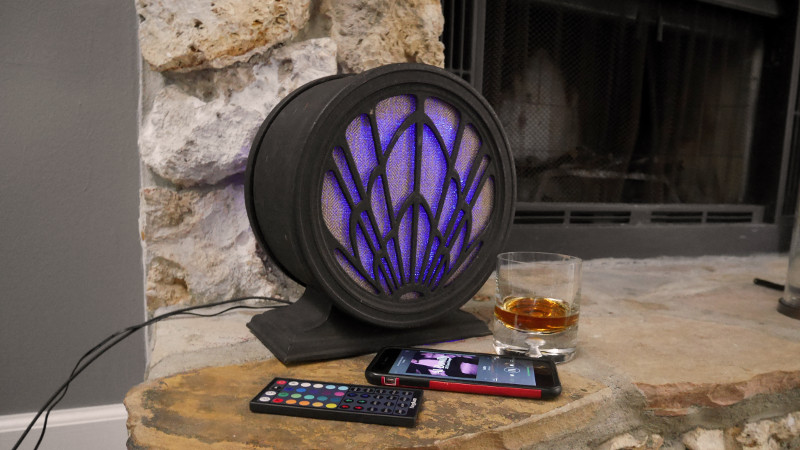
So when [Democracity] came into possession of a wickedly retro art deco speaker, it’s no surprise he saw it as a perfect opportunity to bring some of that old school style into the 21st century by rebuilding it with an Amazon Echo Dot at its core. The fact that the original device was a speaker and not a full radio made the conversion much easier, and will have everyone trolling yard sales for months trying to find a donor speaker to build their own.
To start the process, [Democracity] popped the panels off and ripped out what was left of the speaker’s paper cone and coil. In a stroke of luck, the opening where the driver used to go was nearly the perfect size to nestle in the Echo Dot. With a 3D printed cradle he found on Thingiverse and a liberal application of epoxy, the Dot could get snapped into the speaker like it was always meant to be there.
[Democracity] then picked up some absolutely gorgeous speaker cloth on eBay and hot glued it to the inside of the panels. What was presumably the volume knob was pulled out of the bottom and turned out to be a perfect place to run the Dot’s USB cable out of.
A lesser man would have called this project completed, but [Democracity] knows that no hack is truly complete without the addition of multicolored blinking LEDs. With the RGB LED strips installed inside, the light is diffused through the cloth panels and creates a pleasing subtle effect. You can almost imagine a couple of vacuum tubes glowing away inside there. Judging by the final product, it’s no surprise [Democracity] has a fair bit of experience dragging audio equipment kicking and screaming into the modern era.
This isn’t the first time we’ve seen an old piece of audio equipment get a high-tech transfusion, and isn’t even the first time we’ve seen the Dot used to do it. But it’s certainly the one we’d most like to see sitting on our shelf.


If I shift some mental gears around until it’s an artistic commentary through a synthesis of elements of Brave New World and 1984, I like it….
… otherwise, meh.
If he had /restored/ the speaker, and used it for its intended purpose, rather than gutting it and substituting modern crapware, I would be impressed.
Alas.
A hack this may be, but not one I’ll enjoy.
Maybe be he was drinking way too much of the scotch he has in all his pictures on Etsy ;-)
If it was a speaker rather than an echo I would also see more value in it – but I still haven’t seen the value in an echo anyway. But if that was your thing it certainly looks a lot more pleasing.
Perhaps I should have made it more clear in the writeup, but the Echo Dot doubles as a standard Bluetooth speaker in addition to it’s voice assistant functions.
This is my PC case. It’s a 1939 Philco radio cabinet. When I found it, it had been completely gutted, so I used a pair of brass mailbox doors I found in an antique shop to fill in the big hole where the radio face once was. I made a nixie tube clock to go in the windows from spare parts leftover from a Sony Sobax ICC-600W repair and restoration. I don’t have the parts yet, but I wanna make a dekatron spinner that responds to drive activity.
http://richfiles.solarbotics.net/eb/PhilcoNixie.jpg
That’s a beautiful old case – definitely worth restoring to its original art deco glory. Pity the original radio is gone. Have you thought of building a new radio (tube, of course – transistors aren’t good enough for that baby!) to replace the lost one? Numerous kits exist online.
Call me a little weird, but I kinda like the “well worn” look. Makes it look well loved. I did use a little stain to touch up some spots where the veneer was chipped and gone. I kept a number of pieces of veneer that had come loose and reattached them. Honestly though, other than that, it’s not really been touched up any further. Some of the wood was in pretty bad shape, and it was far too tall for my needs anyway, so I carefully measured and cut those damaged parts out and reassembled the case into a much shorter version. The speaker section (where the damage was) is just under half it’s original height. About one foot (30 cm) was removed, or about the same height as a 33-1/3 RPM vinyl record sleeve. The remaining section is about 10 inches (25 cm) tall. We’re talking massive strips of the veneer simply gone, heavily gouged speaker grill wood, entirely missing posts from the grill. Cutting it down both gave me an enclosure more suited to my size requirements, as well as allowed me to reuse parts of the speaker grill posts that were not as damaged, to fill in for the missing ones. I cut the removed portions down to the same length as the remaining portion, and filled in those gaps. I had the case for about 5 years, before actually deciding to do anything with it. Even gutted, I fell in love with it. I’ve occasionally wondered how to improve the bottom most section. You can see it’s had some “love”. I don’t mind it, but it’s obviously more worn than the upper section and it’d be nice to do something to improve it, without outright wrecking the “lovingly worn” look either. Not really sure what to do with it, so I just haven’t touched it.
I imagine a few people are “reeeeeee”-ing right now, from hearing I cut into that beautiful case. Like I said though, the bottom half was far worse off than the top half, and it now lives on as an item that sees daily use.
I can’t really say I’ve considered rebuilding the radio. I have a Zenith Cobramatic with a tube amp, a stereo satellite speaker, and a built in radio. I don’t use it at the moment, cause it’s in need of a re-cap and it probably needs at least one new tube, maybe. I’m satisfied with working on that restoration project if I’m inclined to listen to tunes on tubes. Last time I tested it, I was getting some hum, and one channel is dead… I’ve not had time to touch it since I got it… Of course the price was right. I was simply asked if I wanted it, and I got to haul it off for zip! :D
That’s one restoration that’ll be faithful to it’s intended purpose. I’ll probably add an audio input to it though.
Well done then! Restorations do take time and a careful evaluation to see what can be restored and what cannot. Glad you kept as much of the good parts as you could. The end result looks great! The hum in your Cobramatic could be caused by many things but is most likely coming from the main filter caps. That’s what went bad in my great-grandfather’s Hammarlund in the 1970s when I last turned it on. I had to leave it in storage while I carried on my career. Now retired, I just got a custom-made cap assembly for it so I can finally proceed with my restoration project. Shudder the thought, but due to the dearth of good music-playing AM stations nowadays I will have to add an audio input as well so I can play Jazz Era tunes from an iPod.
Yeah, among the things missing, were the entirety of the panel that the speaker and speaker cloth would have been mounted too. I rather like vintage electronics, and have a pair of old electronic organs (a Conn theater organ and a Gulbransen Paragon that uses hybrid modules, somewhat short lived technology from the late 60s). I’ve had other organs, and yes, I’ve taken a few apart. I had one old organ that was not working at all and was rather bland, so I took it apart to use it’s very beautifully constructed electronics chassis and numerous rows and columns of tubes as a display piece. It was more beautiful exposed than hidden away in that plain old wooden enclosure. I used the speaker cloth from it, and an appropriately sized piece of plywood to make a replacement panel.
Bonus feature, I hid the air intakes on either side of the new panel (the panel is recessed slightly, leaving a gap on both sides. Those gaps form a chamber around the curved sides and lead into a filter box on either side, where a pair of 10×10 inch (25×25 cm) pleated filters do their best at keeping dust out of the computer’s interior. The whole thing has 15 fans inside it, 8 to pull air in through the filters, three unrestricted exhaust fans, a pair of CPU cooler fans, and a pair of circulating fans to prevent hotspots from forming at the top of the case, where the hard drives are located (it mounts eight 3.5 inch drives, and has SSD mounts closer to the motherboard). The PSU exhausts out the bottom of the case, which opens to the rear, and also serves as a 16th fan, pulling heat off the GPU slot.
I built a custom fan controller to drive all those many, many fans, but takes it’s speed regulation from the motherboard fan headers. It also relays the fan speed back to the motherboard from one fan from each of four separate fan driver banks, and passes the fan speed sensor to another connection that will go to an as of yet unbuilt fault monitor. It’ll have a master alarm indicator, and if you open one of the brass doors, there will be a collection of neon lamps to indicate the exact fan that failed. Working fans should be lit solid, when a switch detects the brass door has been opened, and any faulty fan’s indicator will flash. I’m actually considering making a sort of wire frame “model” of the enclosure, with the neon lamps suspended in the physical location in the case model reflecting where the real fan would be located. I’ve already built the Seconds portion of the nixie tube clock (I built the original nixie tube clock initially with an expansion port to allow that exact upgrade), but the drive activity spinner, and the fault monitor have yet to be built. Every single indicator on this thing, from the power light to the sleep and hard drive activity… and of course the nixie clock… are all neon indicators! Not one stinkin’ RGB LED to be seen anywhere! XD
Although I applaud the effort, I’m inclined to agree with the restorers who have commented. I would have probably sand-blasted the case, repainted it gloss black and re-coned the old speaker so it would fit into an Agatha Christie whodunit set. My 1939 Hammarlund HQ-120 radio desperately needs a speaker like that.
If restoring the original speaker with a new paper cone could be difficult, and looks to me that that speaker is a moving iron type, one of the earliest design, that was abandoned in respect to the current moving coil design due the high harmonic distortion and unreliability. Probably it was also an high impedance winding so it doesn’t work with transistor amplifiers. But looks to me that the eight holes mounting is the same of current car audio speakers. So using a double cone car audio speaker and a bluetooth receiver amplifier could have been a more interesting an higher fidelity solution.
He disguised the Amazon bug in the old speaker cabinet to make a covert listening device. This “smart speakers” have to be changed in a way, that all voice processing and recognition is done locally and only processed requests should be sent out, at best with blinking a big red lamp or only after a confirmation. Of course that would be less comfortable, but I don’t want a listening bug in my living room.
That would be a cool hack! updating the software so it would only call a computer you own, with the software you own.
Yes
huh ????