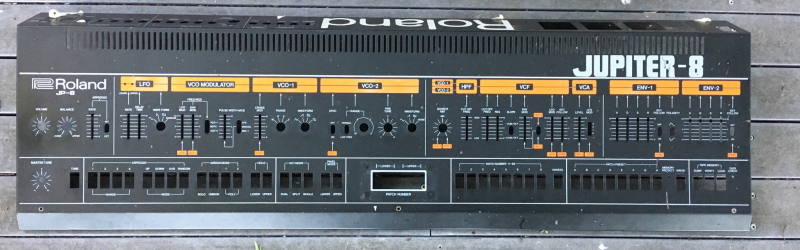
Every restoration project involves various levels of grit, determination, gumption and doggedness. But [Darren Glen]’s restoration of a Jupiter-8 is an absolute labor of love. The Jupiter-8, launched by Roland in 1981, was their flagship “polyphonic analog subtractive” synthesizer and was used by many legendary acts of the ’80’s. The synthesizer was rugged — built to withstand the rigors of travelling everywhere that the bands took it. More importantly, it could produce a wide range of sounds that came from dedicated and independent controllers. These, plus a host of other desirable features, makes the synth highly coveted even today and the rare ones that surface for sale can be quite expensive.
The back story of how he came in possession of this coveted, albeit non-functioning, piece of history is a good read. But the part that makes us all interested is the meticulous restoration that he is carrying out. There is a lot of useful information that he shares which could be handy if you are planning any restoration project of your own.
When he first turned it on, all he got was an “8” on the display — which seemed like an error code. From then onward, he has been carefully stripping away each part and slowly bringing it back to life. All of the linear slide potentiometers and slide switches were de-soldered, dis-assembled, cleaned of rust and the carbon tracks and contacts cleaned with special spray — making them almost as good as new. The transformer and its mounting brackets received a similar treatment of rust cleaning and fresh paint. All of the other internal metal parts, such as the chassis, were restored in a similar fashion.
White plastic buttons and knobs which were faded, were brightened up by spraying them with a generous dose of hydrogen peroxide hair spray, putting them in Ziploc bags and letting them bake in sunlight for a day. [Darren] was satisfied enough with this process and gave the same treatment to all the other colored buttons too, with good results. The other set of plastic parts – the keyboard keys, were cleaned and polished with a scratch and blemish polish cream, and replacements were ordered out from a specialist supplier for the few that were damaged beyond repair.
But by far the greatest challenge for [Darren] has been resurrecting the top metal cover. It was badly rusted and had to be completely stripped of all paint. Repainting it the right shade was relatively easy, but applying the legend and decals took him to every screen printer in town, none of whom could manage the job. He lucked out by locating a screen printer who specialized in custom automotive work and managed to do a pretty good job with the decal work.
The Z80 microprocessor had lost all its magic smoke, so [Darren] has ordered an original Zilog replacement which will hopefully clear the error he noticed when it was first turned on. He’s slowly working his way through all the issues, and it is still work in progress, but we look forward to when it’s all done and dusted. A fully functional, restored Roland Jupiter-8 — one of the first 500 that were built back in 1981 — resurrected with a lot of TLC.
A big shout out to [Tim Trzepacz] for bringing this project to our notice.


gimmie
I used to own one of these. Very impressive sound – it’s probably the fattest polysynth ever – but also very temperamental. Keeping it running required too many expensive repairs. In the end I sold it and bought a new Alesis Andromeda.
Worth it. Those Andromeda’s are killer.
Agreed. A friend of mine had a Jupiter and never felt really happy about it. He used the money from selling for buying a second hand Synthex :)
Smashing read, courageous to remove the paint, before been totally sure to get it redone!
What strikes me as odd is that he hardly mentions the electronics of the synth. Personally I would try to get the thing running properly before caring about the cosmetics. If he can´t get it to operate he will have sunk a lot of money and effort for a beautiful but empty shell. But each to his own – it is a labour of love after all.
I thought the same thing. It sounded like he did some basic voltage probing. The same about the keybed being a mess “surprise” later on. Though he alludes to going back later and doing some re-capping and board swapping on the output, All in all it came out great though. I was not really even bothered by the paint in the beginning but seeing how he dismantled and cleaned the faders and ground em shiny again was nice. Fun read and glad he got his baby going again :)
Well, if all else fails, you could probably put a Raspberry Pi inside and emulate the darn thing :P
Well, it could always be used as a prop for an ’80’s style flick.
hi Cree actually i did exactly that…made sure it was up and working before i moved onto the rust…check out the blog post where i say CORA IS ALIVE!! here https://jup8restoration.wordpress.com/2017/10/13/new-z80-cpu-arrives-for-my-jupiter-8-time-to-try/
Hi Cree actually thats exactly what i did….made sure Cora booted up and was working before i moved onto the rust. Check out the blog post about “time to try the Z80” where i say “CORA IS ALIVE!!!” its here https://jup8restoration.wordpress.com/2017/10/13/new-z80-cpu-arrives-for-my-jupiter-8-time-to-try/
thanks everyone for reading about Coras progress and your comments!@ thanks Hackaday for this story!
hi! Darren, great blog so far! When will the next article be out about the powder coating results and then next steps for the silk-screening progress? I’m asking because I also got a Jupiter 8 in relatively poor condition with rust bubbles under the paint, etc, but I couldn’t locate anyone here in the states to agree to do the powder-coat and silksreening other than a shop that does cockpit and military silk-screening – they wanted $4500USD to do the work. The thing is, if I had a dozen Jupiter 8s, it would have been the same price as the vast majority of the cost was in setup. Long story short, I bailed and stuffed the guts back into the beast. So I’m eager to see a cosmetic refurb success story other than CustomSynth Jeff’s (which are phenomenal).
Hi Steve …thanks for the great msg! The next article will be written when the powder coating and decal printing is done ! Its at the workshop now I can’t rush them too much they get smashed at Christmas time. U need two different ppl for the powder coating vs decal. Even Jeff at custom synths farms the jobs off to two different ppl. It’s a massive pain in the ass job but it will be worth it in the end. $4500 usd is rediculous man they are pulling your chain but to give you some idea Jeff will charge around 700-800 pounds to do it. Jeff often chooses a 2pak Car paint job for the panel over powder coating to make it look even more smooth. Just keep doing searches for workshops that do “silk screen printing on metal”. You’ll find someone