There’s a lot of mysticism around coffee roasting, but in the end it couldn’t be simpler. Take a bunch of beans, heat them up evenly, and stop before they get burned. The rest is details.
And the same goes for coffee roasters. The most primitive roasting technique involves stirring the beans in a pan or wok to keep them from scorching on the bottom. This works great, but it doesn’t scale. Industrial drum roasters heat a rotating drum with ridges on the inside like a cement mixer to keep the beans in constant motion while they pass over a gas fire. Fluidized-bed roasters use a strong stream of heated air to whirl the beans around while roasting them evenly. But the bottom line is that a coffee roaster needs to agitate the beans over a controllable heat source so that they roast as evenly as possible.
My DIY coffee roaster gave up the ghost a few days ago and I immediately ordered the essential replacement part, a hot air popcorn popper, to avert a true crisis: no coffee! While I was rebuilding, I thought I’d take some pictures and share what I know about the subject. So if you’re interested in roasting coffee, making a popcorn popper into a roaster, or even just taking an inside look at a thoroughly value-engineered kitchen machine, read on!
Roasting Coffee
A hot-air popcorn popper is, according to the rough definition above, a fluidized-bed (popcorn) roaster. Indeed, with very minor modification to defeat the temperature-limiting thermostat, a stock popcorn popper makes a good home roaster. And once you’ve made this simple modification, described below, the protocol can be very easy: go outside with the roaster and some green beans and turn it on. Add beans until they just stop swirling around in the bottom, and then pull a few out so that they’re swirling slowly again. Sit back, watch, and smell, but above all, listen.
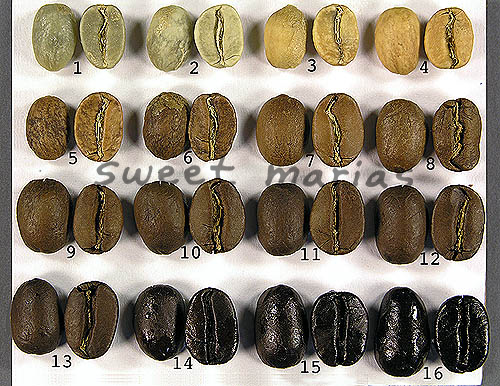 As the beans heat up past the boiling point of water, they’ll start to turn cinnamony-brown and make a sound like popping popcorn, for exactly the same reason: the steam is cracking the beans open. This stage is called “first crack” in roasting jargon, and depending on how many beans you’ve got, this can be loud. The beans will also start throwing off their skin, the chaff, into the air and the steam will start to smell good rather than just beany. You’ll know when you’ve hit first crack. (You’ll also realize why you’re doing this outdoors.)
Afterwards, there’s a quiet spell as the beans continue to heat up and darken in color as they caramelize. At just about the end of the roast, they’ll start to make a significantly quieter snapping noise, called “second crack”. This is the fiber matrix in the beans breaking down, and you’ll see tiny little round chips flying off the beans, and maybe even start to see some smoke. Around here, the beans have a glossy coating from the oil that’s come out to the surface. I tend to stop just at the first sign of second crack, for espresso, but there are those who like it darker. Turn off the popper and throw the beans into a colander to cool down.
Your first home-roasted coffee experiences will be revolutionary, and the minor details of how dark to roast, how quickly, and even what coffees to blend together pale in comparison with the difference that a fresh roast makes. A friend convinced me to try this out around the end of the last century, and I’ve roasted my own beans ever since. Indeed, I roasted with a $3.99 thrift-store machine for a few years before I finally got the urge to take further control and refine the roast.
From Popper to Roaster
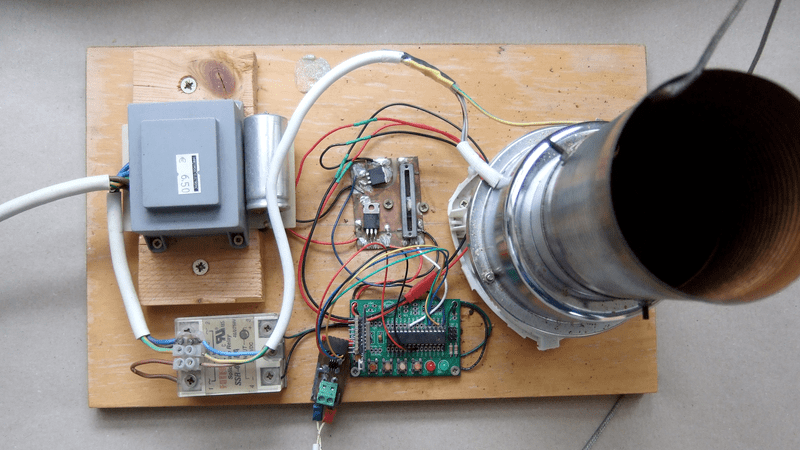
There are only two variables to control with a popcorn popper fluidized bed roaster: agitation and heat input. That means controlling the fan motor and the heater coils, both of which are very amenable to PWM via solid-state relays and beefy MOSFETs, respectively. If you’re going to automate the roast, you’ll also want a temperature probe dipped deep into the swirling mass of beans to use for feedback. As you can see, even going whole-hog isn’t that hard.
The fan motor is a 20-24 V DC motor, and the heater coil is actually two coils run in series that are meant to run off of mains voltage. One of the cleverest bits of value engineering is to use the coils, which are just resistors after all, as a voltage divider before rectifying the AC into DC for the motor.
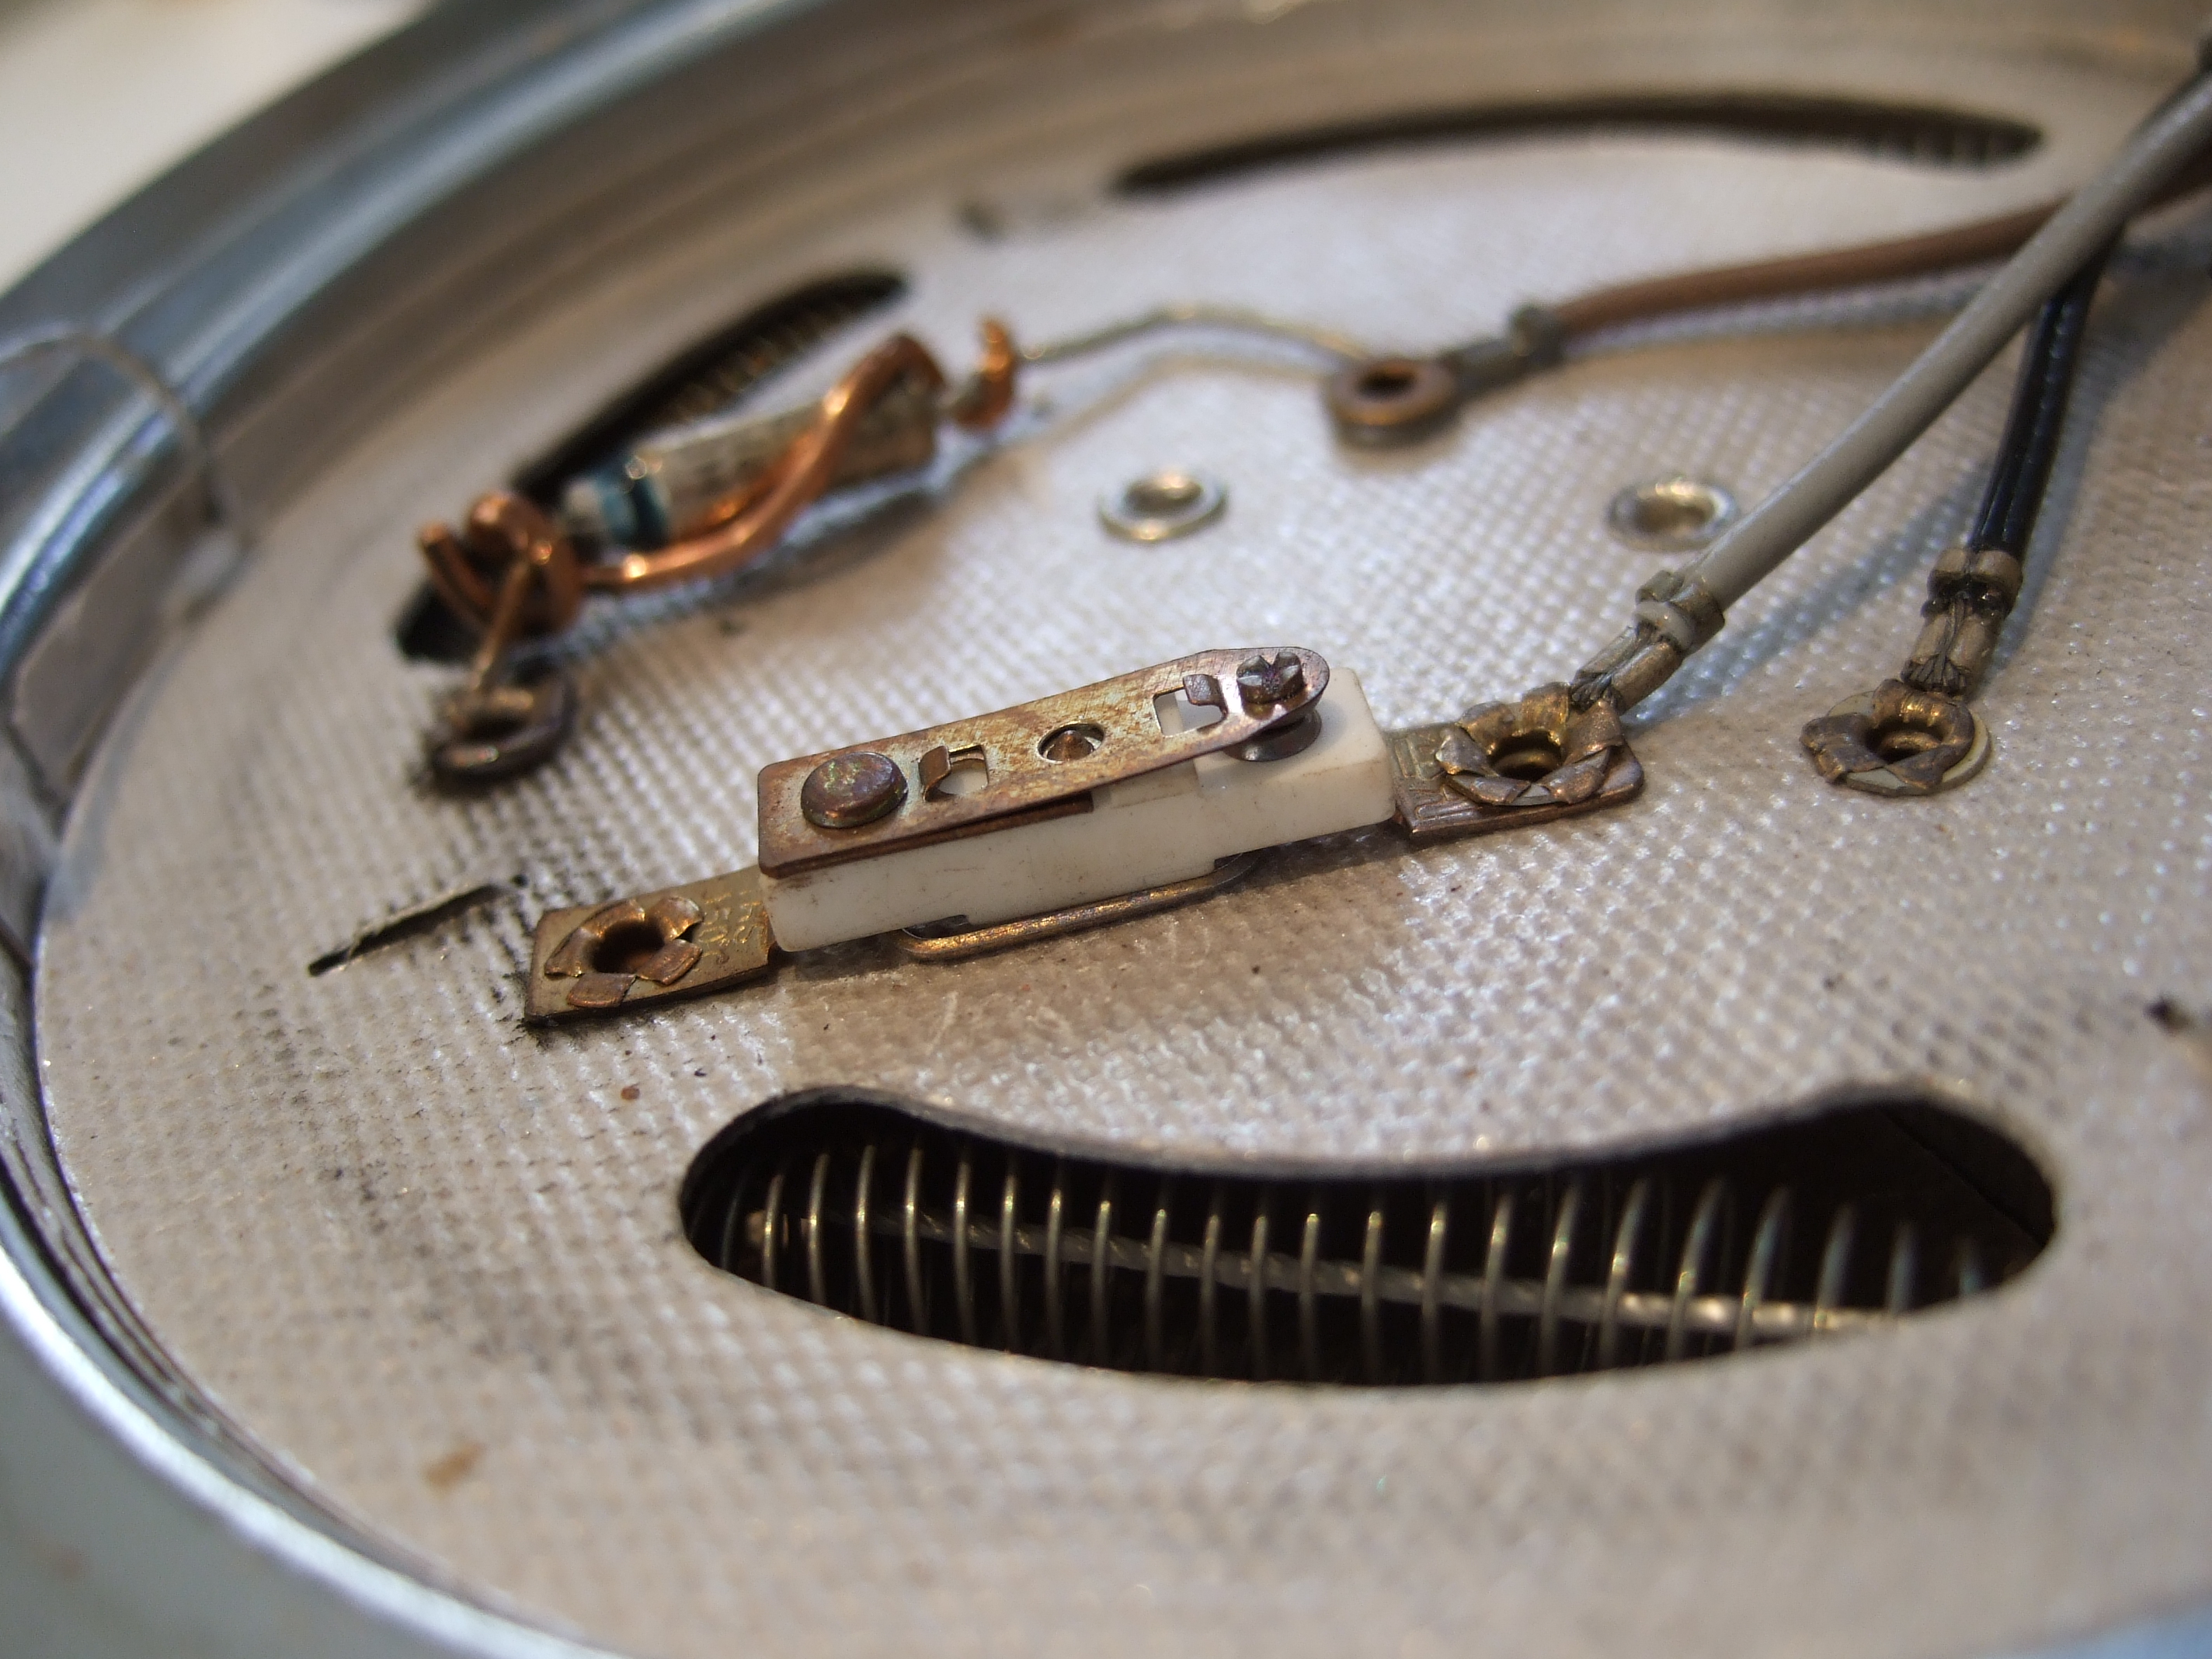
All poppers I’ve seen have also had a thermostat that turns off the heater coil at a suitable temperature for popping corn, which is sadly just a little bit too cool for roasting coffee. The thermostat will need to be bypassed or removed. The thermostat will be a simple bi-metallic strip, either attached to the heater or the roasting cylinder. In the latter case, just snip the wires and throw the thermostat away. If it’s attached to the heater element, you can defeat the bi-metallic strip by bending it hard enough so that it always makes contact regardless of the temperature.
There is also a thermal fuse that prevents the device from catching the beans on fire in case the motor fails to push air over the hot coils. In my experience, this fuse will blow sometime, so you might as well short it out now with a beefy strip of copper wire. If you choose to defeat the thermal fuse, I think my dirty hack, visible here, is enough explanation. That wire needs to be crimped or simply tightly wrapped. Do not use solder — it gets hot in here. If you don’t want to automate your roaster, you’re done and you can screw it back together.
Note that this means that you’re now responsible for ensuring that the fan is on whenever the heater is on. If you’re installing a temperature probe, as I have, this isn’t a big deal. But if you’re running the popper without feedback, you might want to do it on a fireproof surface under strict supervision — we are defeating a fire safety mechanism after all.
[wpvideo 4Pohdey0]
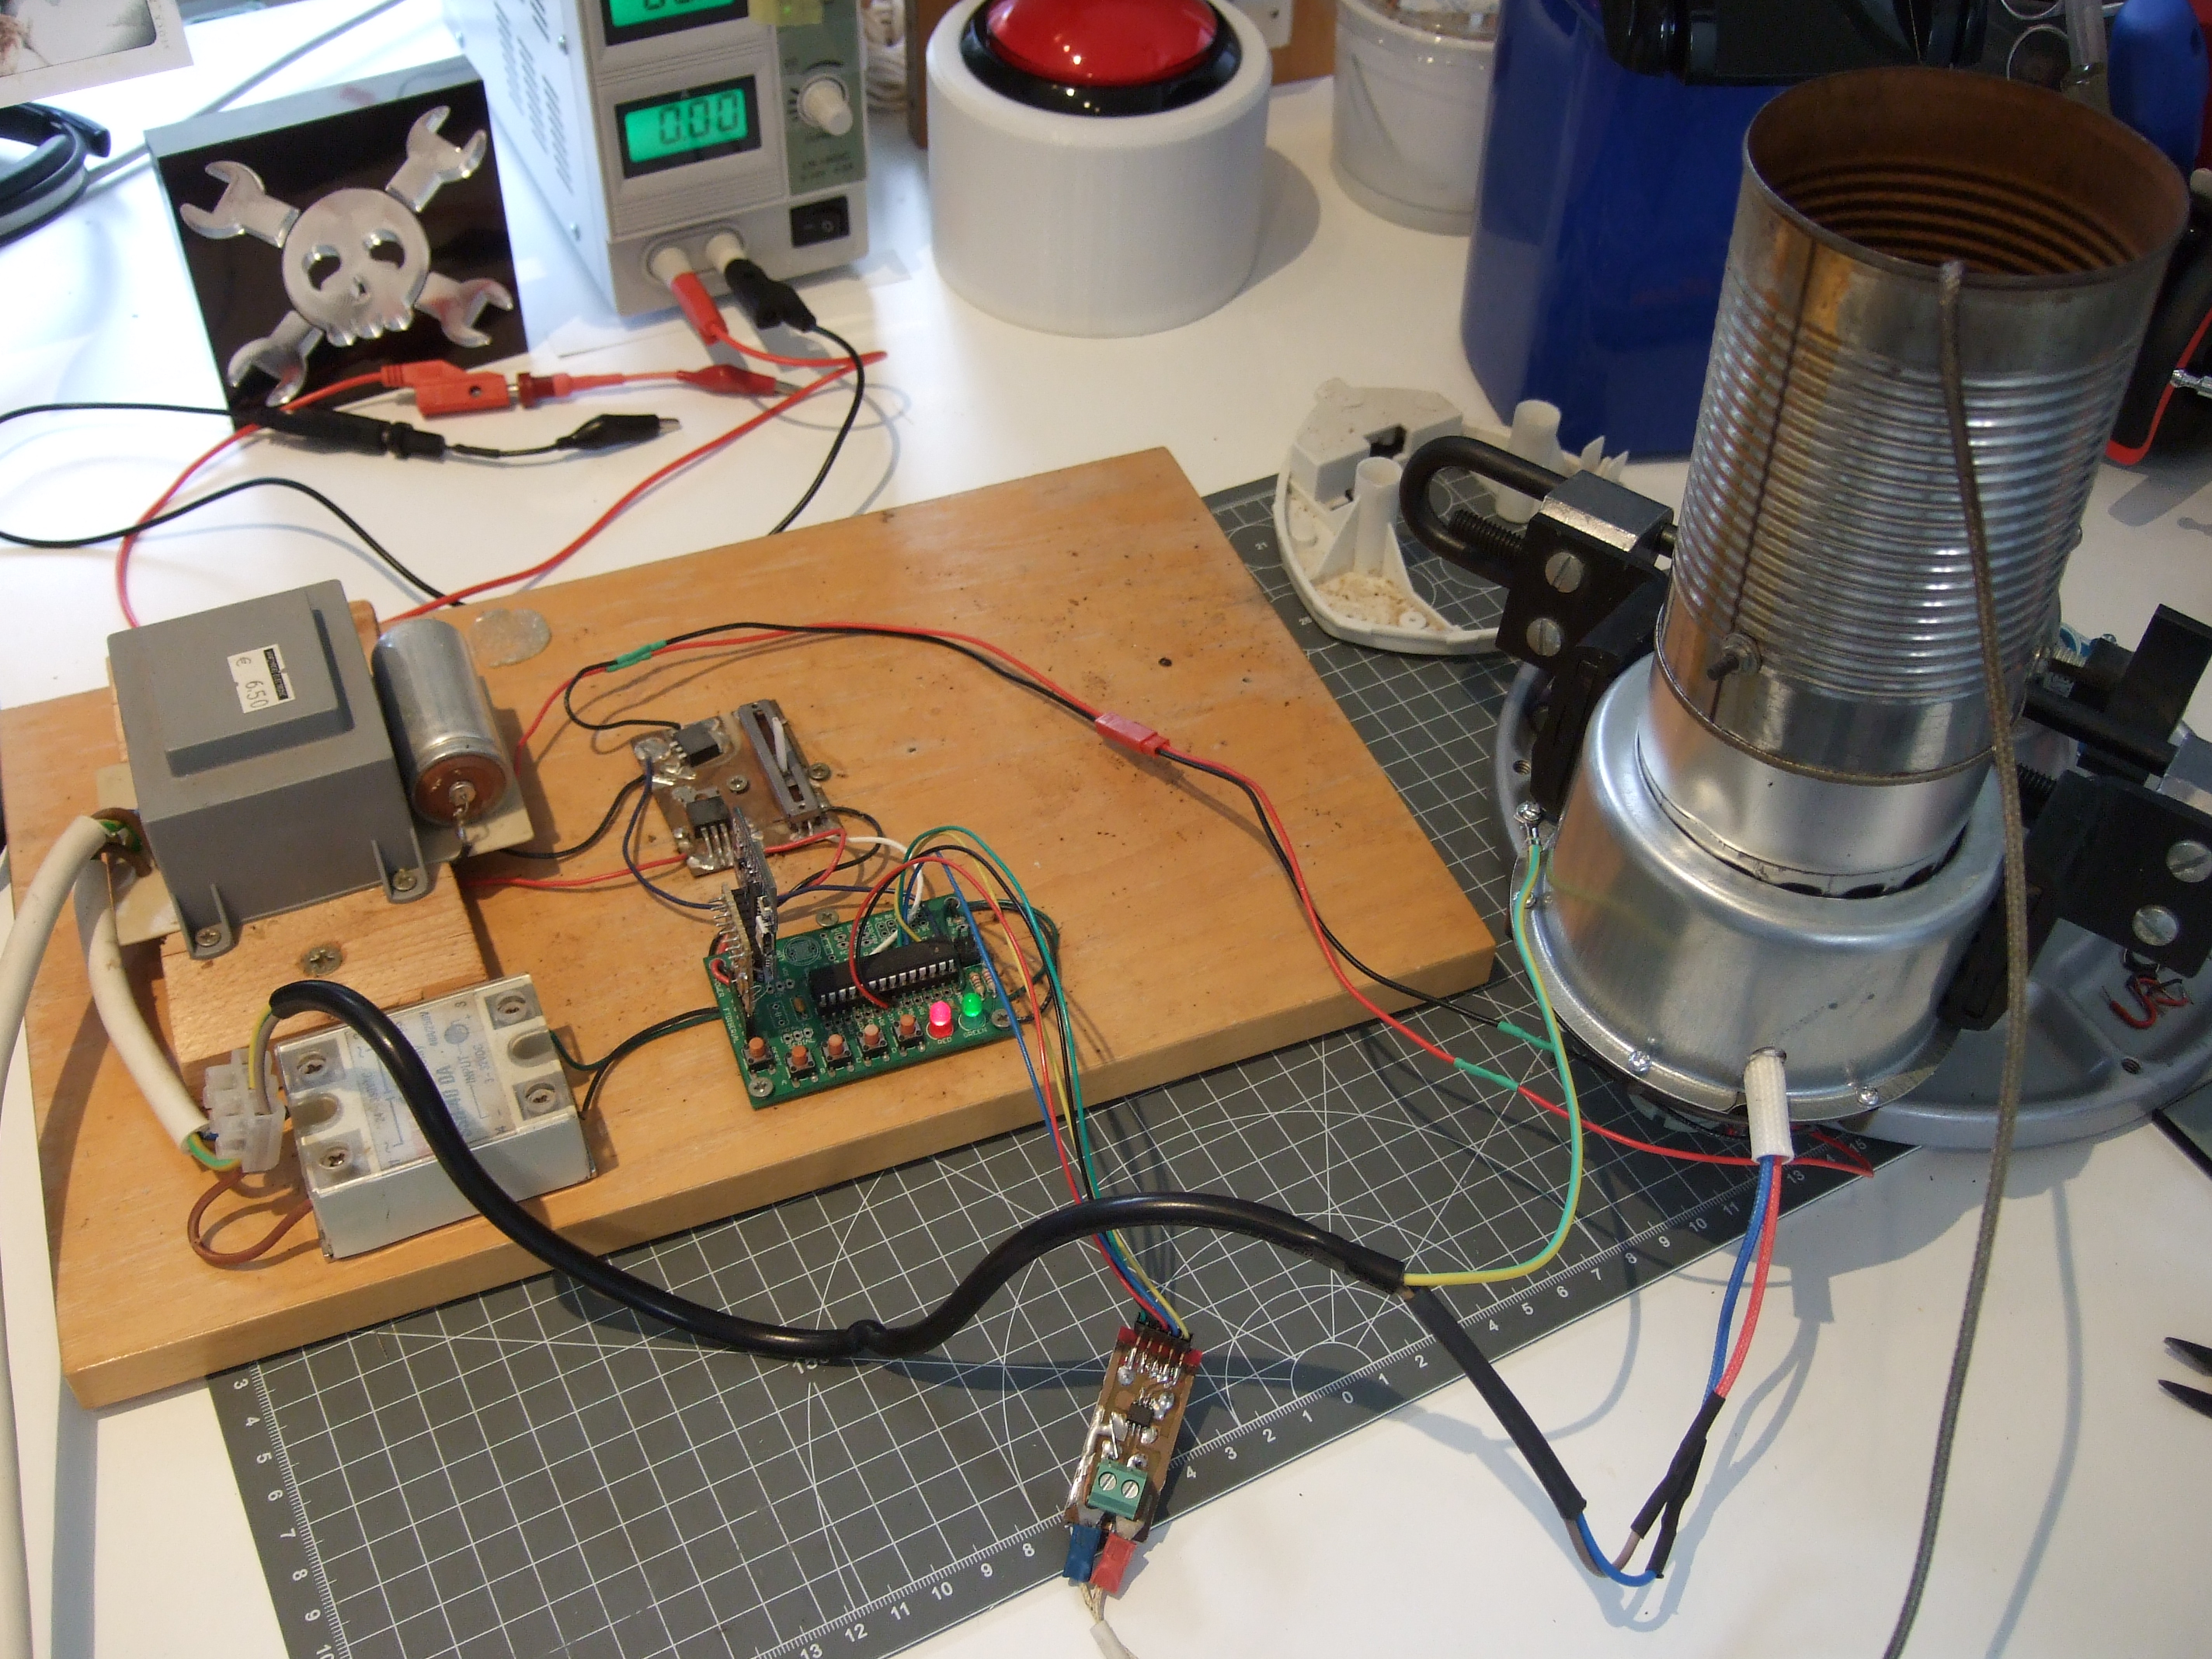
If you do want to automate things, you’ve got some wire cutting and a little desoldering to do. You don’t need the voltage divider if you’re going to control the motor externally, so you can simply cut off one of the three wires that lead to the heater elements. I tend to use just the main coil, which means connecting to the wires just before the thermal fuse and just after the thermostat. Here in Europe, one coil reads 40 ohms while the other reads 10 ohms; use the one with larger resistance.
The motor is soldered to a rectifier board that you can desolder entirely. DC motors tend to be electrically noisy, arcing as the brushes make and break contacts, so I’ll often toss a couple capacitors from the terminals to the motor casing to damp this down. And since I’m going to be controlling the speed with PWM, it’s a good idea to add a freewheeling diode across the terminals.


At this point, you’ve got a pair of wires leading directly to the heater coil, and a pair of wires leading directly to the DC motor. Connect a MOSFET on the low side of the motor and an SSR for the heater. I added in a thermocouple and a (since discontinued) SPI-speaking MAX6675 thermocouple amplifier and reference. You’ll need a thermocouple because the top roast temperature can be in the 250 °C neighborhood, which is too hot for other temperature sensors. From here, the rest of the build is an exercise in microcontrollering.
Physical Build and Creature Comforts
The roaster that I’ve used for nearly a decade is based on a development board that I built for a class in AVR programming that I gave. Why? Because it has four user buttons, some LEDs, and a serial port with a handy pinout. You could use an Arduino or whatever else you like. Buttons are a must for controlling the machine, though. I also connected a potentiometer to an ADC pin that was useful during development. As you’re fine-tuning your roast, you’ll be glad to have as much real-time input as possible.
To make the 24 V DC for the motor, I bought a transformer from the surplus store, whipped up a full-wave rectifier from four diodes and buffered the DC voltage with a very big capacitor (3300 μF) because this DC both runs the motor and is stepped down with a simple LM7805 to the 5 V that the microcontroller needs. I got brownouts and odd resets with less smoothing.
In the pictured embodiment, everything is simply attached to a piece of wood. I re-used the base of the roaster as a support for the motor and heater by just sawing it off and screwing it down. It was easier than building my own bracket to exactly those specifications, but yeah, it could look better. You may also find that the beans fly out as they lose weight. I countered this by extended the roasting chamber with a soup can. I vent the whole shebang out the window with an aluminum dryer exhaust hose, because I like to roast coffee in the winter too.
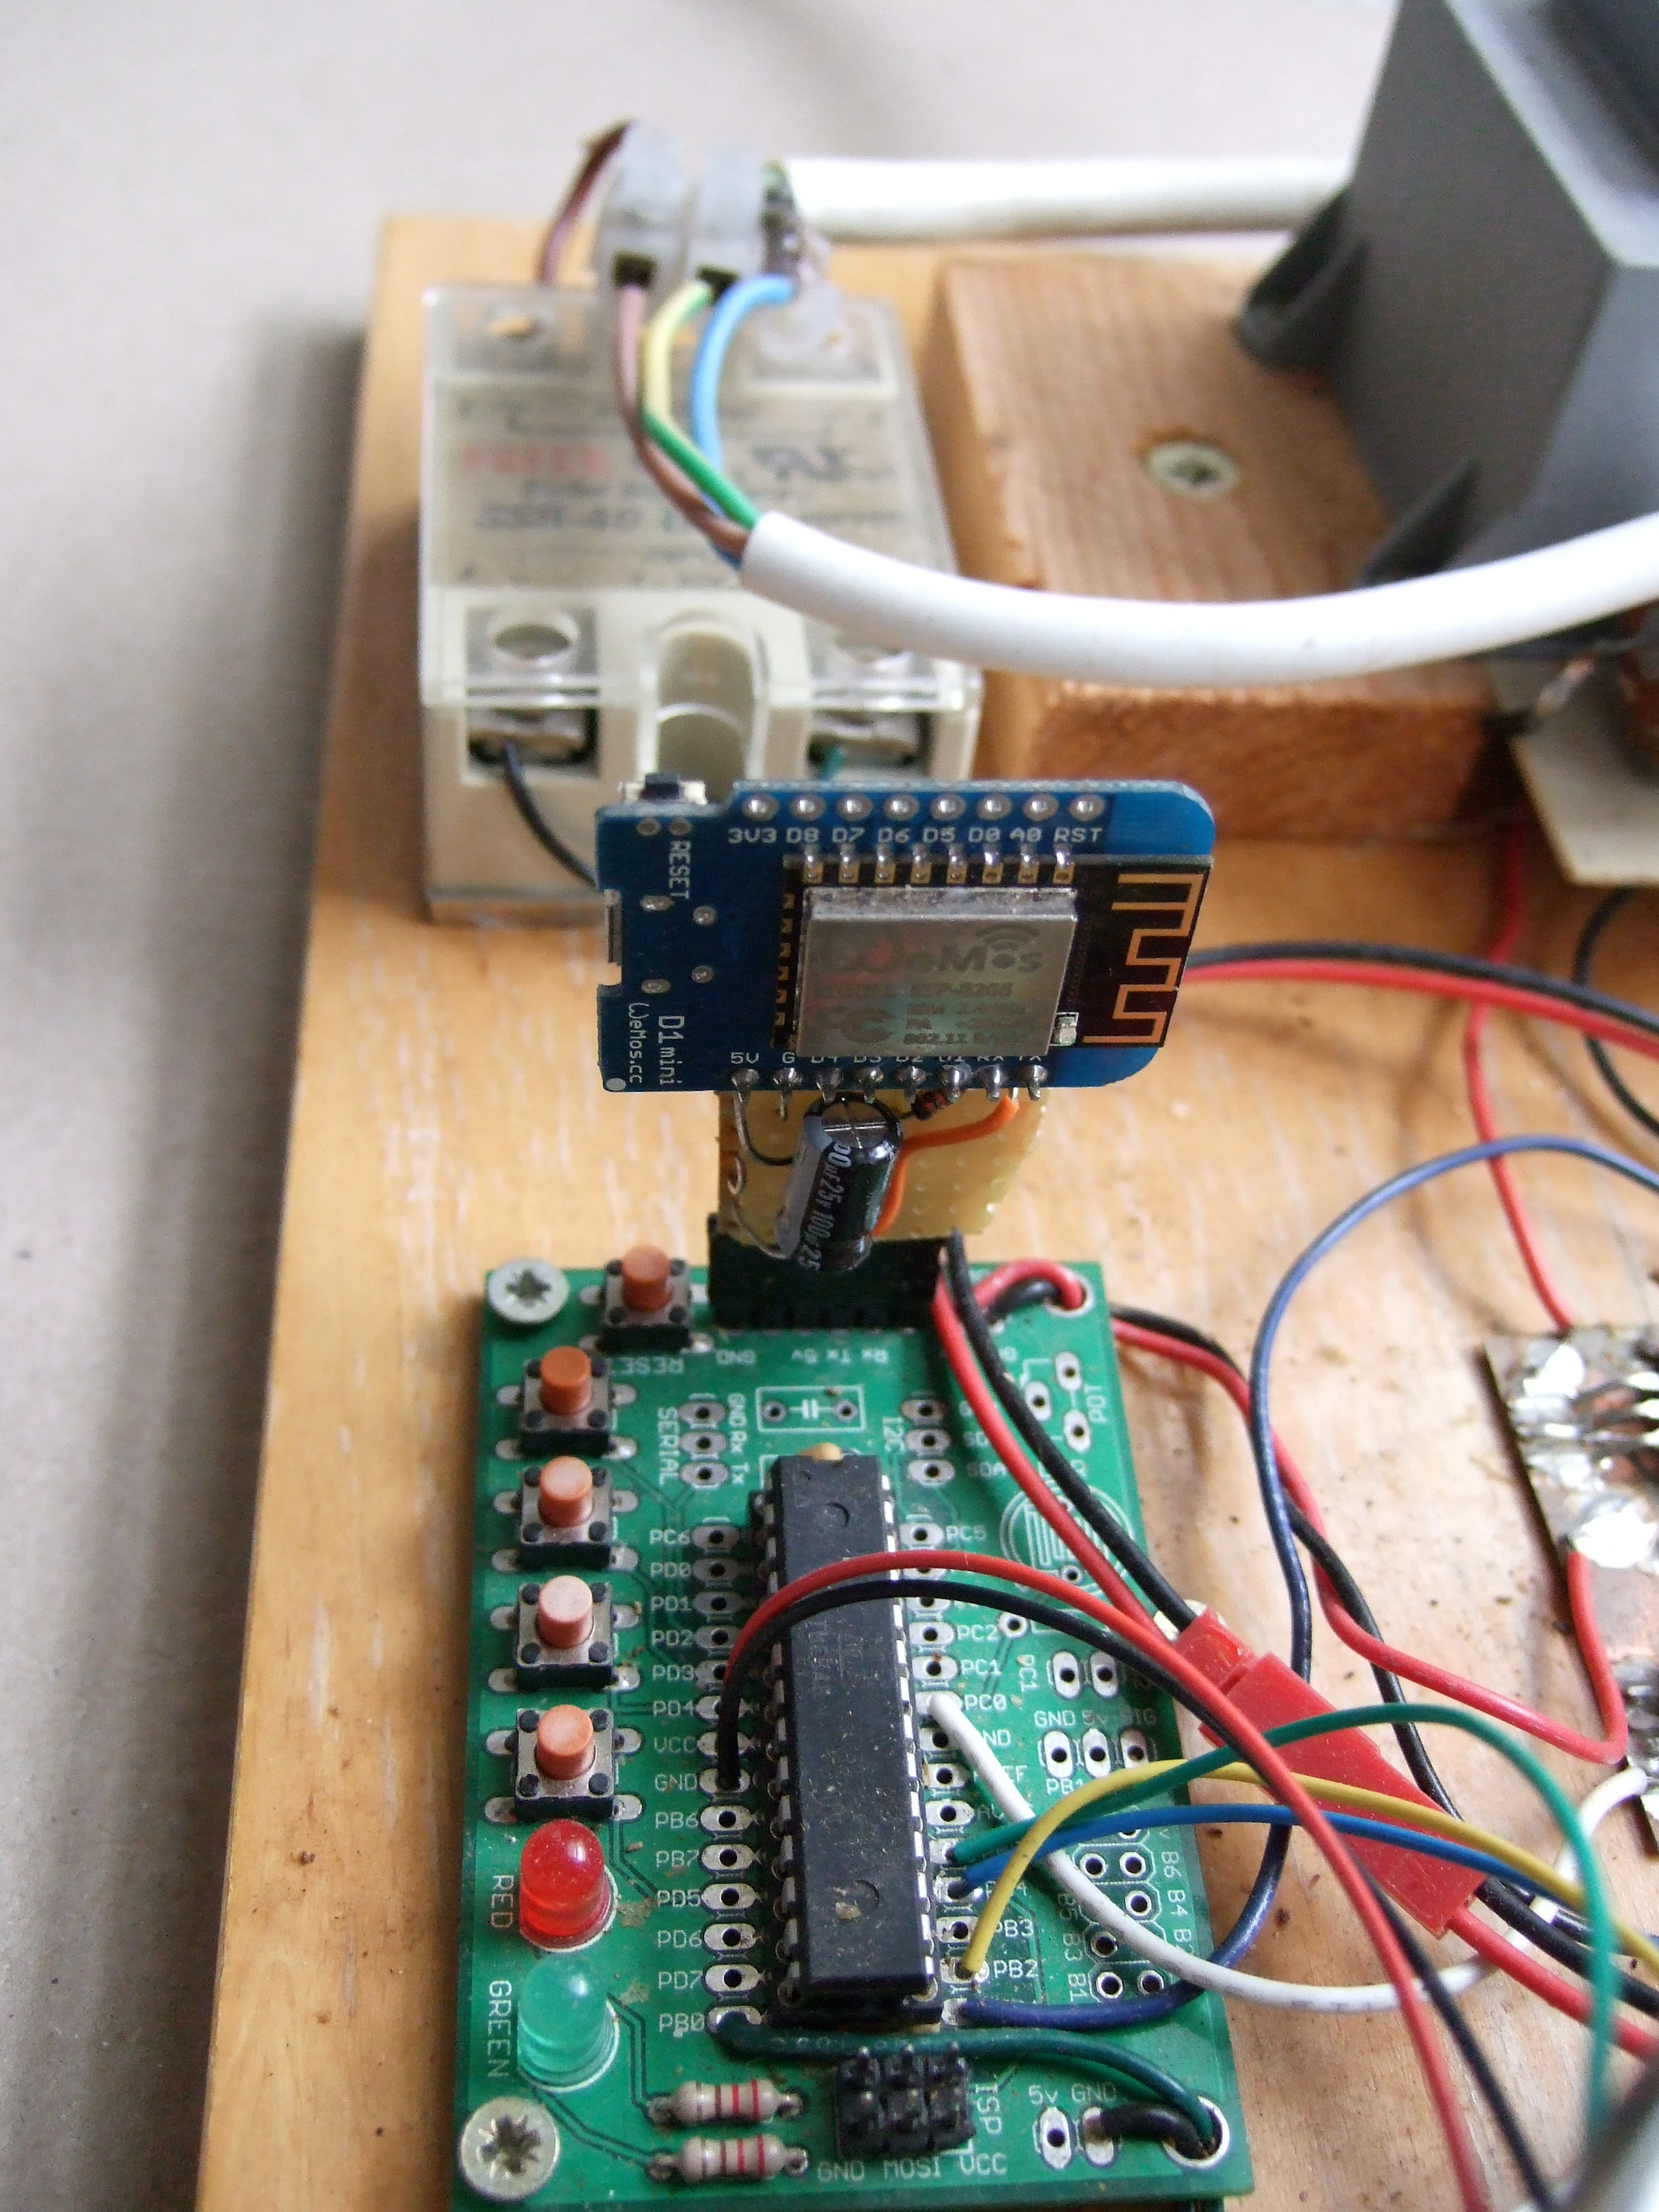 Data about the roast progress are echoed out the serial line as well as reflected in the LEDs. The microcontroller also responds to simple commands sent in over serial in addition to the buttons. I used this for debugging ages ago, but it also turns out to be trivial to make a serial-to-MQTT bridge out of an ESP8266 module. Now control and logging take place over WiFi — no more standing around in the bathroom with a laptop to log a roast. I guess if I sent the data to “the cloud” this would be a buzzword-compliant IoT roaster, but I’d rather keep my data to myself. As it stands, I load up some beans, put the exhaust out the window, walk over to my laptop and type “roast”. The machine does the rest, and code on the laptop logs and plots the results.
Roast Profiles Are Like Solder Profiles
With full control over the roaster, you can start to really geek out over the finer points of roasting. For instance, my routine ramps up with both motor and heater on full until a measured 120 °C and then holds there by cycling the heater for two minutes. Different beans will have different moisture contents and this gives them a chance to roughly equalize, similar to the pre-soak phase of a reflow oven.

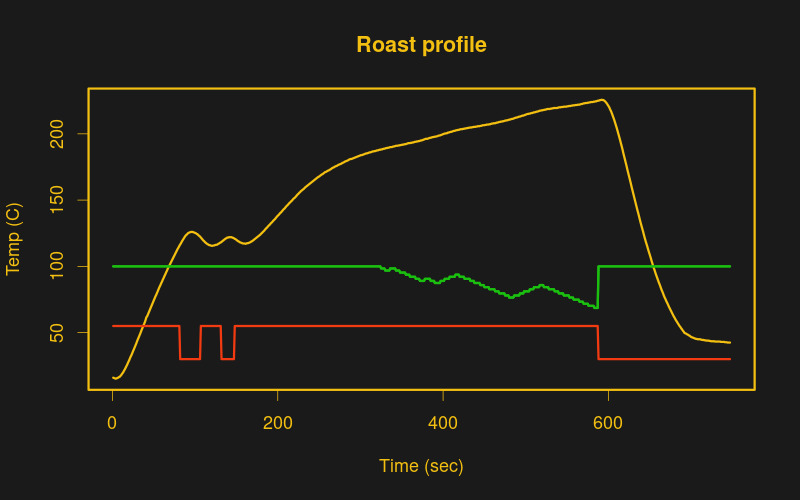 After these two minutes of soak, the beans are brought through first crack at full heat, and then throttled down to a 10 °C / minute ramp until the desired end temperature. With my old popper/roaster, I needed to reduce the air speed (in green) to even achieve such a ramp, but the new popper has a stronger heater and it appears that I will need to PWM the heater in order to not exceed the target rate. Expect variability depending on your popper, but you can’t go too far wrong with the simple soak-and-ramp profile here.
At the end of roast, the heater is shut off, the fan is set on full, and the beans are cooled down. The exact temperature that signals the end of roast determines how dark the coffee is, and is determined through trial and error and depends on your taste anyway. I roast darker or lighter depending on what beans are in the blend, and even whether they’re destined for cappuccino or espresso — the extra bitterness and lower sourness of a darker roast is nice with milk. You’re going to play around with different roasts anyway to get your coffee like you like it, so all you care about here is reproducibility.
The absolute temperature also depends a lot on the location of the thermocouple in the roaster. If it’s fully submerged in the beans, it will read a little bit hotter than the beans’ internal temperature, but it will read differently depending on where it is. You’ll want to supervise a few roasts, noting at what temperature first and second crack occur, and use these as a guide to automating your roast. With my new popper, and corresponding new temperature probe geometry, I’m going to have to re-jigger my temperatures again, which means drinking cup after cup of increasingly delicious coffee. A hacker’s life is hard.
Anyway, that’s my setup and its rationale. With the ESP8266 module, a new $20 roaster, and misc electronic parts, I’d estimate the build cost to be just under $40 for a WiFi connected, logging coffee roaster that can hit almost any roast profile within reason. But as I said earlier, in the past I’ve made do with a $3.99 used popper from the thrift store. The price of admission into the world of coffee roasting is minimal, and the result is more than worth it. And if you can turn it into an overkill weekend project, so much the better! I certainly hope you do.
Drop a line in the comments if you have any questions, or links to your roasters that you want to share with us.


Ummm…defeating the safety mechanisms is generally considered a Bad Thing.
Instead of tearing out the bimetallic strip and thermal fuse, why not purchase a resettable thermal switch like this: https://www.digikey.com/product-detail/en/cantherm/CS713025Y/317-1550-ND/2195564
…and sleep better.
I would hope he’s not roasting coffee while sleeping!
Having some form of thermal protection that isn’t software based is always a good idea, but in this case I think the protection is “sitting there watching it do its job”
Some time ago I took apart a bottled milk and baby food automatic heater. Heating element was controlled via mechanical relay, still there was a thermal cut-out in series with the heating element, just in case relay gets stuck. They spent more money on it than on PSU, which was capacitor/resistor voltage dropper…
I’m quite sure the relevan standards (e.g. IEC 60335-2-15 for coffee makers and such) require something like hardware based safety mechanism against overheating, or maybe even two protectors, like a overtemperature switch and also a thermal fuse for when the switch breaks (and they do because they are mechanical).
So to be able to sell the heater, they must have the expensive parts, no way around it. And it is the same for all manufacturers and that’s a good thing.
I also think that it is highly irresponsible to market hacks like these where the point is to rip off all safety features. Maybe the writer knows the risks but what about others who copy the design? Maybe there should be a series of articles in Hackaday about safety requirements in general (IEC/UL standards), machinery directive in EU (which also applies to self-built machines like 3d-printers or CNC machines!!! They MUST be according to the standard, like have warnings about automatic startng and emergency stop mechanisms etc..!!) and just good practices about asfety in general (isolation: clearance/creepage, pollution degrees, IP classes, things like that).
“I would hope he’s not roasting coffee while sleeping!”
We’re talking about COFFEE here!
The whole idea behind coffee is WAKING UP!!
B^)
Nothing wakes you up better than a fire in your house :)
Depends on what’s on fire…
That’s a wonderful DIY thing under $40. I will definitely try to make one for myself.
Thanks Elliot Williams
Despite the microcontroller doing the roasting, I’m always around somewhere in the house when it’s running, because I have to empty it when it’s done. And it sits on a marble windowsill if that helps…
There is also the thermocouple. I didn’t mention it explicitly in the article, but the firmware runs a sanity check on the TC at the beginning of every roast and shuts down if a reasonable temperature isn’t reached in the first 30 sec. This condition got added after I forgot to put the probe in once, and I got a very dark roast, seemingly at room temperature.
The code also does bounds checking — more than a 15 degree difference in any direction in one second also triggers emergency cooldown. The hope is to detect a loose wire.
So assuming the TC is working, there is a max temp shutdown in the firmware, which would do what the thermal fuse would, but at a higher temperature.
But the original device is for roasting popcorn, and they’re (probably reasonably) worried about igniting the fluffy stuff if the heater goes haywire. I don’t know how hot you actually would have to get coffee beans to pose a fire risk, but it’s above 250 C IME.
In other words, I’m content with the safety of the modified device. You need not be! DIY!
The reason the thermal fuse is there: most safety certrifications require a “single fault test”: what happens if a relay sticks/a FET fails as short (which they do). Even bugfree SW doesn’t protect you there.
And I see this as a very valid approach to safety. So I would replace the thermal fuse with something like a 250°C part instead of bridging it.
A fire, sometimes called a tongue-in-cheek Third Crack, can happen rather soon after second crack – I’ve seen it! The variability of beans could end up surprising you. I would recommend *never* roasting unattended, and use two thermal fuses – one near the heating element, and one in the roasting chamber (just like a “flame roll-out sensor” on a furnace). Size them appropriately and they won’t go out as a nuisance, but some day they could save your butt. They are cheap as dirt, so go for it!
@Antron: The switch you linked cuts out at 130 C, but coffee roasts up to 230-250 C. That’s kinda the original problem.
The popper’s safety design is with a (mechanical) thermostat and a fuse. The only time the fuse should see its temperature is if the thermostat had failed shut.
For the roaster, temperature is regulated by the firmware/thermocouple combo and there are some (firmware) safeties that I actually implement — see comment below.
I maintain that the TC/firmware combo is significantly more reliable than a bimetallic strip, but if that failed, I guess it would be nice to have a fuse as backup. Maybe 280 C? It’s belt-and-suspenders, but there’s nothing wrong with that.
Still, even with no thermal fuse, on a scale of 1 to Colin Furze, I’d rate this project a 2.
“on a scale of 1 to Colin Furze”
hahahahahha. I choked on my drink while reading that. Thanks for the great write up. I know what I’m going to be looking for in the thrift stores now. This sounds like serious fun.
It’s OK to defeat the thermostat, if you want to control the temperature otherwise.But I would not defeat the thermal fuse. I would replace it with a higher temperature version. I would call this OK, as the unit is obviously modified (can instead of plastic housing) to be able to take the higher temperatures.
It would be so cool to have a roaster that is an acoustic levitator hit by a laser.
Roasting one bean at a time.
That is probably going to be the key to perfection.
Nerd perfection.
Thats pretty neat and straightforward, I think I might try this one of these weekends, Im always looking for better coffee
Nice article [Elliot]!
One question, while I realize different “roasts” will vary in roasting time, how long does it take yours from the time you dump in the beans until they are ready to grind?
Doh! I just saw that you have “seconds” on the horizontal access of your roasting profile.
600 seconds = 10 minutes (IIRC, you are in Germany, so those are probably metric seconds/minutes…)
metric time is a lesser known measurement of time. In which case it would only be 6 metric minutes
It took me a moment to get that…
(Where’s my caffeine?)
B^)
There was once a metric calendar, during French revolution.
Quickly forgotten, it was 12 month of 30 days, 10 days week and 5 to 6 days at the end of the year.
If you’re pressed for time, you can skip out on the two-minute soak, and the slow ramp up at the end. With an overpowered popper of yore, I used to get four or five minute roasts. Folks in the biz aim for eight to twelve.
As you noted, my roast time was sitting around ten minutes before.
Having had beans roasted locally, they (correctly) recommended waiting a couple days before grinding. The oils seep out of the beans over a period of a day or two and the coffee comes out much nicer.
Although that was when I was doing french press, nowadays I do cold brew and wonder if I would need to wait.
Nice article, I’d love to see a nice “BOM” and circuit diagrams of the original air popper circuitry and the roaster circuitry (indicating added/altered/removed elements.) Always wanted to try home roasting and this would get me to do it.
I’m not sure about oils, but I do know there’s another chemical change that happens, especially during the first day or so – during roasting, a lot of CO2 is produced. Much of the CO2 leaves over the first 24 hours. This CO2 is also why you “bloom” coffee with a little bit of hot water for 30 seconds, before adding the remaining water. CO2 is not very soluble in hot water, so adding the little bit of water is enough to release it from the bean structure, where it comes out of solution and into the air. You can hear and see this happen!
Nice, perhaps a heat gun would also work, and would not require removal of safety features.
Google “heat gun dog bowl roaster”. It’s already a thing. And I’ve done it.
You can get a paint stripper with a stronger fan and enough heat pretty easily. The leftover work is then designing a roasting chamber for it. Should be very doable, and might yield higher capacity than the 5 scoops (~5 double espressos after the beans expand) I get out of a popper.
I don’t think the dog would be at all happy about his dish being that hot!
So you need a hot-dog for compensation .-)
hi i;m new in coffe industiry can i ask
That’s really slick! Do I understand correctly that the chaff from your batch just gets vented directly out the exhaust? That’s handy. My roaster keeps it inside and I need to do a cleanup after each batch.
I just vent it out the window. It’s soooo little biomass, especially compared to what the trees in our neighborhood drop on the sidewalks, that I’m claiming it’s not a problem. Commercial roasters have to filter, I believe.
I used to roast in downtown DC out of a 4th floor apartment. You could watch the chaff float down the block…
The heater in two sections with the voltage tap to run the motor should be used as a whole. It wasn’t designed to operate at many percent higher current with only the greater leg, insulator board suffers as well. There is much less safety factor and burnout of element is possible. Sparks fly. If this isn’t hot enough, get an industrial grade or one of those $10 hot air guns and hack it into the swirl bowl. They have the same resistor divider, leave it alone and just isolate the motor to a DC supply etc. It will be hot enough!
You’re probably right. The smaller coil is strangely located out of the air flow, though, which gives me the creeps about running it. But I suppose you’re right that it’s on when the thing is running normally as designed, and that it’s probably putting more stress on the main coil. I’m not really sure why I chose to just use one coil — maybe has to do with thermostat placement on the older roaster.
When/if this one burns out, I’ll give it a shot.
The smaller coils has much less current on it because most of the current goes through the motor. with 10 and 40 Ohms and a 22V motor at 230V perhaps something like half/half. Although 45W seems a little much for the motor.
I used a popper my family bought back in the 70s (was a kid then), sort of inherited it, I guess, but never used it as an adult, but just hung on to it. When I saw the same model used for coffee, I had to try. Just needed some green coffee beans. The modifications only take a few minutes, quick and painless. Only takes about 5 minutes to roast a batch of beans, and you most definitely want to do this outdoors. Not really enough time to leave it unattended. Once you get the roast just right, for the bean you are using, it can produce a coffee, that almost has a natural sweetness. Only been lucky a few times over the years, and it’s not something you can buy in any store. Roasted coffee only stays fresh a few days, then it starts tasting like store bought coffee. The popper works good, but only does small batches. Not real practical if you drink a lot of coffee. After you roast, you need to let the beans rest a few hours, otherwise it tastes a little grainy, like a light roast (yuck!) Don’t remember the name, but I built a larger batch (1/2 pound) roaster, from instructions I found on the web. It uses a different style popper, which used oil, and stirred the kernels. A table-top convection oven top to heat the beans. Took about 15 minutes to roast a half pound, couple batches and I was good for a week or so. I look at the store bought roasters every now and then, but think them over-priced, and seem to fail often.
Yeah. Small volume of roast is the big downside to a popper, once you’ve got the temp/fan under control. I usually do two batches in a row, and that lasts for 3-4 days around our house, and much less with friends/relatives over.
That’s just about right for the freshness peak, though. “Tastes like store bought after a few days” is a good reason to roast small, IMO.
As for the beany taste of the super-freshly-roasted stuff, I’ve come to like it a bit. I’ll definitely agree that it tastes “better” after a rest, but I also like the variety. It’s all good, just different kinds of good.
I did a similar hack but I mounted the popper in a sealed plywood box and produced positive pressure in the box using the output of a (new) shop vac. Controlled the airflow with a variac and put the heating coil on a pid controller. Put a glass oil lamp chimney on top to keep the beans in and allow for a somewhat larger batch. Collected the hot air and chaff with the input of the vac thus recycling the already heated air back into the roaster. Just recently added a second K type probe interfaced to the computer with a phidget USB and logged using Artisan software.
Seems like you could not achieve positive (or negative) pressure if the shopvac’s input AND output are in the same box…
Here’s a YouTube of the setup minus the logging computer.
https://youtu.be/HXMUm1_0i4Y
This is really cool. I like the differentness of it. Curious to know how it does with roasting the beans.
Good article! I have been using a popcorn popper for several years to roast coffee, although mine is manual. Some comments: Charity stores are a good source for popcorn poppers to mod. I did not remove the thermal cutout but replaced it with a higher temperature one. I think it was a 260 degree one. Much safer than removing it. Secondly, I always roast outdoors partially for safety but mainly because the chaff makes a mess. I now use a PT-100 temperature sensor with a MAX31865 for temperature sensing. More expensive than a thermocouple but better suited to the temperature range. I like the small batches as I don’t drink a lot of coffee but I like good coffee when I do. I use a Silvia espresso machine modded with a PID controller. One advantage of roasting your own beans is cost saving. Green bean prices are generally much cheaper than roasted bean prices and green beans can be kept unroasted for a long time. I am fortunate to live quite close to Sweet Maria’s which is a great source for green beans and she is a real person!
This can be a great fit as controller for the project
https://makerstorage.com/index.php?id_product=27&controller=product
That’s a pretty darn good fit. That’s almost exactly what I’ve got, but ready-made instead of cobbled together over time out of what was in my closet…
Cool.
Hey Elliot, I am going to buy the above temperature controller in the link and try to figure this out. I have been roasting on a modified popper that I split the fan and 2 heating elements to separate plugs but would I would like temperature control. What parts do I need in addition to this board? I am new to this type of build. Any help is greatly appreciated.
Thank You
I think I have seen one or two heat guns mounted on the body of an old bread machine. The bread machine was hacked to spin the mixing paddle in the bottom continuously. A youtube search for “heat gun bread machine coffee roaster” turns up many examples.
Maybe in the food hacking category one can build an inexpensive sous-vide cooker?
could u send me the circuit schematics along with an arduino code.. i would really appreciate it Mr.William.. Also did u have to use any regulators when u took power from different step down levels like 24v for the motor and 5v for the micro controller…could u tell me how u use a single wire to power everything without fluctuations in the current and any flickering effect taking place
Thanks for your idea. Inspired by you I found a popcorn machine and started with an Arduino, thermocoupler, relays and LCD screen. Today I roasted by first 50 grams. Let wait how it taste.I can control motor speed and temperature (within about 10 degrees C). I had a lot of noise from the motor controller, specially because the LCD display was connected with test leads. But it works.
Any wattage requirements for the heater elements? Would 1250w be enough?
This would be a great way to save for a real coffee roaster. You could start selling coffee and make a few of these for the budget as coffee sales start coming in. I love it!!
Thanks for posting this article.
I’m interested in trying your design. I currently have a Behmore 1600 but it doesn’t offer me as much control as I would like. Would you feel that I’m better just honing my skills using the Behmore or does the popcorn popper roaster offer more opportunities for better roasts? Which machine, in your opinion, would be able to give better results for someone wanting to up their skills by tweaking roasts?
I’m curious about the wattage of the popcorn poppers you get/use (they could be MUCH higher than ones designed to run on 110VAC).
What is the largest mass of beans you can roast in a single batch?
The ‘The rest is details’ : https://www.sweetmarias.com/instructions link is dead. I couldn’t find it at the site or with Google. Please update the link. Thanks.
Bah! I’m not even sure what I linked to.
Sweet Maria’s seems to have moved their tutorial resources here, but there are a ton more roasting guides/resources around.
Still, I’d assert that the first best thing you can do is to just get your hands on some green beans and roast them however you’re able. I’ve done pan-on-stove (inside!). Bad idea, too much smoke, chaff everywhere. But good coffee. Outside in a gas-powered wok — great idea only if you’re doing a large batch, because of the uneven roast. Still good coffee. Air popper? Good coffee. Hair dryer + metal dog bowl? Worst method ever, still good coffee.
See what I’m getting at? All the remaining refinements are about _your_ taste.
Thanks for this nice article!
I split the fan and the heater, and supply the fan directly with a laptop power unit.
I mounted a temperature sensor in the center of the heater cup.
My little contribution: I added a diode in series with the heater, with a switch across the diode. In this way I can choose between 50% and 100 % heating power, which is helpful during controlling the temperature. Just did my first roast that way and it works excellent!
Hey man looks awesome. Sorry if I missed it in the comments do you have a complete list of materials you would need to do this? Been roasting a slightly modified Poppery I for several years and I’ve been looking at ways to upgrade but I don’t have a lot of electronic knowledge.
Elliot, I have the same popcorn machine, I think, but this is too advanced for me. Are there Web resources that can teach me in a detailed manner which (220V compatible) components I need to buy and then, step by step, what to do. I have some electronics experience. Thank you for this.
It’s tricky. I used a lot of parts out of my closet, so they’re old and over-specced. But the basic principles are sound.
I used a solid-state relay for the heater coil, because I wanted to be able to control the heat fairly easily, and it lets you switch on and off the coil many times per second. It needs to be rated for as many watts, or volts-amps, as your heater. Mine’s 1200 W, which is under 6 A, so most of the SSRs on the market can handle it, acutally. I think I used a 25 A SSR.
For the fan, as I said in the article, a simple MOSFET that can handle the 24 V DC (or whatever) runs the motor should do. The only trick with power MOSFETs is to make sure they turn on with the microcontroller’s voltage. I used an AVR, and they run at 5 V, so it was no problem.
Back when I built this, there weren’t thermocoupule + sensor boards for cheap on eBay, but there are now.
Which leaves the microcontroller and code. Any old AVR-based Arduino should do, but the code I wrote is less than re-usable. If you search “Arduino coffee roaster” you’ll definitely get enough hits, with code examples. Here, though, I’d exercise caution. It should have a shutdown if the temperature _doesn’t_ rise, signalling that your temp probe is broken or wiggled free. It should have an emergency override button that turns the heater off and cools the beans down for a fixed amount of time (120 sec?) that you can hit when any real problems arise. My temp probe gives screwy readings sometimes, and I do a lot of sanity-checking on the temperature values as well to ignore those values — jumps of 100 degrees are simply ignored.
In short, my version of this is less a turn-key solution and more of a general “how to” for people who know most of the how-to other than the coffee roaster part. Other tutorials might be better for you, but make sure you’re watching the machine like a hawk until you’re sure it’s working correctly. Roasting initially outside, on a fire-proof surface, wouldn’t be the worst idea.
Hi, Eliot. Thanks for that. In the meantime I’ve found this video and I think it will suit me well at this point . . . are you familiar with it!
https://youtu.be/RsAJW_yvZMM
It would be great if I could see a tutorial (that is, how to identify wires and contacts) to do this with our type of popcorn machine.
Thanks again.