An ADS-B Antenna Built From Actual Garbage

With the advent of low-cost software defined radio (SDR), anyone who’s interested can surf the airwaves from the FM band all the way up to the gigahertz frequencies used by geosynchronous satellites for about $20 USD. It’s difficult to overstate the impact this has had on the world of radio hacking. It used to be only the Wizened Ham Graybeards could command the airwaves from the front panels of their $1K+ radios, but now even those who identify as software hackers can get their foot in the door for a little more than the cost of a pizza.

But as many new SDR explorers find out, having a receiver is only half the battle: you need an antenna as well. A length of wire stuck in the antenna jack of your SDR will let you pick up some low hanging fruit, but if you’re looking to extend your range or get into the higher frequencies, your antenna needs to be carefully designed and constructed. But as [Akos Czermann] shows on his blog, that doesn’t mean it has to be expensive. He shows how you can construct a very capable ADS-B antenna out of little more than an empty soda can and a bit of wire.

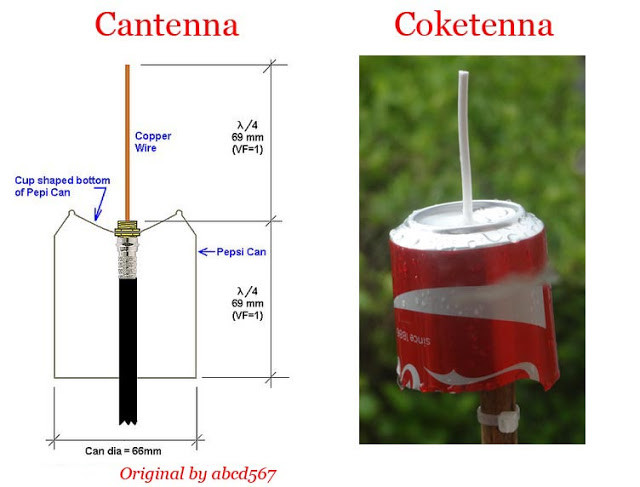
He makes it clear that the idea of using an old soda can as an antenna is not new, another radio hacker who goes by the handle [abcd567] popularized their own version of the “cantenna” some time ago. But [Akos] has made some tweaks to the design to drive the bar even lower, which he has dubbed the “coketenna”.

The primary advantages of his design is that you no longer need to solder anything or even use any special connectors. In fact, you can assemble this antenna with nothing more than a pocket knife.

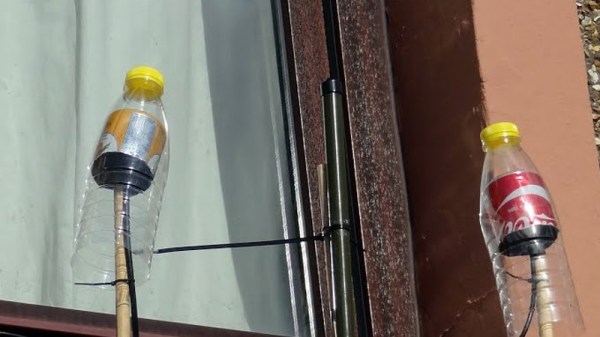
You start by cutting the can down to around 68 mm in length, and cutting an “X” into the bottom. Then strip a piece of coax, and push it through the X. The plastic-coated center conductor of the coax should emerge through the bottom of the can, while the braided copper insulation will bunch up on the other side. If you want to make it really fancy, [Akos] suggests cutting a plastic drink bottle in half and using that as a cover to keep water out of the “coketenna”.

How well does it work? He reports performance being very similar to his commercial ADS-B antenna which set him back $45 USD. Not bad for some parts of out the trash.

We’ve covered the math of creating an ADS-B antenna in the past if you’d like to know more about the science of how it all works. But if you just want an easy way of picking up some signals, this “coketenna” and an RTL-SDR dongle will get you started in no time.

Making Prints More Resilient With Fibre-Filled Filament

For all that we love 3D printers, sometimes the final print doesn’t turn out as durable as we might want it to be.

Aiming to mimic the properties of natural structures such as wood, bone, and shells, a research team lead by [Jennifer A. Lewis] at Harvard John A. Paulson School of Engineering and Applied Sciences’ Lewis Lab have developed a new combined filament and printing technique which they call rotational 3D printing.

Minuscule fibres are mixed in with the epoxy filament and their controlled orientation within the print can reinforce the overall structure or specific points that will undergo constant stresses. To do so the print head is fitted with a stepper motor, and its precisely programmed spin controls the weaving of the fibres into the print. The team suggests that they would be able to adapt this tech to many different 3D printing methods and materials, as well as use different materials and printed patterns to focus on thermal, electrical, or optical properties.

Be it adding carbon nano-tubes or enlisting the expertise of spiders to refine our printed materials, we’re looking forward to the future of ever stronger prints. However, that doesn’t mean that existing methods are entirely lacking in endurance.

[Thanks for the tip, Qes!]

Retro Flip Clock Gets A Retrofit

Retro tech is almost always ripe for the hacking — be it nostalgia, an educational teardown, or acknowledging and preserving the shoulders upon which we stand. Coming across an old West-German built flip clock, YouTuber [Aaron Christophel] retrofitted the device while retaining its original mechanical components!

No modern electronics are complete without LEDs of some kind, so he has included a strip in the base of the clock face for visibility and cool factor. He doesn’t speak to the state of the clock beforehand, but he was able to keep the moving bits of the clock working for its second shot at life.

Continue reading “Retro Flip Clock Gets A Retrofit”

DIY Graphene Putty Makes Super Sensitive Sensor

It is sort of an electronics rule 34 that if something occurs, someone needs to sense it. [Bblorgggg], for reasons that aren’t immediately obvious, needs to sense ants moving over trees. No kidding. How are you going to do that? His answer was to use graphene.

Actually, his super sensitive sensors mix graphene in Silly Putty, an unlikely combination that he tried after reading (on Hackaday, no less) about similar experiments at Trinity College resulting in Gputty. The Gputty was highly sensitive to pressure, and so it appears is his DIY version called Goophene. At Trinity they claimed to be able to record the footsteps of a spider, so detecting ant stomping didn’t seem too far-fetched. You can see a video of the result, below.

Continue reading “DIY Graphene Putty Makes Super Sensitive Sensor”

3D Printed Desk Harnesses The Power Of Fusion 360 And McMaster-Carr

Black pipe furniture is all the rage now, and for good reason — it has a nice industrial aesthetic, it’s sturdy, and the threaded fittings make it a snap to put together. But if you’ve priced out the fittings lately, you know that it’s far from cheap, so being able to 3D-print your own black pipe fittings can make desks and tables a lot more affordable.

Cheapness comes at a price, of course, and [Vladimir Mariano] takes pains to point out that his desk is a light-duty piece that would likely not stand up to heavy use. But since the flange fittings used to connect the plywood top to the legs and as feet would cost about $64 all by themselves from the local home center, printing them made sense. Together with custom pieces to mount stretchers between the legs, the 3D-printed parts made for a decently sturdy base.

But the end product isn’t the main point of the video below. Thanks to the ability to browse the McMaster-Carr catalog from within Fusion 360, [Mariano] was able to seamlessly import the CAD model of a suitable iron flange and quickly modify it to his needs. The power of this feature is hard to overstate; you can literally browse through a catalog of engineered parts and print usable replicas instantly. Sure, it’s not made of metal, but it’s a huge boon to designers to be able to see how the final product would look, especially in the prototyping phase of a project.

Not familiar with McMaster-Carr? It’s an engineer’s online playground, and we covered the ins and outs of doing business with McMaster a while back.

Continue reading “3D Printed Desk Harnesses The Power Of Fusion 360 And McMaster-Carr”

Build An Excellent Coffee Roaster With A Satisfyingly Low Price Tag

There’s a lot of mysticism around coffee roasting, but in the end it couldn’t be simpler. Take a bunch of beans, heat them up evenly, and stop before they get burned. The rest is details.

And the same goes for coffee roasters. The most primitive roasting technique involves stirring the beans in a pan or wok to keep them from scorching on the bottom. This works great, but it doesn’t scale. Industrial drum roasters heat a rotating drum with ridges on the inside like a cement mixer to keep the beans in constant motion while they pass over a gas fire. Fluidized-bed roasters use a strong stream of heated air to whirl the beans around while roasting them evenly. But the bottom line is that a coffee roaster needs to agitate the beans over a controllable heat source so that they roast as evenly as possible.

My DIY coffee roaster gave up the ghost a few days ago and I immediately ordered the essential replacement part, a hot air popcorn popper, to avert a true crisis: no coffee! While I was rebuilding, I thought I’d take some pictures and share what I know about the subject. So if you’re interested in roasting coffee, making a popcorn popper into a roaster, or even just taking an inside look at a thoroughly value-engineered kitchen machine, read on!

Continue reading “Build An Excellent Coffee Roaster With A Satisfyingly Low Price Tag”

Building A Better Kerbal Space Program Controller

If you have even the most passing interest in space and what it takes to get there, you’ve probably already played Kerbal Space Program (KSP). If you haven’t, then you should set aside about ten hours today to go check that out real quick. Don’t worry, Hackaday will still be here when you get back. Right now you need to focus on getting those rockets built and establishing a network of communication satellites so you can get out of low orbit.

For those of you who’ve played the game (or are joining us again after playing KSP for the prescribed 10, 12, 16 hours), you’ll know that the humble computer keyboard is not very well suited to jaunts through space. You really want a joystick and throttle at the absolute minimum for accurate maneuvers, but even you’ll be spending plenty of time back on the keyboard to operate the craft’s various systems. If you want the ultimate KSP control setup, you’ll need to follow in the footsteps of [Hugo Peeters] and build your own. Luckily for us, he’s written up an exceptionally well detailed guide on building KSP controllers that should prove useful even if you don’t want to clone his.

Wiring switches and buttons to the Arduino.

At the most basic level, building a KSP controller consists of hooking a bunch of switches and buttons to a microcontroller such as the Arduino or Teensy, and converting those to USB HID key presses that the game understands. This works fine up to a point, but is limited because it’s only a one-way method of communication. For his controller, [Hugo] forked KSPSerialIO, a plugin for KSP that allows bidirectional communication between the game and your controller, enabling things like digital readouts of speed and fuel levels on the controller’s panel.

Once the logistics of how you’ll talk to the game are settled, the rest is really up to the individual. The first step in building your own KSP controller is deciding what you want it to do. Are you looking to fly planes? Control a rover? Maybe you just want a master control panel for your space station. There’s a whole lot of things you can build in KSP, and the layout, inputs, and displays on your controller should ideally reflect your play style.

[Hugo] went with a fairly general purpose panel, but did spend quite a bit of extra time to get some slick LED bar graphs hooked up to display resource levels of different systems on his craft. That’s an extra step that isn’t strictly required for a build like this, but once you see it, you’re going to have a hard time not wanting to include it on your own panel. He also went through the expense of having the panel and case professionally laser cut and etched, which definitely gives it a polished feel.

We’ve covered quite a number of custom KSP controllers here at Hackaday. The overlap between KSP players and hackers seems unusually high, but of course a game that lets you build and fly contraptions of your own design does sound like something that would be right up our alley.