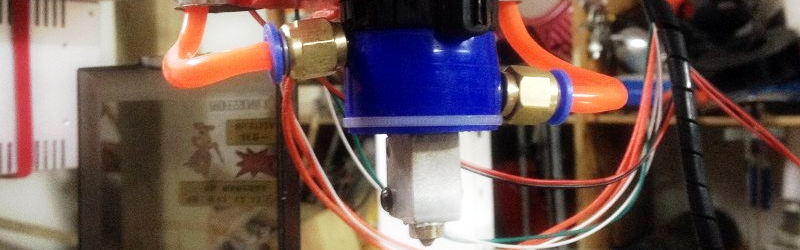
It may seem like a paradox, but one of the most important things you have to do to a 3D printer’s hot end is to keep it cool. That seems funny, because the idea is to heat up plastic, but you really only want to heat it up just before it extrudes. If you heat it up too early, you’ll get jams. That’s why nearly all hot ends have some sort of fan cooling. However, lately we have seen announcements and crowd-funding campaigns that make it look like water cooling will be more popular than ever this year. Don’t want to buy a new hot end? [Dui ni shuo de dui] will show you how to easily convert an E3D-style hot end to water cooling with a quick reversible hack.
That popular style of hot end has a heat sink with circular fins. The mod puts two O-rings on the fins and uses them to seal a piece of silicone tubing. The tubing has holes for fittings and then it is nothing to pump water through the fittings and around the heat sink. The whole thing cost about $14 (exclusive of the hot end) and you could probably get by for less if you wanted to.
[Dui] mentions that you don’t need a super powerful pump. We suspect too much pressure in the system would make it much more likely to leak, so this is a case where less is almost certainly more. In fact, [Dui’s] first few attempts had some leakage, so you’ll want to carefully test before you install everything back into the printer.
You might wonder if you need water cooling when fans work fine. Well, first of all, when has that ever stopped any of us? But second, apparently, as you increase flow rate — either for extrusion speed or to use a larger nozzle or both — you have to increase temperatures and this can tax the normal cooling system. That causes clogs and the water cooling is much more efficient.
Water cooling is nothing new for PCs, of course. We’ve seen water-cooled LED lights, too. We’ve even seen chips directly cooled with water.


I tired this. It worked, but the heater couldn’t keep up. Temps where over 260C and I couldn’t print fast. Never jammed (wich was my problem I was trying to solve), but the water just pulled way too much heat out of the hot end. I want to redesign the hot end to have better thermal isolation between the waterblock and the hot end. It’s on my list of projects. ;)
It would be quite straight forward to machine an adapter that has a gap for an insulator to separate the ‘core’ from the hot end. You could design as a sleeve or a whole new tip inclusive of a reservoir surrounding the area you need cooling. Heck, from there, place an internal thermistor to control (via an Arduino or trinket) the flow rate of the water pump to more accurately keep temperature than a fixed gph pump and avoid over cooling.
Hmm, that sounds like a fun project. I’ve got some 6061 and some 304 just waiting to be put in the lathe…
Hey, go for it. ???? But I did have a gap between the hot end and the water block. It seemed to keep the barrel cool wich was the worst thing for speed. Couldn’t get above 40mm/s (I think) without the extruder shredding the filament.
Thing is, if the water flow rate gets too low, it’s going to start boiling, knackering the whole cooling system and it’s presumably plastic tubing. Maybe NaK or something would be better (that was a joke).
The whole point of a hot end is surely to be hot. You can get rid of heat just by waiting. Much easier than trying to get rid of over-cooling.
I’ve been building custom water cooled hot-ends for years and I can tell you the amount of water you need moving is small, like 10cc/min small. Small enough I experimented with just using convection for circulation…
The hotend I run now is 80w with 6 ports and that could boil the water in it in about 2 minutes, but that’s only because it only holds about 3cc of water. That was the sweet spot.
I see the main advantage of water cooling when adding ports or running at higher temperatures as reduced weight. My 6 port 80w hotend actually weighs less than a regular E3D v6. Doing it this way is rather pointless other than you don’t need a machine shop to do it.
mmmm, NaK… For times when you REALLY want a fire hazard in your house/workshop :D
Exactly. More powerful is not always better. It confounds me when I browse thingiverse and every part of the printer has some kind of bracket to blast a computer fan on it. God damn it, you don’t need to put a fan on every stepper motor, the raspberry pi, the microcontroller, the LCD display maybe?? Why? Those are fine. But people do it anyway.
I don’t see why I’d want to run plumbing down to my hot end when a tiny 30mm fan and some aluminum fins make it work perfectly. Never a jam, extrudes super fast, temperatures stay very stable. Way less mass and tubey stuff dragging on my X carriage. I do like to add some insulation around the bottom of the hot end, though: gotta keep the layer cooling system from fighting the heating element. Makes it heat up faster, too.
Maybe using some kind of ultra-high temp filament would benefit from this, but I have a hunch it’s true purpose is so the owner can say it’s water cooled.
I was having extremely bad jamming issues. My barrels would only last 5-10 lbs of filament. And non lined barrels just completely jam. Water seemed like a good idea. It would maintain a very stable temperature gradient. It still may be a good idea. But it didn’t work for me. For now. ????
Make sure your bed is flat and even! I have a heated glass bed (heating element combined with glass) that has four clamps in the corners and bends upwards in the center. I had jams with a certain PLA depending on how the printed parts were layed out on the build plate, because pressure would build up and at some point jam the hot end… After installing two metal clamps to hold down the center of the bed and loosening the other four screws it now prints fine…
It jammed well after the first layer. So I don’t think that was it.
The length and thermal conduction of the heat-break becomes absolutely critical when you switch to water. You need a good stainless all-metal heat-break with a long (about 3mm) break, but with a thin wall thickness in the break. Polish the inside. with some rubbing compound on a bit of filament in a drill. You will never go back.
That is an issue I was having. Wile I did have a gap, trying to get a long enough barrel wasn’t working. And I have no idea how to machine such a small, long hole. I’m stuck with 1.75mm filament. :(
Drilling that hole is a PITA even with good equipment.
Start with a normal all-metal heat break and modify it instead.
Chuck the heat break in a drill and widen the existing gap with a file. You’ll still need a good micrometer to make sure you don’t make it too thin. If you got one, a drill press will help you keep the file flat/level so it doesn’t bind in the gap and bend/snap off your heat break.
The reason you would need this is if you want to print with big filaments at high speeds for a very big printer (which was my case so it was the reason why I built this). My printer is hidden in my garage where usually nobody sees it, so I didn’t build this for the simple pleasure of jerking off on a watercooled setup, especially since this setup is quite Mc Gyver style XD
As I tried to explain in the instructable, if you have a big printing surface and a big nozzle, heat will build up during the travels, which is a big issue because it will clog the nozzle. It happens much less on small machines, where a fan is perfectly fine. On my particular machine, it was absolutely necessary and it actually fixed all of my issues.
The only advantage of using this on a small machine would be for very high melting point filaments or to lower a bit the noise (the system itself is totally silent but you would still hear the noise of your part cooling fan as well as the noise of your steppers).
It’s likely that your heating cartridge is a bit exhausted or weak. You might want to change for a new one just to make sure. But if actual temp reading was over 260C I suspect the culprit could be a not powerful enough extruder motor. In which case, either tweak up a bit your driver current settings (provided you have a way to cool the driver too), or get a bigger extruder motor. I did both of these, to make sure the filament is pushed through with the maximum possible force. Also, make sure you have the same kind of extruder system that I have (the heating element is perpendicular to the ground). This type of extruder allows for a bit more time for the filament to heat up.
I had the same thought about extruders. So I got the bondtech extruder. Powerful extruder. So powerful that it chewed up the filament. :) My heater is underpowered. But I took a thermal picture of the setup. I couldn’t get precise temperature readings due to FLir’s app stinking it up. But you could see the heat just getting sucked right out of the heating block. I know I had way too big of a passage way on my water block. That would be something I would want to experiment with. But, I needed the printer back up and running. Even if it means changing barrels every few weeks. Once I get my second printer built. I’ll get back to this. :)
I also couldn’t see sticking with this for this printer due to weight and efficiency. Without better heat isolation, your just dumping a ton of heat right into the air. My printer runs almost 24/7. So decreasing operating costs is a consideration. I may look into peltier coolers combined with water cooling. Well, at that point, it would be water heating. :)
Oh, and I was using a volcano style heating block.
Water has much higher specific heat than air. To compensate for this maybe the water should come in contact with the heatsink a bit further from the hot part.
I think with air the first fin of the heatsink is easy a few tens of C higher than ambient, but water will not allow that. So a better system could be to have another temperature sensor here and control the water flow to maintain a specific temperature at the cold part of the extruder.
You are exactly right. I experimented quite a bit on this with heat breaks of various thermal conduction and length.
Summing up: a short heat break used with water cooling will jam. Rather than trying to control the water temperature though, I found just making the heat break area a little longer worked well. A 3mm long thin wall stainless heat break was pretty much ideal.
A real estate agent friend once told me that if you have a flat roof, leaks aren’t a matter of “if” but “when”. I get the same feeling about water cooling moving parts on a 3D printer, and considering that there’s electronics nearby… hmmmm.
I’ve had real estate agents try to give me legal advice also…. It’s amazing, both a legal and roof specialist education in just 2 weeks of classes.
I grew up in a house with a flat roof – the only time it ever leaked was when a tree fell on it. However, you do have to go up and clean off all the leaves and needles every summer.
Notwithstanding that the orange tubing in the picture is pretty rigid stuff. Might consider a more flexible and smaller diameter tubing in the next iteration.
You know it’s time to repair your roof, when it starts leaking trees inside.
I use the blue “silicone” airline tubing you can get at pet supply stores. It melts when you hit it with a lighter so I doubt that it’s real silicone, but it’s really cheap and definitely more flexible (it’s like pasta) than the clear/orange vinyl tubing. It also doesn’t degrade or collapse under vacuum like the rubber surgical tubing does.
It does tend to get stiffer after a couple years of use, but that may be due to my use of antifreeze which I’m sure it wasn’t designed to carry (cold climate, printer in car…).
Surely, you’d fill this with the same deionised watercooling fluids used in PC watercooling setups? Hell, with the correct pump you could use mineral oil if you were THAT worried.
Mineral oil next to a 260°C extruder…yes…much better…
A mineral oil leak is the last thing I’d want on the printer, desk, floor, etc.
I’m not convinced of the need for water cooling a hot-end in any but very special and unusual circumstances.
One word: overkill.
Is it bringing more precision? No, here even better question: is it bringing anything better in comparacment with air cooled printer?
Uh, you have no idea what you’re talking about. You would absolutely create more precision with varying the flow rate of the water. It would enable quicker and more precise temperature changes vs. using a fan.
Dui isn’t going for precision. He’s using a Volcano, so 1.2mm nozzle diameter. He’s going for speed, and not clogging up the hot end with retractions. The air cooler couldn’t keep up and was causing jams in the cold side of the hot end.
It brings reliability at high printing speeds on my machine.
It indeed doesn’t help you at all with precision, but precision doesn’t matter if your print got screwed because of a clogged extruder anyways!
My goal was to print really big plastic parts as fast as possible (I’m talking about parts size up to 800 mm x 700m x 400 mm max), I don’t really care if my printed parts aren’t a super smooth finish as long as they work fine, are strong and were printed in a few hours instead of a few days :)
Similar hacks but with RC water cooling jackets has been around for a few years: https://forum.e3d-online.com/threads/e3d-water-cooled-mod.53/, and there is a much better solution available from Rene Jurack since last year: https://well-engineered.net/index.php/en/86-community-water-cooling
The 2nd is very similar to the one in the story, but with a more refined jacket. I wouldn’t say it’s ‘much better’, its just different. In fact the ability of the linked mod to use standard hotend parts is a definite plus on that side. I like the use of a more solid water jacket as that is the admitted weakpoint in the articles setup as stated by the modder himself.
Id though water cooling was a decent idea as a quick though when I first heard of the problems associated with heat creeping up into the cold site of the hotend and the needs for careful tolerances in the heatbrake when reassembling a hotend.
so 3 thoughts to do with the articles setup:
1. Perhaps go with a solid waterjacket, or at least come up with a more robust connection between the water nozzle and jacket.
2. Your just moving heat with this setup, eventually you’ll overcome the cooling abilities with just the ambient cooling of the reservoir. Would be worth considering putting in a radiator if this was to get any bigger.
3. Theres starting to be quite a bit of mass put on to the hotend at this point. Thats going to start effecting the speed and accuracy of prints. Any lack of rigidity in the whole printer is going to become apparent really quick.
A 5-8l bucket should have close to 0.5m^2 of surface, no need to implement specialized parts ;-)
Silicon not silicone???
It’s a novel and good idea. We still need a way to keep the heat localized to the nozzle.
Commercial mass production plastic injection machines face similar problems. They require a careful balance of heating and cooling of different areas, often quite close together.
Then there’s mold cooling and heating. Much of cycle time is how quickly the mold temp can be changed. For plastic the molds must be heated so the plastic won’t start solidifying too fast. Then they have to be cooled enough to solidify the plastic to the point where it won’t distort when ejected and dropped out or picked out by a robot. Heating can be done with electric coils or by heating up coolant (oil or water+additives) to run through. After injection, cold coolant gets run through. Cooling too much will increase cycle times.
Molding materials that rely on chemical reaction to cure (like silicone rubber) requires the opposite process. The whole machine and mold must be kept cool, until after injection. Then the mold must be quickly heated to kick off the chemical curing reaction, then cooled again before ejecting the molded items.
Watercooling is mostly a novelty. It is the thing that set’s your 3D printer apart from all the other 3D printers.
But is it better… Well when I build my first 3D printer (from scratch, I made every part of the extruder myself, just for fun but also to keep it small and exactly like I wanted it to). It worked and performed great. But was it worth the hassle of the extra tubes, reservoir, coolant and noise (though that was just because of a bad choice for a pump)…
Time went on… and now I’m using a fan for a few years, it works just as fine… I would like to say even better, because the whole system is lighter and simpler in design therefore easier to maintain and therefore the chances for system failure are smaller.
From my point of view water cooling is only required when you have lot’s of heat to get rid of… a simple 3D printer nozzle is not to be considered as lot’s of heat. The biggest problem isn’t getting the heat away from the cold end… but getting the heat into the hot-end.
Though I have to admit… my original water version looked much more impressive. So I completely understand people wanting to have it.
Ummm, for those of you pointing out other examples, why has no one mentioned the E3D Kracken? Frankly it’s an absolutely beautiful design for 4 nozzles, water cooling block, and 4 independent heaters, where air couldn’t keep up. (I so want to eventually put Volcanos on mine.)
Also, I had a printer with 5 nozzles, often I could only use 1-3 of them, because the #*&$(*#$ bonedead method of leveling. The Kraken is SO much easier: level the bed with respect to one, release set screws, tighten set screws on the others: DONE! That printer was also water cooled, and is now air cooled with a diamond hotend on it.
Jan is right about the need. Unless you have multiple heaters going… it’s not worth it at all.
Waiting for a 3D printer that uses injection moulding to extrude. A big tank of molten plastic and pipe it out like icing. I should imagine wax or chocolate machines may be a good starter.
plastic requires a fair bit of pressure to overcome all the friction when pushing through a tube
On a side note. 3D printed candles.
Is there a really easy to make hotend out there?
I recently bought an enclosure from Protopro, in Cumbria uk it is excellent for temp control and the fume filter does what it says. They also sell a water cooled unit which doubles the print speed. See videos on ultimaker .
Unmentioned in the article and comments is the desire to print in a heated chamber. My printer always worked fine with a fan/heatsink cooled extruder until I tried to raise the chamber temperature. Never a problem at ambient, the extruder reliably jammed at ~45C chamber temp from heat creep into the extruder. I’d like to print at 55-60C or higher, and water cooling will be required for this. I’ve got a rig hooked up that works fine at ambient, and I’m getting ready to try it at elevated temperatures.
Yes, I am perfectly aware of reduced lifetime/failure rates of enclosed steppers/bearings, etc.
Cool the steppers with water too?