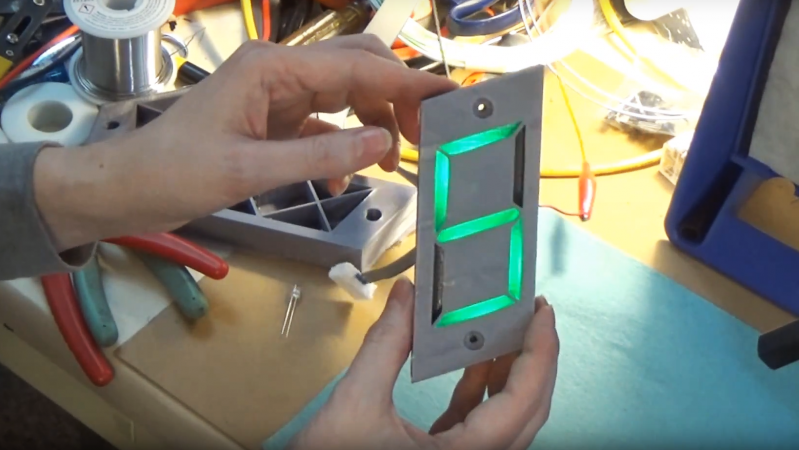
Seven-segment LED displays have been around forever, it seems, and the design is pretty optimized by now. Off-the-shelf units are readily available in all sorts of sizes and colors, but if you want a really big display, you might have to roll your own. Scaling up the size doesn’t necessarily mean you have to scale up the complexity, though, if this light-pipeless jumbo seven-segment LED display is any indication.
It’s clear that [Fran Blanche] has a thing for collecting and building oddball numeric displays, like this cathode ray tube Nixie knockoff or her Apollo DSKY electroluminescent display. Her plus-size seven-segment display is far less complicated than either of those, and that’s by design; [Fran] wanted something that was 3D-printable as a single part, rather than an assembly with light pipes and diffusers. To that end, the display is just a pair of X-shaped dividers stacked on top of each other behind the display’s face. They dividers form six triangular compartments and a diamond shaped one, with each compartment opening into a segment-shaped window. One LED goes in each triangular compartment, while the double-sized diamond space gets two. That’s it — the LEDs light up the inside of each compartment to turn on the appropriate segments. Watch it in action below.
The display still needs some tweaking, but it’s big and bright and has a large acceptance angle. What’s more, it’s scalable — imagine a display the size of a sheet of plywood using LED light bulbs. We’re looking forward to [Fran]’s improvements and her next display project, which appears to use hot glue as a light pipe.


Oh this is cool!, thanks for sharing
And it’s o much easier to integrate the counter/latch/decoder into such a large readout. Everyone liked those TIL311 readouts, but they were never cheap.
Michael
Didn’t they also draw a lot of current?
If you are using directly driven displays. These days most displays are multiplexed.
ehmmm… current consumption has nothing to do with multiplexing.
Example: If you have 4 displays that consume 25mA each, that would be a continuous current of 100mA.
If you multiplex these so that only one of them is on at any moment in time (so you can save IO-pins), that doesn’t mean that you only draw 25mA. Nope, because if that was the case then the brightness would be also 1/4 of the normal brightness. So you need to send 4x the normal current for a display that’s only one 1/4th of the time.
So the power consumption should roughly be the same for a continuous system and for a multiplexed system.
Therefore I think that when you wrote “these days most displays are multiplexed” you meant “these days LED’s are much more efficient and require less current for the same light output”
Super nice build. Thank you!
THIS is why I come here. Awesome job.
+1
Needs printed thin baffles to even out the hot center against the dim ends of each segment, or more diffusing fill. Make it big enough and LED tape would even out the light.
This lightbox looks like it could easily be adapted to papercraft, too.
my wallclock was almost the same, but I put a diffuser infront of it. I like the indirect, reflected light.
http://ruemohr.org/~ircjunk/projects/wallclock/p1070500.jpg
nice Fran!
Nice more pictures and description would be really nice, e.g. did you have to get a tight fit for that diffuser, and are those dots?
The directory is free reign, I’v not got much time for doing writeups. http://ruemohr.org/~ircjunk/projects/wallclock/
An avr spools time from a dallas parallel RTC. It outputs to a set of 74hc595 which go to transistors drivers, The display is NOT scanned because I can pick up on the strobing and it drives me crazy. I have two dc-dc converters fed by a 19.5V laptop adapter, one of them runs the avr at 5V, the other supplies a lower voltage to the leds to reduce power dissipation (the voltage across those ballast resistors is quite low) The diffusers needed two layers, the first is coloured tissue paper, the last is just a white paper. I used an old quasar IR remote to interface for setting the time.
If you need additional reflectivity from a PCB, you could use a plated surface on your whole board (instead of white solder mask). A couple of year ago, I built a UV-exposure box with that technique, together with a bunch of through hole UV LEDs. Worked really great, and was really cheap to make! Your manufacturer might complain, but if you’re lucky, they won’t :)
In any case, I do like the simplicity of this build. When looking at it, it seems really obvious, but I doubt I would have come up with the same simple solution. Thanks a lot for sharing!
For those printing at home – The 7-Segment Display Version 1 .stl files are now on Thingiverse –
https://www.thingiverse.com/thing:2833498
Thank you! Your next task is… https://en.wikipedia.org/wiki/Sixteen-segment_display :grin: