If a hacker today wanted to build a simple game, he or she could whip it up using an Arduino board and a few other bits and pieces in about an hour, only to be greeted with “where’s the hack?” But when you look at [OiD]’s SPEBEG (Single Player Eight Bit Electronic Game), you’ll understand why building anything using old-skool 70s tech is so awesome and educational.
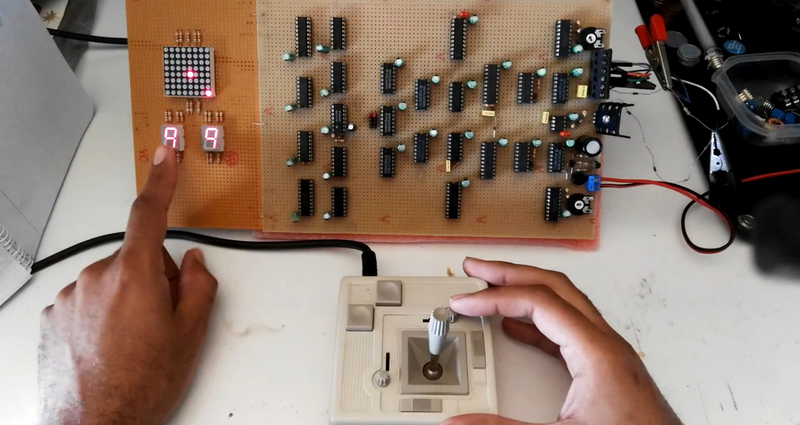
The SPEBEG is a simple 8-bit game where you aim with the joystick at the target and fire to gain points. As your score increases, so does the game speed. It doesn’t need a single line of code, since the whole design is completely hardware based. And it uses the venerable 555. The display is an 8×8 LED matrix while score and levels are displayed on two 7-segment LED displays.
An 8-bit bus forms the backbone of the game and it is all held together by lots of 74-series TTL logic. The 555 provides a 47 kHz secondary clock, while the 100 Hz signal after the rectifier diodes is used to introduce the essential “randomness” that every game requires. [OiD] does a good job of describing the whole circuit by breaking it down into byte-sized chunks and walking us through each. For something so simple to build using modern technology, he needed over 25 different chips to build it, and ended up setting himself back by almost 200 €.
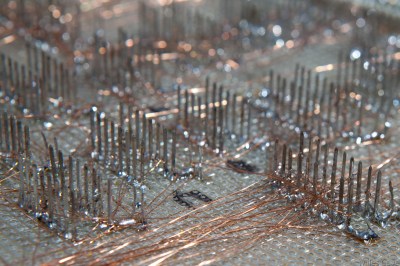 But there’s one more part of this project that amazes us, and that is its construction technique. [OiD] purchased IC sockets with extra long pins and a lot of thin, enamel (insulated) copper wire. A soldering station with a fine tip and high temperature setting allowed him to heat the end of the copper wire to melt its enamel insulation, so it could be soldered to the long pin sockets. Using this method, he assembled the circuit using point-to-point soldering, pretty much like wire wrapping. Only, instead of wrapping the wires, he soldered them.
Despite all of his efforts, the game was pretty much unplayable when he first built it almost five years back. He recently pulled it out of storage, swatted all the hardware bugs, and fixed it nicely. Check out the video after the break. [OiD]’s project is decidedly more simple compared to this game that was Fabricated from the Original Arcade Pong Schematics.


What are all those ICs for? I could have done it with 555 timers.
Buh! It could have been built with discrete transistor only!
jk, this is awesomely nuts.
That was a hard sell on the wire wrapping article.
Ironically, the comparison was already in there, and I thought “hey, we just did this great wire-wrapping article” and linked it.
The technique used here _is_ exactly like wire-wrapping + solder.
So I’m not the only person that “Wire wraps” like that!
Nice to see this in the wild: whole wire-tracks wired in enamel copper core wire.
I’ll proceed to wire up a BGA SPARTAN-6 FPGA with enamel wire as a challenge and try some soft-CPUs out for kicks…. actually, I’ll look at the datasheet first to see if this is possible… however I’m looking to use some BGA chips in a prototype before deciding on sending away for a board (The BGA chips I plan on using isn’t an FPGA BTW, yet another power management project)
I pretty much gave up on wirewrap one I bullshitted together a “wiring pen” out of a mechanical pencil so much faster for point to point or modding where you might have to tack a wire to a qfp
What kind of wire do you use? I tried a similar method with a pack of magnet wire from Radio Shack, but the insulation didn’t melt – I had to file it off for each termination, which was kind of hateful. I seem to recall that it’s a particular type of insulation that melts off easily, but don’t remember which kind.
Back in the ’80s I liked the “just wrap” tool. Worked for me.
“Roadrunner” wire is what I use for wire mods. The insulation is designed to melt at soldering temperature.
http://cpc.farnell.com/roadrunner/rrp-c-105/wiring-pencil-wire-clear-38awg/dp/CB01207
The “enameled” wire you use makes the difference. The experience is either “wanting to go destroy something” and “experiencing joy”.
Obligatory ELM-Chan for soldering with magnet wire.
All hail ELM-Chan! The I’ve often wondered whether it was a good thing, progressing from deadbugs (“Manhattan”) + 30 AWG Kynar wire to Kicad + OSH Park. I could wire a circuit then as fast as I can draw it in Kicad now, and don’t have to wait two weeks. I have also tried using magnet wire, but found that you have to be careful with putting parallel wires too close together on long (over 1″) due to capacitive coupling, which isn’t generally a problem with the thicker Kynar insulation.
I’ve found twisting the enameled wire in a bit of sandpaper to be pretty quick. some of the really good enameled wire is designed not to flash into flammable vapor when it overheats and by design doesn’t come off so well with a hot iron.
You know, once microcontrollers and their programming tools became widely and cheaply available, I never looked back. Having to source 20 or 30 different types of chips for a project was always a pain. The industry agrees with me – in the 1980s, virtually everything digital went from discrete logic to microprocessor-based, with 74-series logic relegated to steering data into and out of the MPU. So while some people may find some nostalgia value in discrete logic, it would just be masochism to me.
That construction reminds me of my time in high school making electronic projects I could afford the components AND the strip board/protoboard what ever you want to call it. So I’d lay the components out on a piece of laminex, mark the location for the legs and drill holes to pole them through than solder wires to join the apropriate legs together. Using coloured laminex added a nice touch to the finished project.
I got one of those pong games linked in the article from that guy as a kit years back.
I should dig it out and hook it up to one of the small CRT’s I have in my collection.
Maybe the next project after I get RGB and/or HDMI working on my salvaged 5″ colour CRT.
I think I would be addicted to play it