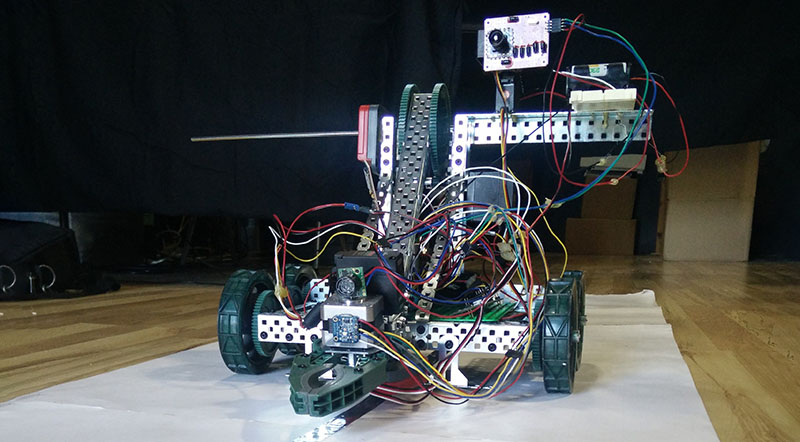
The world — and the Hackaday Prize — is filled with educational robots. These are small, wheeled robots loaded up with sensors, actuators, a few motor drivers, and some sort of system that is easy to program. The idea behind these educational robots is to give students an easy-to-use platform to test out code, learn inverse kinematics, and realize odometry is a lot harder than you think it is. Give these kids some time and patience, and you’ll have a fleet of Battlebots at the end of the semester, if the teacher is cool.
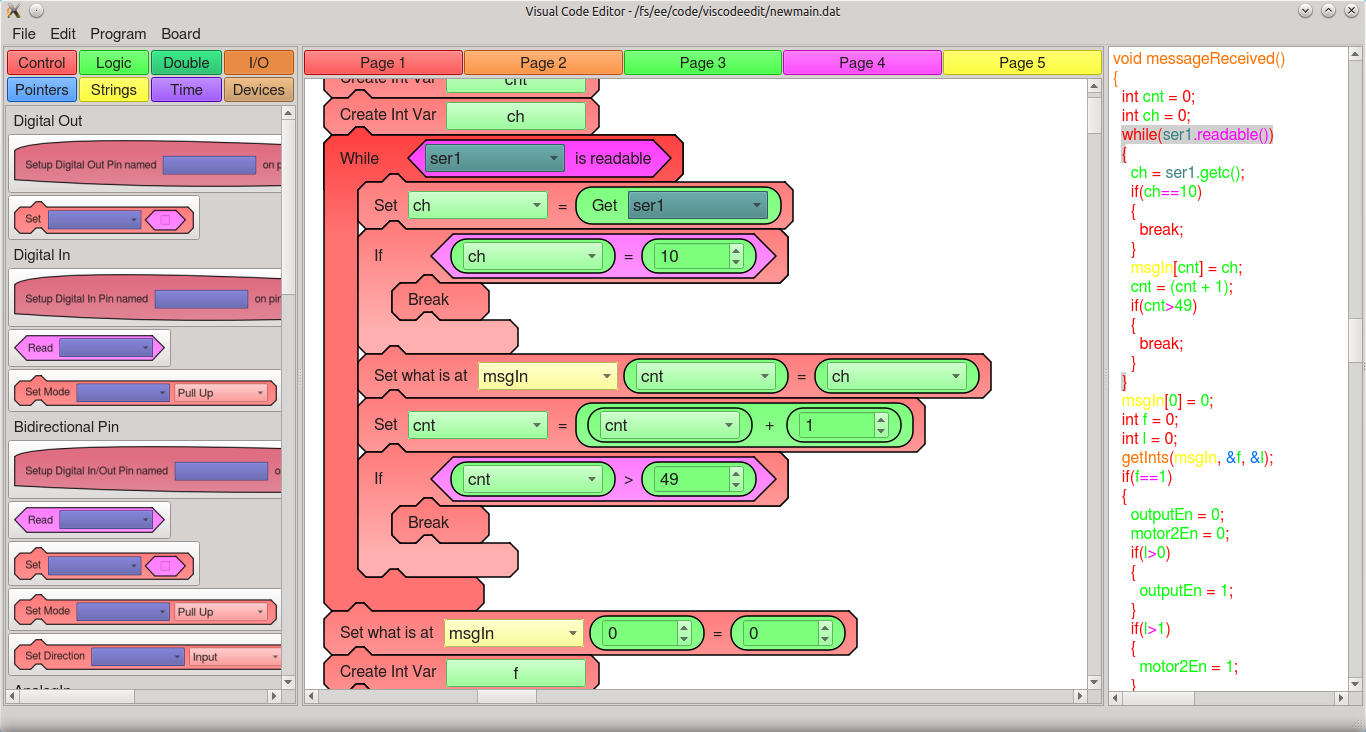
But there’s a problem with all educational robots. The programming. For someone just starting out in robotics club, being able to code isn’t a guarantee. You need an easy to use programming interface. This project for the Hackaday Prize gives all students a great visual programming interface. It’s basically like the first generation of Lego Mindstorms, only you don’t need a weird IR tower attached to a serial port.
 Of course you can’t program a robot without a board, and this project brings it in spades. The brain for this platform is built on an ARM microcontroller, has Bluetooth, supports up to six DC motors, twelve analog inputs, PWM and serial ports, and all the ports are color-coded for kids who can’t read so good.
This is a visual programming environment, though, and with that, you get a fancy IDE filled with loops that wrap around commands, IO access that’s in easy to read blocks, and control software that gives students a dashboard filled with buttons and odometers and the video feed from the camera. It’s a great Hackaday Prize entry, and an excellent way to introduce kids to robotics.


Reminds me a bit of the Scratch GUI. Which, at least with my kids, is a good thing.
Thanks! It was definitely inspired by Scratch!
It is better than Scratch as you can see the final code, Scratch gets kids started then acts as a barrier to them progressing to the next level as it does not have that conceptual bridge.
Love the way he organized everything. You’d think that the Arduino IDE would be like this. Props to him for making it all progressive by levels and the use of a powerful chip. Once someone uses this, they can easily jump to having the knowledge necessary to wield multiple microcontrollers.
Also, nice Shawshank Redemption reference.
Thanks! That’s the goal. At this point the software only generates mbed code for my board, but the software can be configured via a text file and so could easily be modified to generate code for other boards/libraries…
What kind of motors? Encoded?
Really, most kinds of motor. You can use DC motors, steppers, servos, solenoids. I have three dual motor driver chips on the board with PWM outputs from the ARM connected. And yes, you can hook up encoders to digital inputs. The software/libraries is already setup to use encoders. In my demo robot I did PID control of the arm/claw…
Caveat – am a cranky, old, cigar-chomping, get-off-of-my-dirt type.
The GUI is **not** the principal reason to use ‘visual’ programing. And others have heard me utter this crap bazzillions of times – it is not graphical vs textual programming; it is dataflow vs imperative.
Dataflow stuff (e.g., LabView) is a decent agent for concurrency. Otherwise, if you have an implicit list of things to do in a deterministic fashion, imperative programming is the choice.
This stuff took a boat-load of hard work – and is probably usable because it emits C code (am looking at you, National Instruments). Otherwise, visual stuff is the black hole of industrial control systems – once it goes in, you never can see it again; that is, Write-only.
Now get off of my dirt…
And, despite data flow graphs being, well, graphs, their neat identity mapping to a clear conceptual representation of the task at hand makes data flow intuitive (to me at least) despite my being unable to form a “mental picture” or call up a visual memory as such (with advanced warning I can memorize a description I make of what I’m looking at but if asked about some aspect of the scene I didn’t think to describe I’m out of luck).
Thanks for your input. From my perspective, I went with the graphical over text not because of dataflow vs imperative programming, but to ease learning imperative programming for beginners. By using a graphical interface a beginner doesn’t have to learn the syntax to program. That way beginners can just learn the logic and how things work before moving on to learning the syntax. My context for developing this is teaching inner city kids how to code, and so a main goal is to lower the barrier to entry. But the end in mind is to teach actual code, so that is why it emits C code and can actually show the correspondence between various ‘blocks’ and the code they generate…
Visual doesn’t always mean easy… Speaking as someone with no visual memory anything taught through an essentially visual/spatial metaphor becomes inaccessible. (Imagine that you are looking at the interface through a keyhole with no way to remember what any previous view looked like). Anything like this ought to have a purely textual/verbal representation on an equal footing.
Looks just like AppInventor.
Isn’t this basically what ROS Blockly package does? I use that to teach children Programming and robotics basics here in New England.
The current FIRST Tech Challenge system uses a similar interface grown out of Google/MIT’s App Inventor. With it, our team of 5 teenagers (who had never worked on a robot before) went from no experience to rewriting the control code for the previous season’s team in three 2-hour sessions.
Unfortunately, the FTC system uses two Android phone and an expensive (and cranky) hardware interface from Modern robotics. Once you get past the cost and loose connectors, the programming interface is great. I look forward to seeing if this can be made as easy to use.
For more information of the FTC programming, google “FIRST tech challenge programming resources”
Love the interface for the actual robot with dials and everything, but the programming GUI is basically Google Blockly: https://developers.google.com/blockly/
Thanks! Yes, it is like Scratch, Blockly and others. I’m not completely sure anymore, but when I first made the software a few years ago, I couldn’t find any that met my requirements, 1) were customizable enough to generate C/C++ mbed code, 2) shows how the blocks translate to actual code, and also preferences a) runs on locally and not via web on a Raspberry Pi, b) has different ‘levels’ so blocks can be added to correspond to lessons, and some other goals, c) is easily customizable…
Picaxe controllers had an option for something like this but used proper flow chart symbols which I think is better.
I love the Zoolander reference.
Gary Jenkins
FRC Coach