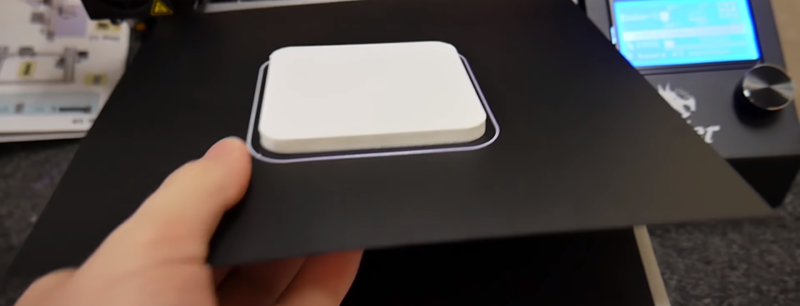
We have a friend who has always been obsessed that he didn’t invent the Weed Eater. After all, it is just some fishing line and a motor. We might feel the same way about Easy-Peelzy, which [Maker’s Muse] reviews in the video, below. The idea is very simple. Two squares of material that have magnets in them and one surface is something similar to BuildTak. You mount one square down on your print bed and then put the other square down so that it magnetically sticks. Print, and then pull the top square off and pop your print off.
Judging from the video this looks like it works very well. The price looks high until you realize the currency converts to under 20 U.S. dollars.
In tests, the bed worked well with PLA. It did warp a bit on PETG until he raised the bed temperature a bit. Because the surface is like BuildTak, a high-temperature bed like that needed with ABS is probably not a good idea.
The two squares do have to align correctly to lock in. We don’t know whether it has multiple magnets, or if there is something about the way the sheets are magnetized — it was hard to tell from the video. Although the system had a successful Kickstarter and claims it has a patent pending, [Maker’s Muse] points out there are other places to get essentially the same thing. In addition, we’ve seen homebrew versions, including one from [Maker’s Muse] himself.
We’ve talked about how to improve print surfaces before. One of these has more or less taken over, and it will be interesting to see if magnetic removable surfaces are a fad or become the way things work by default.


Just use Pertinax. Cheap and works great with both PLA and ABS.
Cool idea! Any experience with blank PCBs with the copper still on them?
Never having heard of this, I wondered how a Roman Emperor assassinated in AD193 could help my prints stick to the build plate. Finally found out in the search results way down that it appears to be plain phenolic sheet, is that correct?
Right.
Use 0.5 to 1mm thickness.
Sand it down till it doesn’t shine anymore, then either clamp it to the build plate (for small objects and first experiments) or fix it permanently using 3M 468MP.
Sticks perfectly when hot, and the prints will separate themselves when the plate cools down.
Lasts nearly forever.
Thanks, I appreciate it. I ought to be able to source a phenolic sheet locally, probably not as thin as 0.5mm but more towards circuit board thickness.
They have discontinued this product.
I’d like to try it but the only shipping option from HK was $65 USD. I think I’ll wait.
What? I just checked and it said HK$35 which amounts to $4.46 USD as of right now. Where the hell are you getting $65 USD?
Also it’s on sale for HK$95 (20cm square size) which as of right now is $12.11 USD. Seems like it’s worth a try for under $20 shipped
My mistake, it’s $65 HKD
Damn. My build plate is aluminum.
That’s why there are two pieces. One sticks with adhesive. The other sticks to that piece magnetically.
Ah, I had misunderstood. I thought the flexy sheet was itself magnetised.
The two pieces stick magnetically. One if the pieces also sticks with adhesive. The sticky one is the interface between your bed and the flex one.
The time, money, and effort that your average 3D printer (the person, not the machine) will expend to avoid doing something the right way never ceases to amaze me. They’ll happily spend $5, twenty times, and hours upon endless hours, trying to get prints to stick, instead of spending $20-30, one time, for a piece of PEI that “just works”.
Penny-wise and pound foolish, indeed!
My only problem with straight-up PEI beds is that it occasionally works too well. If the bed is a hair higher than it’s supposed to be, and your print has a lot of bed contact, you can just about fuse the print on. If you’re lucky, you were using ABS and you can acetone the bits off. If not, get a scraper and just try real hard not to completely ruin the bed finish.
A scraper will pop prints off. If they’re sticking too hard, you may be running the bed too hot.
I’ve printed PLA, TPU, and ABS, for years on multiple printers with PEI bed surfaces, and never had a print stuck so hard it wouldn’t pop off with a scraper. If you cheap out and get PEI tape, you’ll end up with bubbles or tearing it and have to replace it frequently. If you get a piece of 0.3 or 0.7 mm PEI it will last for years. I have a piece of 0.7 mmPEI on a printer at the makerspace that’s been in use for over 3 years and no one has managed to destroy it yet (though on guy did use a wire brush to “clean” it!). If there were a way to destroy it, they would have found it by now.
That doesn’t track with my experience. I’ve had prints attach themselves so firmly that I’ve had to get out the chisel and hammer.
I printed on PEI for a while. When I started printing with PETG I had prints that would snap before they came off the PEI sheet. Scrapers would either marr the print or the bed. I prefer PETG so the PEI had to go.
I agree with this sentiment, except for the conclusion. PETG sticks waaaay too well to PEI at the “right” temperature, but if you then start to dial it down, you’ll find a sweet spot where it sticks just enough but then peels off without damage when fully cooled.
OTOH, I _do_ peel the parts off with a razor-blade scraper for Ceran cook tops or cleaning glass. A normal paint scraper just won’t get under the lip of the print. IME.
I’ve also dreamt the dream of removable PEI sheets, but since my $15 sheet is still going, 3 km of filament after install, I haven’t had the opportunity to play around yet.
PEI is not an end all solution either. It is good but if printing ABS the adhesive will weaken from the temps and start introducing air bubbles under the PEI over time.
I agree with you core statement, but I don’t agree that you can just buy PEI and be done with it. PEI works great for some materials, but can work too good or not at all as well. I loved PEI for smaller PLA prints, but when I started printing big it was too much work to get stuff un-stuck. Then when I started printing nylons getting adhesion was a nightmare. I’ve gone back to plain old glass with glue stick.
Try washing the glass with soap and water, and drying with a clean paper towel. Once you do, don’t touch it or use anything else, glue stick, isopropyl, nothing. PLA/PETG sticks like a champ, and when the bed cools, the part pops off.
That is how I started when I first got my printer and it was awesome! But I quickly started having adhesion problems and I was always either meticulously cleaning the bed before each print or worrying about adhesion. Maybe my workshop is just more dusty than average? Now I do 3-5 prints between application of gluestick and up to 10 applications of gluestick before cleaning the bed down to glass.
For PLA I put down a layer of diluted PVA glue (a wet cloth and a squirt of glue is enough) which then dries super fast with the heated bed on. The sneaky part of this is the PLA sticks to the PVA well, and when a part is removed most of the PVA remains but some is pulled off. That leaves behind PVA *and* small patches of newly exposed super-clean glass that also sticks super well. Adhesion remains good even after dozens and dozens of prints in my experience.
For me, I use PLA on glass and I just clean it off with Acetone every few prints. Alcohol never worked for me. Glue is messy. Clean glass gives a nice finish to the bottom layer.
I think pei works too well. The print is impossible to remove. I generally print large flat items so the print may have above average bed contact. I use a piece of buildtak. Works perfectly for me.
I use acetate (transparent for laser printing) and glue it with stick glue to my print bed.
Prints adhere perfectly, heat is transferred really well and they’re super easy to remove.
The sheet can stay there for months, and when you remove it you can just use water to clean the glass bed.
https://www.youtube.com/watch?v=MMxrqxx-Fjg&t=6s
I’ve been using a 1mm thick carbon fibre plate as my build surface for the past 4 years.
Sticks (really, really sticks) when hot, releases (fully loose) when cooled down.
No preparation or anything required, couldn’t be easier.
I only print with formfutura HIPS though, so I can’t attest to how well it works for other plastics.
Same here. I print mostly Pla ….absolutely perfect. I love it
“We have a friend who has always been obsessed that he didn’t invent the Weed Eater. After all, it is just some fishing line and a motor. ”
The first person who invents an easy way to reload those things without all the disassembly, and winding will make millions.
Indeed they will. I’ve found the trimmer head where two precut lengths are pushed through ratchets to work much better than the winding spool units. More wasteful as the unused ends have to be extracted but only takes seconds to put new pieces in.
I actually get such good results with just masking tape that I wouldn’t bother.
I’ve been loving the PrintInZ bed I bought a few months ago. Shame they appear to be discontinuing it. No need for a heated bed with PLA, prints adhere great during printing, and pop off with minimal effort when done. I’ve only had a couple mishaps with parts that had very little contact area to the print bed coming loose (Things like parts with triangle gaps at the bottom, or thin-walled tubes.)
I have some magnetic sheets for printing signs on. I may give them a try. I am not sure about the top surface of the magnetic sheet, but perhaps masking tape over the top?
I used glass sheets with glue stick for a looong time, and with the last printer i got a can of 3DLAC for free that i’m using now. So far, it works good enough. Maybe if the can of 3DLAC is empty, i’ll have a look at other surfaces.
As for the Easy-Peelzy, or other magnetic surfaces, they shure are OK for lower bed temperatures, but for ABS or other shrinking plastics, they are not the solution because of thermal demagetization at higher bed temperatures (Easy-Peelzy says it “can be used” up to 80°C). An other interesting aspect to me would be thermal conductivity of the magnetic sticker.
I ordered the Easy Peelzy and it fell apart after the third print.
So when peeling off the third print a part of the surface came off.