Successfully connecting things without physical wires has a profound effect on the maker brain. Machines talking to each other without any cables is as amazing today as it was a decade ago. When Bluetooth came out, it was a breakthrough since it offered a wireless way to connect cellphones to a PC. But Bluetooth is a complicated, high-bandwidth power hog, and it didn’t make sense for battery-powered devices with less demanding throughput requirements to pay the energy price. Enter Bluetooth LE (BLE), with power requirements modest enough to enable a multitude of applications including low power sensor nodes and beacons.
 Over the years, a number of gadgets with BLE have popped up such as the LightBlue Bean, BLE Beacons as well as quadcopters like the FlexBot that rely on BLE for communication. Android or iOS apps are the predominant method of talking to these wonderful gadgets though there are alternatives.
This is the first in a two part series on building with BLE devices. First, I’ll survey some BLE devices and how to get started with BLE from the Linux command line. Later, we will go into describing the process of making a NodeJS cross-platform app that will leverage the BLE capabilities and connect it to the Internet.
Lets get started.
Available BLE Hardware
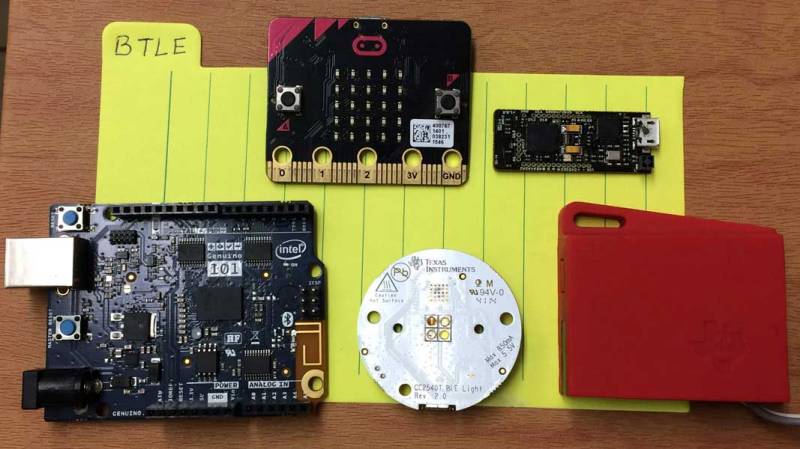
There are a number of hardware manufacturers that jumped on the BLE wagon by introducing some offerings to makers – the first board is free. Some boards were more successful than others, however, there were those that failed to withstand the test of time. Here is a short summary of the trinkets where money was spent.
LightBlue Bean
The LightBlue Bean by PunchThrough design has to be one of the most popular BLE board of its time. It came with a temperature sensor as well as an accelerometer and an RGB LED to boot. To make programming it easier, it was supported by the Arduino IDE and to program it, and you could use the ‘Bean Loader’ to upload your sketch wirelessly.
The production has since been discontinued but if you want to make your own, then feel free to download the hardware files and get at it.
TI LED Lights and Sensor Tag
Sold as a reference design, the TI Bluetooth Low Energy Light and the TI BLE sensor tag are excellent starting points for people who are starting out. The BLE light runs off the USB power and the BLE Sensor Tag has all sorts of sensors for you to try your hand at BLE integration.
Flexbot
I am not even sure if this one is available in the market or not but it is a good example of a real-time BLE application. It is a quadcopter that talks to a phone over BLE. The chip is the CC2650 and the master controller is an Atmega32U4.
IMUDuino
Initially launched in a Kickstarter project, [Alex Albino] did an excellent job at creating a usable BLE device with and IMU sensors as well as a barometer to boot. The software that comes with it is the highlight of the project and there is a lot you can do.
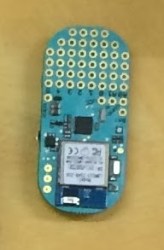
BBC Micro:bit
 The BBC Micro:Bit is a very capable device featuring support for MicroPython and a dozen other languages. The ARM Powered device has been developed by a lot of big names and is worth a look by beginners as well as more advanced makers alike.
Intel Edison and Arduino 101
Both the Intel Edison and Arduino 101/Intel Curie were part of Intel’s experiment with the maker market and both have been axed. They supported BLE and were expected to be a venture into the wearable market however that really did not work out. Great boards though.
Raspberry Pi 3 B/B+
Saving the best for last – the Raspberry Pi 3 B/B+ supports BLE and it is amazing. The same(ish) software that you write for desktop/laptop projects will work without (too many) hiccups on the single board computer. And this is where I am heading in this article. Since the RPi 3 supports BLE, what is stopping the maker community from making a gazillion IoT devices and sensor nodes with this wonderful technology? Not much.
That is the premise of this write-up. Lets look at the options.
BLE Communication in the simplest language possible
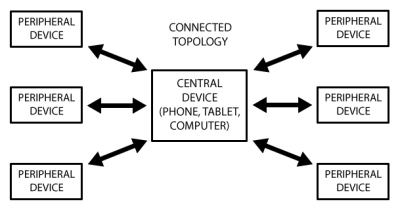 BLE or Bluetooth Low Energy works very differently from conventional serial emulation devices. Every BLE peripheral can be thought of as a server that is ready to accept connections. It advertises itself regularly over the airwaves. A client will connect to the device and can ask for a list of ‘services’ provided by the device. Services further have characteristics — for instance some services can only be read from while others can be only be written to. Some can do both. The client may then request a read or write operation to a service as per requirement.
Adafruit has a beginners guide, though you may not need all of the information to get off the ground. The important thing to note here is that a device may have more than one service and each service may have more than one characteristic.
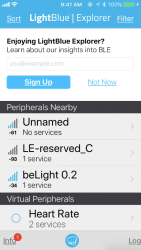
Testing BLE devices – LightBlue App On Android and iOS
So how do I know that my BLE device works to begin with? We can use the smartphone to answer this question with relative ease. In my case, I have an iPhone with the Light Blue App installed. The BLE device under test is the TI BLE Light and it shows up in the app as beLight 0.2. Connecting to it is as simple as clicking on the icon and a list of services it offers pops up. In the screenshot, the service UUID FFB0 is used for the LED control and the service itself has four characteristics.
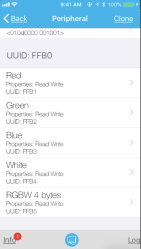
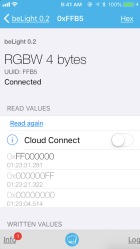
Every characteristic is like a memory location that we can write to and in my experiment, I can write four bytes to the RGBW characteristic which will then in turn be used to control the brightness of the four LEDs.
This was quite easy since the hardware works and the iOS app works as well. There is just one problem. What if I want to be able to use a color picker to control the color of the light like a Hue light bulb? What if I want to talk to multiple of these LED lights? What if I want to be able to connect them to say the Internet?
And what if I don’t want to learn Java(Android) or swift/C++ for iOS?
Alternatives to Phone apps – Command Line Tools
If you have a Linux machine, then the simplest option would be to use a couple of command line tools. Here is the recipe that I am using on OpenSUSE, though this should work on any Linux laptop or computer with a BLE interface.
There are two tools required. The first is the hcitool which allows you to talk to the Host Controller Interface. It comes pre-installed in most modern distributions but you may install it manually. (I found this page quite useful). The second tool is gatttool which may also come pre-installed or may be installed manually.
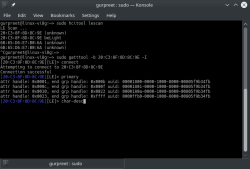
Step 1 is to see if the BLE adaptor on your Linux box can be recognized by hcitool.
hcitool dev
Devices:
hci0 xx:xx:xx:xx:xx:xx
If nothing shows up, you can check if the onboard BLE adaptor is enabled, or if you have an older laptop or Raspberry Pi, get a BLE USB dongle. These are quite cheap on eBay and the like.
Step 2 is to scan for BLE devices, which should yield a list of BLE devices in the vicinity.
sudo hcitool lescan
Step 3 is to try to connect to the device. This is where the fun really starts. There are two options where the first is to use the interactive mode.
sudo gatttool -b xx:ma:c_:ad:re:ss -I
This will bring up a prompt and you can establish a connection simply by typing connect. In order to get a list of services on the device, type primary and press return. A few services should pop up depending upon the device. To get a list of the characteristics, type char-desc to get a list of all characteristics on the device along with their handles. This is important since we need the handle corresponding to the appropriate characteristic.
The final step in our experiment is to read or write to the appropriate characteristic. This is accomplished by using
char-write-req handle data.
Here are screenshots for the exercise from my OpenSUSE laptop. I found this page quite informative on the subject.
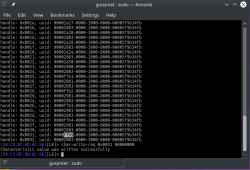
To read data, issue the command char-read handle.
gatttool can also be run out of interactive mode and can be used to read or write to a device directly:
sudo gatttool -b xx:ma:c :ad:re:ss --char-write-req -a handle -n value. This is very useful if you want to script a set of commands like bash or even Python. Lets look at a quick example. If you don’t have pexpect installed, you’ll need it.
import pexpect
import time

LIGHT01 = "20:C3:8F:8D:8C:9E"
VALUE = ["00000000", "FF000000", "00FF0000", "0000FF00", "000000FF", "00000000"];

child = pexpect.spawn("gatttool -I")

child.sendline("connect {0}".format(LIGHT01))
child.expect("Connection successful", timeout=5)
print ("Connected to the light!")
while True:
    for i in range(6):
        child.sendline("char-write-req 0x0031 {0}".format(VALUE[i]))
        print ("Value: ", VALUE[i])
        child.expect("Characteristic value was written successfully", timeout=5)
        time.sleep(1);

child.sendline("disconnect")

child.close()

print ("Light Turned OFF")
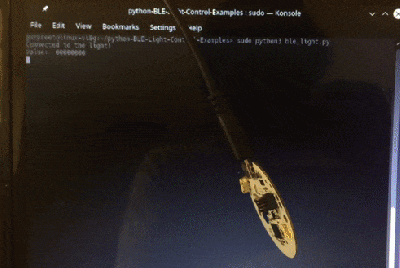 This small piece of code calls
 gatttool through Python. Here I cycle through the RGBW lights, but this can be extended as far as you’d like.
Conclusion
We just saw how easy it was to control a BLE LED and this can be extended in a number of ways. You could use this as the starting point for a wearable project, for instance. We can also connect it to the Internet and we will be taking that up in the next installment. For now, I would love to hear about your BLE adventures. Happy experimenting.


I really miss SPP in BLE
” But Bluetooth is a complicated, high-bandwidth power hog, and it didn’t make sense for battery-powered devices with less demanding throughput requirements to pay the energy price.”
I hear the stacks are a mess, which might explain a lot of difficulties I’ve had over the years. WiFi has been less problematic.
Why is ESP32 not mentioned?
supposidly its ble libraries arent up to snuff. but i played around with my esp32 yesterday and didnt have any problems getting bluetooth to work.
Likewise, I have the ESP32 working and an example project for BLE communication with Android in place: https://www.youtube.com/watch?v=O3rAx-gd5ao
There is a lot not mentioned, but, in articles like this how far do you go? Try to include everything it would never be finished.
well, one could start by stating an intention and then working within the constraints of it, say “making low power sensor nodes and beacons”. As it is, much like the talk of skipping the ESP32, including a RPi3(+) and the Intel (Edison/Curie) seem a bit of a contrast compared to the other devices which are small, cheap and readily available dev boards that are suitable for embedding (i.e. things I would describe as bluetooth devices rather than systems that can, amongst many functions, use bluetooth).
So, does it need to include everything? No, but at least things can be evaluated in a consistent manner towards a clear goal. As it is, this article feels a bit ‘shot-gun’ like with bits all over the place and told me more about talking to a specific ‘widget’ rather than creating an entire solution (which is ultimately useful once one has a suitable sensor).
Perhaps this was the intent, in which case the ESP32 and the sensor side of the ‘experiment’ is not the focus and this is more about creating support software for such devices instead but at least making it clear would set the right expectations for a reader.
and you are missing the Nordic Semiconductor nRF51-52 series
micro-bit and the arduino 101 has the nRF51… no need to mention :-)… very good write up, congrats to the author.
Its worth a mention of fully open source implementations of Bluetooth Low Energy specifications including Bluetooth Mesh in https://www.zephyrproject.org/ and http://mynewt.apache.org/
Thanks. I’ve been slacking on my nrf51 project. I need to check those utilities to the HID-over-GATT sorted
Same concept, commercial device and a bit of reverse engineering ;) “https://iayanpahwa.github.io/Reverse-Engineering-IoT-Devices/”
Anyone try Atmosphere IoT? Their tools make it really easy to get started with BLE in the IoT setting and they support Arduino 101, and ESP32.
https://developer.atmosphereiot.com/documents/guides/gettingstartedesp32.html
Their tool has a fairly neat interface that helps get you started.
Nice introduction.
¿Off topic?
After reading the python script, ¿how does it disconnects from the belight?
There’s no ending to that “while True” expression.
And if you kill the script, then “disconnect command” is never sent.
What happens with the device in that case?
Hello,
Any one has tried to connect micro:bit to an ESP32 via BLE. I can’t find any documentation to do that.
When I scan bt with ESP32’s scan example, I can see micro:bit. but no manner to connect.