Queercon is a conference within a conference. Taking place within DEF CON, Queercon is a social network of LGBT hackers that gathers each year to host events, talks, and a kickin’ pool party. Since 2012 they have also been building electronic badges as part of the fun and I can vouch that they’re contenders for most creative badge design every single year.
A total of 450 electronic badges were made this year, and the aesthetic is as close to a polished consumer product as I have ever seen in a badge, yet they also retain the charm and feel of unique electronics built for hardware geeks. With wireless communication that delivers a complex and clever game to the badges, the designers are encouraging interaction between people (not just between badges). I had the chance to do a teardown of one of these glorious badges, and also gathered quite a bit of info on the puzzles within during Friday’s badge talk in the QC suite.
Join me after the break as I tear down the Queercon 15 hardware badge. If you haven’t yet looked over my review of the official DC26 badge, check that out as well!
Hardware That Is Gorgeous Assembled and Disassembled
![]()
Each badge is made up of three distinct layers. Shown here from right to left, the top layer is a PCB face place, the middle layer is acrylic, and the bottom layer is where all the magic happens.
The faceplates themselves are Printed Circuit Boards but ironically have no circuitry in them. This is a tongue-in-cheek comment since I think this choice was brilliant. PCB fabrication has become so accessible, and its use as an artistic medium is so en vogue, that it is indeed the perfect choice. Joining the badge makers to deliver the top layer designs is [TwinkleTwinkie] who you probably know as a prolific add-on designer.
The center layer is a thick acrylic frame that is laser-cut. It is split into two pieces that key together and acts both as a stand-off between the top and bottom layers, as well as a diffuser. Multiple 90-degree RGB LEDs are positioned around the circumference of the board, shining through this acrylic. There are also 6 upward facing RGB LEDs that shine through the center strip of to the faceplate (either through holes or through the substrate) to indicate game progress.
![]()
The bottom layer of the badge is where all of the electronics are located. The most prominent feature are the two LCD character displays. These were dirt cheap since they’re old stock with an unknown manufacture date. An interesting anecdote from the badge talk is that these modules use leaded solder but the badge fab process was ROHS (lead-free). This presented an interesting problem as solder on the modules melts at a lower temperature than the paste used to attach them to the boards. This meant sometimes the pin connections on the displays themselves would be disturbed during reflow and led to hand rework on some badges.
Here you can get a good look at the two styles of LEDs as well as the HT16D35B LED driver chip. The button detail also shows how the extra-long momentary push switches are used to extend through holes on the top faceplate. The copper-colored circle is an add-on header extension board that interfaces with the underside of this layer.
![]()
The underside of the board remains visible when the badge is fully assembled. It has a pleasant matte-black solder mask with white silkscreen. Here you’ll find two MSP430 processors (MSP430FR2422, MSP430FR2972IPMR), one which handles the main hardware functionality (buttons, screens, visualizations, and game) with the other handling radio communications (the green board to the left is a HopeRF RFM75 module).
The badge is powered by two AA batteries; this saves a lot of weight compared to the four AA batteries of the official DEF CON 26 badge, but at the expense of a shorter battery life that will require replacement for many during the con.
Let’s Play a Wireless, Collaborative Game
The badge immerses all users into an interactive text adventure game. Based on the Expeditionary Force series by Craig Alanson, the storyline of the game is beyond the scope of review. Let’s just say the badge has an attitude that keeps you playing as you hope for more snarky retorts from the character called Skippy who inhabits the badge.
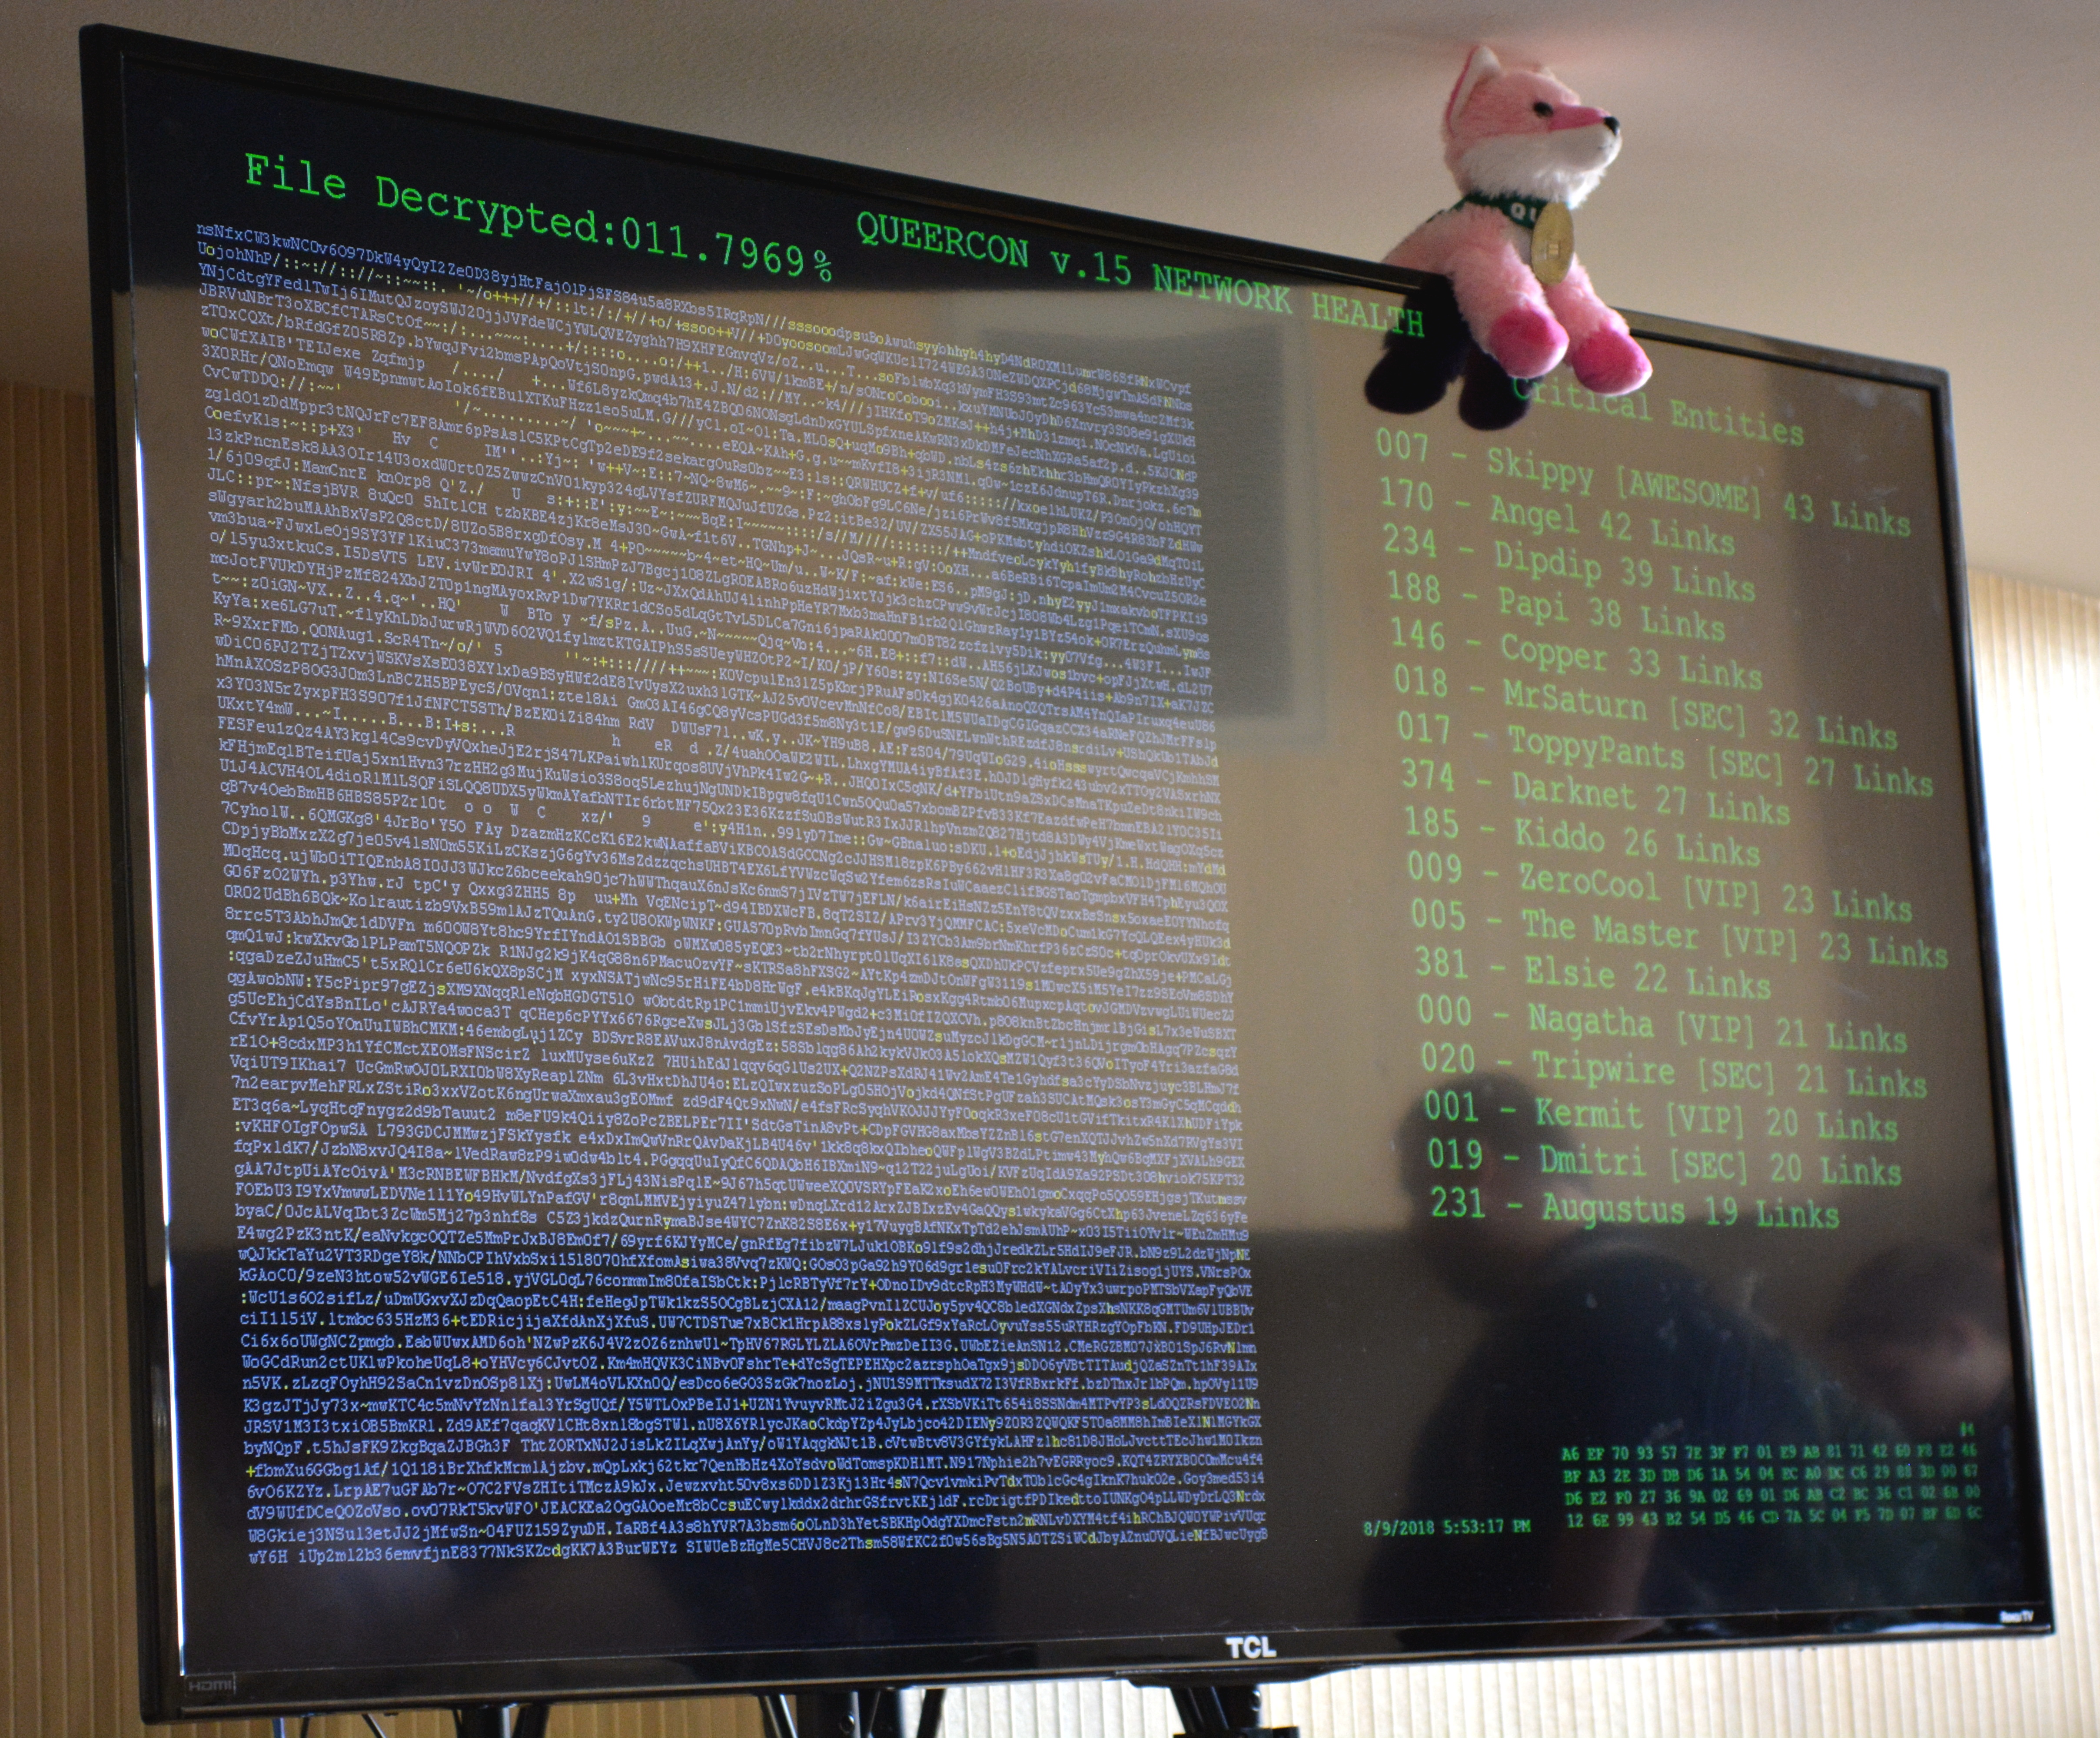
Each badge contains 1/16 of a larger file. By communicating with other badges, this file begins to assemble itself. Badges recognize each other’s presence automatically, but can only be paired if both badge owners choose that option from the menu. This encourages people to visit with one another as they establish who’s badge is who’s and work to unlock more of the puzzle.
At the Queercon suite, a scoreboard wirelessly queries nearby badges to show how far the collective process has progressed toward solving the group puzzle (correctly assembling that 16-part file I mentioned before). The big board also shows a list of badges by their number and stock name, along with the number of inter-badge links they have successfully performed.


With a block of characters, you can see some stand out yellow against the mostly white characters. This is not a cipher, but as the file is solved, images will become recognizable visually. I’m uncertain if the hex block is of use but thought I’d snap an image just in case.
A Clever Tool for Firmware Development
Anyone who’s looked into a badge with puzzles like this one knows that a very intense state machine is at work guarding all the doors and holding all the keys. I think it’s really interesting that a tool to manage all of this was built as part of the badge development process. Called the “Statemaker”, the tool is written in Python to take CSV input and spit out binaries that can be written to the badge.
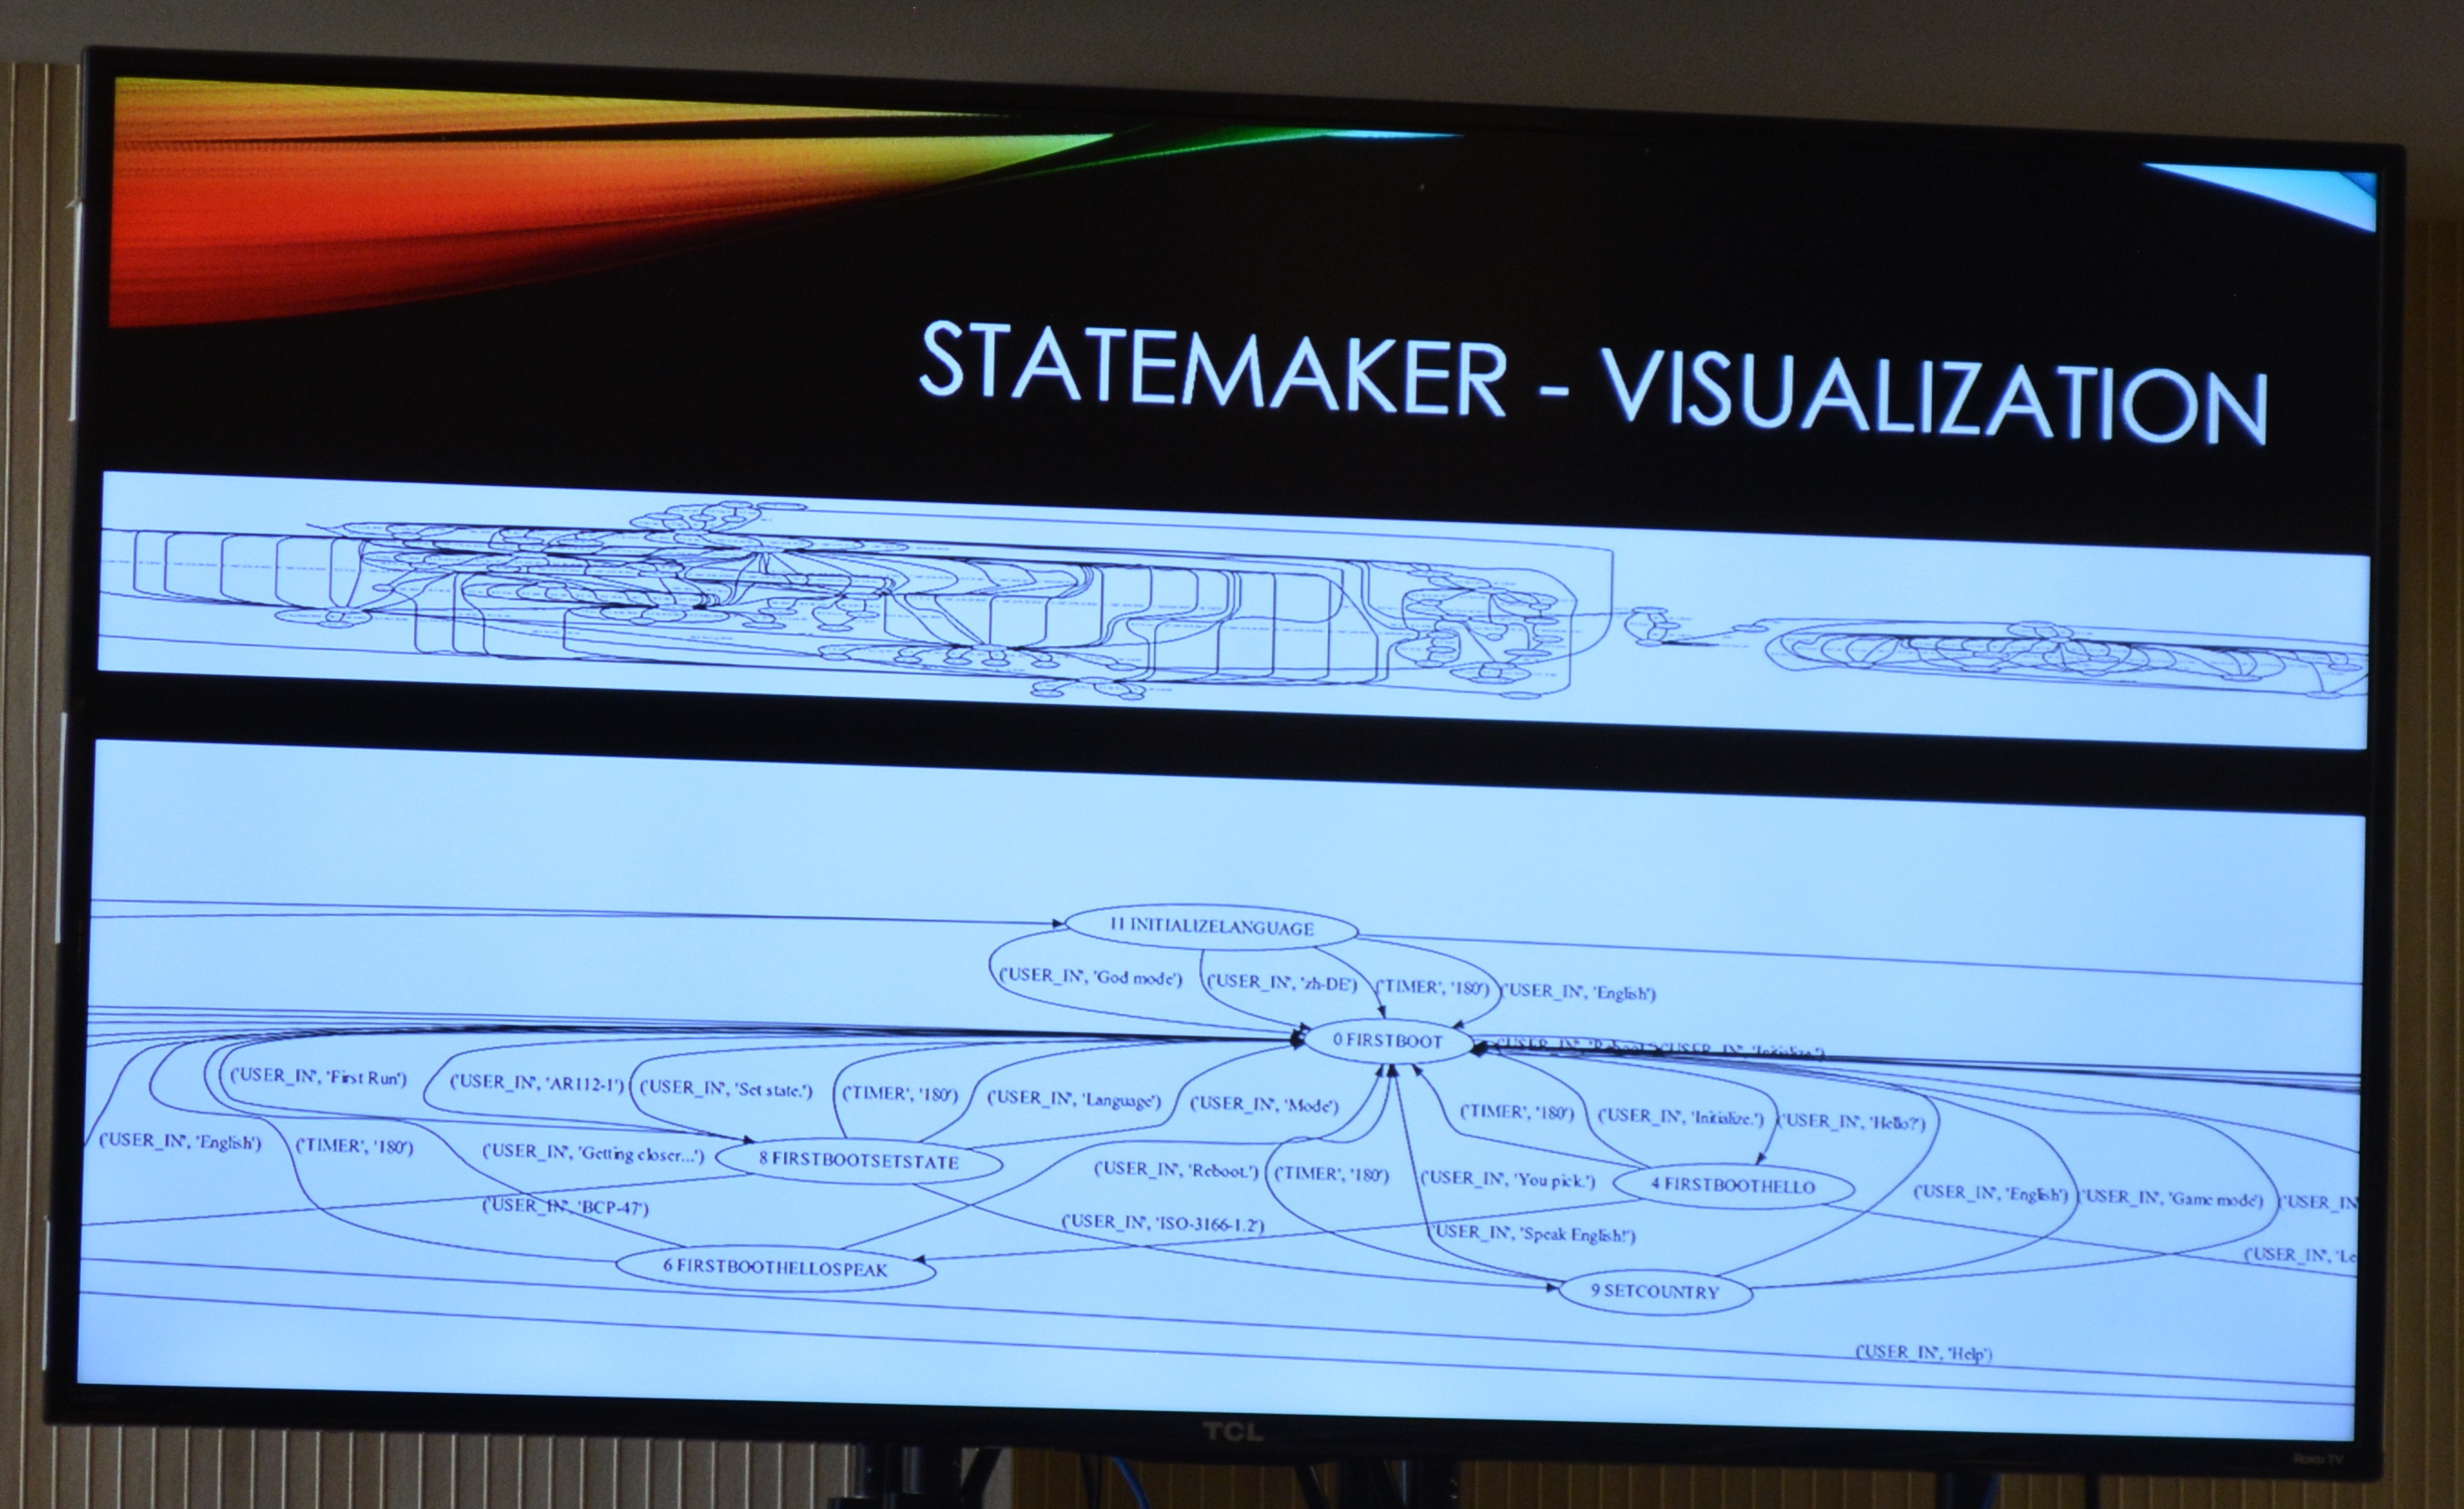
The team used Google Sheets to track all of the choices, all of the interactions, and all of the strings that can possibly take place during the game. Statemaker uses the CSV export from that spreadsheet to perform several important operations. Most notably, it ensures that the data output is valid (avoiding string buffer overruns and other common gotchas before they are added to the firmware). But a side benefit is the ability to visualize the state machine. Shown here is the overview of the entire game, you can also see some closer detail here.
Another Hardware Masterpiece Joins the QC Ranks


The Queercon badge team’s ability to hit home runs is somewhat alarming. Taking a look at some of my favorite QC badges (2017 badge, 2016 badge, 2014 badge) from the last few years you can see that aesthetic, form, and function have all seen one brilliant leap after the next.
[Evan Mackay], [George Louthan], and [Jonathan Nelson] are the heavy lifters behind this badge (and I believe all of the others as well). But as with all great undertakings, their success also depends on a dedicated team who do whatever it takes to get these kinds of passion projects across the finish line. Bravo all.


It’s funny how something so simple as “I’ll use two dirt-cheap displays instead of one expensive display” can be transformative. I think we just naturally look at the amount of information we need to show, and size one display to hold it all. That’s a little mental leap that makes for not only a more affordable product, but a more versatile form factor.
Years ago, I had some B&W CRTs that had a little character LCD underneath for settings, rather than implementing an OSD. I’m not sure why they did it this way (possibly because the input was stupendously versatile, and maybe an OSD would’ve been unwieldy to make cope with such wide sync parameters?), but it gave some interesting abilities: The LCD could be on while the CRT was sleeping, could report sync timings even while the CRT was displaying gibberish or disabled itself for invalid input, could adjust its brightness independent of the main electron gun, et cetera. It was really cool, and I need to keep that technique in my mental back pocket.
That’s far out!
I liked how they used PCBs as a plate cover for the badge, it really lended to the finished look of the badge. It’s an idea I should keep in my toolkit!
i have so many of those displays its not even funny, i think i got 40 for $30 or so at an online surplus store some years back
If you got datasheets, at least you could use them someday.
I bought a box of lcd’s because they were absurdly cheap.
I think I ended up with 200 for ~$30 shipped or something.
problem is, they are potted, with unmarked controllers, that I couldn’t even get to turn on, with no datasheets to indicate pins, part number, manufacturer…
Lesson learned; cheap can be too cheap if they are useless to you.
Binary LoL
Hang on is this “15” as in they’ve had 14 Queercons already, or is it from 3 years ago?
Well the article mentioned that Queercon started in 2012, so by reasoning it couldn’t have been 15 years, I would say it was from 3 years ago, 2015.
No, the article says they started doing badges in 2012.
Some form of Queercon was running at least as far back as 2008.
We’ve had 14 already. Cool badges did not start until the last few years.
According to https://www.queercon.org/about-us/, “Queercon started 10 years ago”. I can’t quite figure out how the numbering works.
This year (2018) was Queercon’s 15th year in existence, and the 6th year of fancy electronic badges that have definitely grown more fancy each year! The website is just way out of date. Thanks for the nice write-up!
“Hang on is this “15” as in they’ve had 14 Queercons already, or is it from 3 years ago?”
It is 15, as in pen15.
B^)
Queercon #15 badge, which is the 6th Queercon badge, debuted Defcon #26 taking place in 2018 and yes, it is indeed confusing haha.