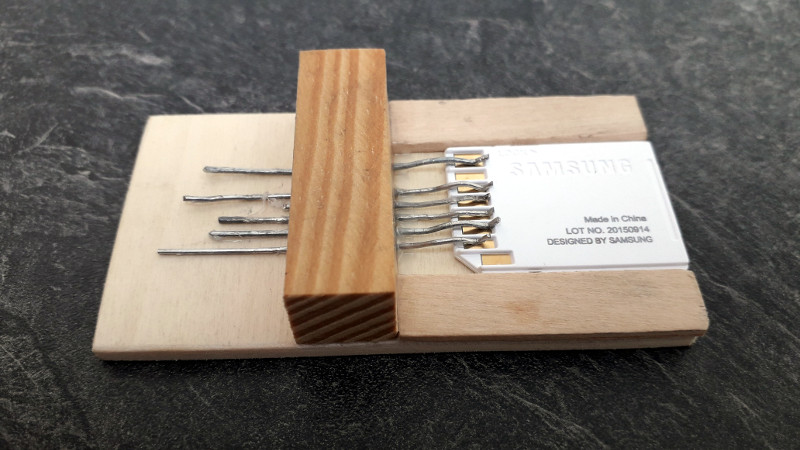
We feature hacks on this site of all levels of complexity. The simplest ones are usually the most elegant of “Why didn’t I think of that!” builds, but just occasionally we find something that is as much a bodge as a hack, a piece of work the sheer audacity of which elicits a reaction that has more of the “How did they get away with that! ” about it.
Such a moment comes today from [Robinlol], who has made an SD card socket. Why would you make an SD card socket when you could buy one is unclear, beyond that he didn’t want to buy one on an Arduino shield and considered manufacture his only option. Taking some pieces of wood, popsicle sticks, and paperclips, he proceeded to create a working SD card of such bodgeworthy briliance that even though it is frankly awful we still can’t help admiring it. It’s an SD card holder, and despite looking like a bunch of bent paperclips stuck in some wood, it works. What more could you want from an SD card holder?
Paperclips are versatile items. If an SD card holder isn’t good enough, how about using them in a CNC build?


Heh. Full sized SD card adapters make nice bodgeful holders for micro SD cards.
But that’s not a bodge, that’s literally what it’s for.
I think svofski is referring to the trick of soldering wires to the adapters pads in order to access the microSD card pins.
In that case bodge would be apt since that isn’t what the adapters are intended for.
I prefer this one with double headers: https://www.instructables.com/id/Cheap-DIY-SD-card-breadboard-socket/
Why not use a double row header, clip off the pins on one side on the bottom, and super glue in some plastic sheet for a spacer to press the card contacts against the pins?
Nice, I like that, definitely better than the paperclips hodgepodge, just as cheap, and breadboard friendly!
Greg, I suppose that if you use a double row header, you’ll struggle to bend the contacts as needed, and if you use a spacer you then have the sharp end of the pins rubbing on your contacts. But if you are not planning for many insert/remove cycles, your idea is sound.
I had to do this for microSD cards ( using the cnc router to flash hundreds of smoothieboard sd cards ) and it was hell to make and never lasted. Guess for one card it’s fine though.
just use an micro-sd to sd adapter next time and you have less struggle.
I would have needed hundreds of those, the point of the setup is I laid down as many as 400 microsd cards on the CNC router’s table, then moved the pins in contact with each to flash them.
Nice idea!
Well it didn’t work very well. I managed to flash a few hundred but it was so much work we went back to manual flashing. I need something reliable to make contact/spring, and the DIY options I tried didn’t work well. I think on digikey I found some pogo pins that are very compact and sold in rows, that would probably work, but I need to make the PCBs to solder them to.
Ahhh, took a while to cotton that you had the CNC moving from card to card…. Yah for something like that I might have rigged a “pez dispenser” of MicroSD cards with the contacts in top, spring loaded, just kick each card out when programming finished.
pogo pins would have worked. I’ve used them for something just like this at a old job.
Pogo pins perhaps?
I’d be impressed with the MacGyver factor if structure was ALL popsicle sticks…. :-D
This approach would work pretty well when you’ve got a really odd contact layout, if you wanted to read smart cards or SIM cards for example, you could have longer and shorter pins to hit the contacts you need.
There’s other ways to go for this, edge connectors for example, this one used the 5.25 floppy edge connector plug..
https://hackaday.com/2016/02/28/floppy-drive-hides-sd-card-reader/
Thanks for sharing the amazing post.
Once I had to build a programmer to reset my xerox toner-cartridge chips – the most difficult task was to find a socket where this 4-pin circuit board could be plugged into. Finally I took a SATA plug and added some support fills on both side to match the raster of plug and the card.
First belly laugh of the day! Glad it worked (at least a little). Yup, you can get away with a lot sometimes.
It’s a hack!
Much easier – build it like this: https://www.hackerspace-ffm.de/wiki/index.php?title=SimpleSDAudio#Build_your_own_SD_breadboard_adapter
I think that was mentioned here a couple years ago, but I forgot about it until now.
Forgot to use duct tape.
Another option is to use an old connector of a floppy drive. A SD card fits perfectly in the connector that connects to the floppy drive cable that connects to the mother board. One just have to add a spacer like a piece of old PC board in the connector to ensure that the SD card goes into the right part of the connector.