This Simple Media Player Will Inspire Beginners And Invite Experimentation

While it would have been considered science-fiction just a few decades ago, the ability to watch virtually any movie or TV show on a little slab that fits in your pocket is today no big deal. But for an electronics beginner, being able to put together a pocketable video player like this one would be quite exciting, and might even serve as a gateway into the larger world of electronics design.

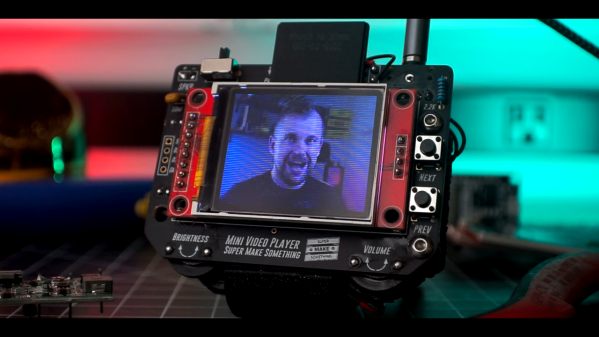
For inspiration, [Alex] from Super Make Something on YouTube looked to the Rickrolling keychain media players we featured back in January. His player is quite a bit larger and more capable, with a PCB design that allows the player to be built in multiple configurations, from audio-only to full video and a LiPo battery. The guts of the player center around an ESP32 module, with an audio amp and speakers plus a 1.8″ LCD screen with SD card reader for storing media files. Add in a few controls and switches and a little code, and you’ll be playing back media files in a snap. Build info and demo in the video below.

It may be a simple design, but we feel like that’s the whole point. [Alex] has taken pains to make this as approachable a build as possible. All the parts are cheap and easily available, and the skills needed to put it together are minimal — with the possible exception of soldering down the ESP32 module, which lacks castellated edge terminals. For a beginner, getting a usable media player by mixing together just a few modules would be magical, and the fact that it’s still pretty hackable afterward is just icing on the cake.

Continue reading “This Simple Media Player Will Inspire Beginners And Invite Experimentation”

Digging Deep Into SD Card Secrets

To some, an SD card is simply an SD card, notable only for the amount of storage it provides as printed on the label. However, just like poets, SD cards contain multitudes. [Jason Gin] was interested as to what made SanDisk’s High Endurance line of microSDXC cards tick, so he set out to investigate.

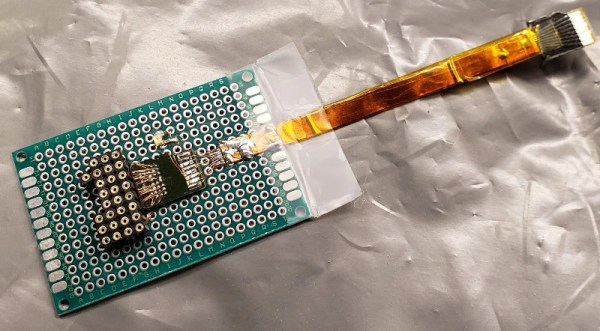
Naturally, customer service was of no help. Instead, [Jason] started by scraping away the epoxy covering which hides the card’s test points. Some delicate soldering was required to hook up the test points to a breakout board, while also connecting the SD interface to a computer to do its thing. A DS Logic Plus signal analyzer was used to pick apart the signals going to the chip to figure out what was going on inside.

After probing around, [Jason] was able to pull out the NAND Flash ID, which, when compared to a Toshiba datasheet, indicates the card uses BiCS3 3D TLC NAND Flash. 3D NAND Flash has several benefits over traditional planar Flash technology, and SanDisk might have saved [Jason] a lot of time investigating if they’d simply placed this in their promotional material.

We’ve seen other similar hacks before, like this data recovery performed via test points. If you’ve been working away on SD cards in your own workshop, be sure to let us know!

No SD Card Slot? No Problem!

We feature hacks on this site of all levels of complexity. The simplest ones are usually the most elegant of “Why didn’t I think of that!” builds, but just occasionally we find something that is as much a bodge as a hack, a piece of work the sheer audacity of which elicits a reaction that has more of the “How did they get away with that! ” about it.

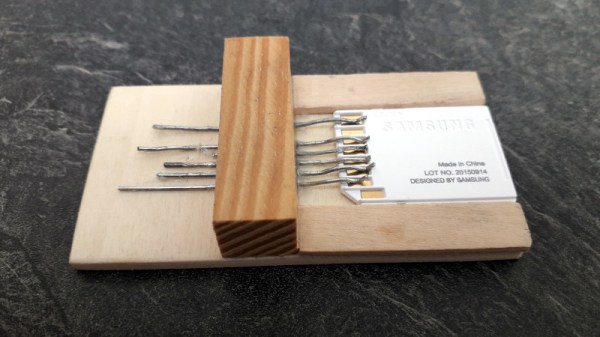
Such a moment comes today from [Robinlol], who has made an SD card socket. Why would you make an SD card socket when you could buy one is unclear, beyond that he didn’t want to buy one on an Arduino shield and considered manufacture his only option. Taking some pieces of wood, popsicle sticks, and paperclips, he proceeded to create a working SD card of such bodgeworthy briliance that even though it is frankly awful we still can’t help admiring it. It’s an SD card holder, and despite looking like a bunch of bent paperclips stuck in some wood, it works. What more could you want from an SD card holder?

Paperclips are versatile items. If an SD card holder isn’t good enough, how about using them in a CNC build?

Ask Hackaday: What’s In Your Digital Bugout Bag?

Your eyes pop open in the middle of the night, darting around the darkened bedroom as you wonder why you woke up. Had you heard something? Or was that a dream? The matter is settled with loud pounding on the front door. Heart racing as you see blue and red lights playing through the window, you open the door to see a grim-faced police officer standing there. “There’s been a hazardous materials accident on the highway,” he intones. “We need to completely evacuate this neighborhood. Gather what you need and be ready to leave in 15 minutes.”

Most people will live their entire lives without a scenario like this playing out, but such things happen all the time. Whether the disaster du jour is man-made or natural, the potential to need to leave in a big hurry is very real, and it pays to equip yourself to survive such an ordeal. The primary tool for this is the so-called “bugout bag,” a small backpack for each family member that contains the essentials — clothing, food, medications — to survive for 72 hours away from home.

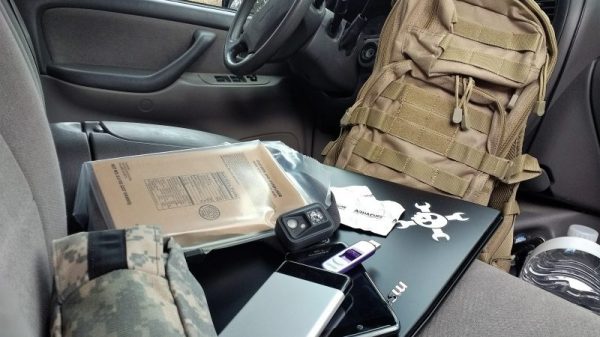
A bugout bag can turn a forced evacuation from a personal emergency into a minor inconvenience, as those at greatest risk well know — looking at you, Tornado Alley. But in our connected world, perhaps it pays to consider updating the bugout bag to include the essentials of our online lives, those cyber-needs that we’d be hard-pressed to live without for very long. What would a digital bugout bag look like?

Continue reading “Ask Hackaday: What’s In Your Digital Bugout Bag?”

Ask Hackaday: How On Earth Can A 2004 MP3 Player Read An SDXC Card?

What were you doing in 2004? Can you even remember 2004? Maybe it’s like the old joke about the 1960s, if you can remember it, you weren’t really there, man. Cast your mind back, [Lance Armstrong] was winning the Tour de France, and SpaceShipOne made it into space.

[Gregg Eshelman], wrote to us to say that in 2004 he bought an MP3 player. Ask your parents about them, they were what hipsters used before they had cassette tapes: portable music players that everyone thought were really cool back then, onto which music didn’t come from the Internet but had to be manually loaded from a computer.

Jokes about slightly outdated consumer electronics aside, [Gregg]’s player, a GPX MW3836, turned out to be a really good buy. Not only does it still work, it packs an unexpected bonus, it reads 64Gb SD cards when they are formatted as FAT32. This might not seem like a big deal at a cursory glance, but it’s worth considering a little SD card history.

Back when the GPX was made, the maximum capacity of an SD card was 2Gb, a figure that must have seemed huge when the standard was created, but by the middle of the last decade was starting to look a little cramped. The GPX player is designed to only read these original 2Gb cards. In the years since then there have been a couple of revisions to the standard, SDHC, and SDXC, which have given us the huge cards we are used to today. Many other devices from the 2Gb SD era, made before SDHC and SDXC existed, cannot read the modern cards, yet [Gregg]’s GPX can.

Hackaday’s readership constantly amaze us with the sheer breadth of their knowledge and expertise, so we are sure that among you reading this piece will be experts on SD card standards who can shed some light on this mystery. Why can a player designed for the original SD card standard read the much newer cards when other contemporary ones can not? [Gregg] would love to know, and now our curiosity has been whetted, so would we.

If you think you’ve heard [Gregg]’s name before, it might be for his expertise in resin casting automotive parts.

SD card image: Andreas Frank (CC BY 2.5).

Add A Second SD Card To The Pi Zero

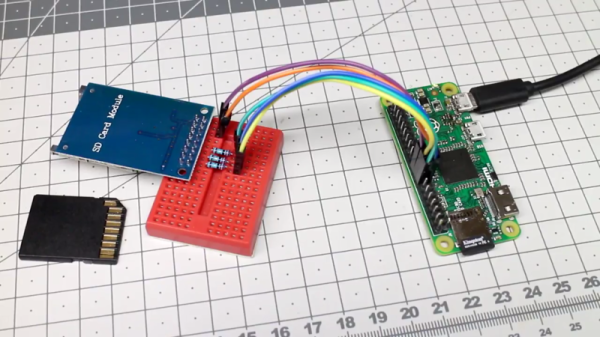
The Raspberry Pi Zero is a beautiful piece of hardware, fitting an entire Linux computer into a package the size of a pack of gum (don’t chew it, though). However, this size comes with limited IO options, which can be a complication for some projects. In this case, [Hugatry] wanted extra storage, and devised a smart method to add a second SD card to the Pi Zero.

The problem with the Pi Zero is that with only a single USB port, it’s difficult to add any other storage to the device without making things bulkier with hubs or other work arounds. Additionally, the main SD card can’t be removed while the Pi is running, so it makes sense to add an easy-to-use removable storage option to the Pi Zero.

It’s quite a simple hack – all that’s required to pull it off is a few resistors, an SD card connector, and some jumper wires. With everything hooked up, a small configuration change enables the operating system to recognise the new card.

Overall it’s great to see hacks that add further functionality to an already great platform. If you find it’s not powerful enough, you can always try overclocking one. 

Continue reading “Add A Second SD Card To The Pi Zero”

Roll Your Own 64GB SD Card From An EMMC Chip

It’s well-known that buying Flash storage devices from cheap online retailers is fraught with danger. Stories abound of multi-gigabyte drives that turn out to be multi-megabyte ones engineered to falsely report their capacity. So when [Jason Gin] found a source of 64GB Toshiba eMMC chips for only $6 per device he bought a few, but was prepared for disappointment.

To test them, he decided to use an SD card interface. There are minor differences between eMMC and SD, but the interfaces are electrically the same and in most cases an SD controller will happily do business with an eMMC. It was not however an easy task to connect the two — these eMMCs were in BGA packages, hardly the easiest ones to work with. He resorted to dead-bug soldering the relevant interface wires to SD lines, and connecting up his computer.

His first attempt was something of a failure, wiring the chip to the PCB of a cheap USB-to-SD adaptor. This did not put him off though, he followed it up by cracking open a very old 2GB SD card that contained a PCB instead of being potted, and soldering his eMMC in place of its Flash and controller. This even fit in the original SD housing, and met with success when plugged into more reliable SD card readers. He was thus able to confirm the capacity of his chips.

His blog post is worth a read for more than just the very fine soldering involved. He takes us through some of the intricacies of SD interfacing, as well as talking at length about the decoupling and termination required to make a reliable connection. We particularly like his use of an area of unconnected BGA balls as prototyping space for decouplers.

If you marvel at the exceptional dexterity required for hand BGA work, we’ve a couple of other treats for you. There is this TI infra-red sensor BGA soldered to a piece of stripboard, and this wafer-level chip package soldered to an SOIC prototyping board.