Multi-switch Useless Box Is Useless In Multiple Ways

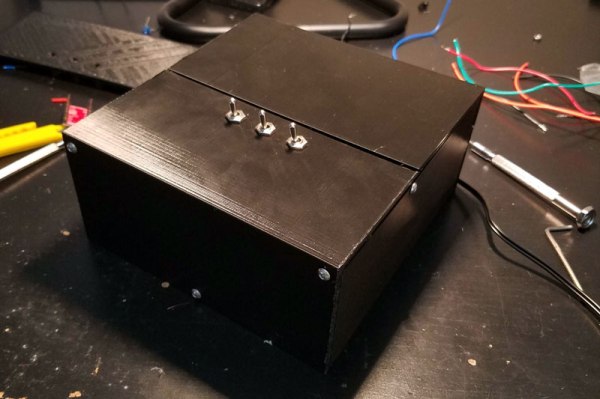
We’ve probably all seen (and built) a useless box, in which you flip a switch that activates a servo that pops out a finger and flips the switch off. [Coffeman500] decided to take this a step further by building a useless box with multiple switches. Flip one, the finger pops out to flip it back. Flip several switches, and the finger pops out and flips each back in turn.

It’s a smart build that [coffeeman500] says is his first electronics build. The compulsively switching brain of this is an ATmega328 driving an A4988 stepper motor driver, with one stepper moving the finger mechanism and the other moving the finger along a rail to reach each switch in turn. [Coffeeman500] has released the complete plans for this wonderful waste of time, including 3D models for the box and mechanism, plus the code. Redditors are already planning bigger and more useless designs with more switches, a pursuit that we fully support.

Continue reading “Multi-switch Useless Box Is Useless In Multiple Ways”

Radio Antenna Mismatching: VSWR Explained

If you have ever operated any sort of transmitting equipment, you’ve probably heard about matching an antenna to the transmitter and using the right co-ax cable. Having everything match — for example, at 50 or 75 ohms — allows the most power to get to the antenna and out into the airwaves. Even for receiving this is important, but you generally don’t hear about it as much for receivers. But here’s a question: if a 100-watt transmitter feeds a mismatched antenna and only delivers 50 watts, where did the other 50 watts go? [ElectronicsNotes] has a multi-part blog entry that explains what happens on a mismatched transmission line, including an in-depth look at voltage standing wave ratio or VSWR.

We liked the very clean graphics showing how different load mismatches affect the transmission line. We also liked how he tackled return loss and reflection coefficient.

Continue reading “Radio Antenna Mismatching: VSWR Explained”

A Tiny Steering Wheel You Can Print

Racing games are a great way to test drive that Ferrari you can’t quite afford yet, and the quality of simulations has greatly improved in the last 30 or so years. While there are all manner of high-quality steering wheels to connect to your PC or home console, many gamers still choose to play using a typical controller, using the thumbstick for steering. What if there was something in between?

What we have here is a tiny steering wheel you can print for an Xbox One controller, that mounts to the controller frame and turns rotational motion into vaguely linear horizontal motion on the thumbstick. It does come with some pitfalls, namely blocking a button or two and it also obscures some of the D-pad. However, for those of you driving in automatic mode without using the buttons to shift gears, this could be a fun device to experiment with. Files to print your own are available on Thingiverse.

It’s a neat hack, and there’s plenty of room to take the idea further and personalise it to suit your own tastes. While you’re there, why stop at steering? You could make your own custom buttons, too!

[via Gizmodo, thanks to Itay for the tip!]

The Wonderful World Of USB Type-C

Despite becoming common over the last few years USB-C remains a bit of a mystery. Try asking someone with a new blade-thin laptop what ports it has and the response will often include an awkward pause followed by “USB-C?”. That is unless you hear “USB 3” or maybe USB 3.1. Perhaps even “a charging port”. So what is that new oval hole in the side of your laptop called? And what can it really do? [jason] at Reclaimer Labs put together a must-read series of blog posts in 2016 and 2017 plumbing the depths of the USB 3.1 rabbit hole with a focus on Power Delivery. Oh, and he made a slick Easy Bake Oven with it too.

A single USB Type-C connector

When talking about USB-C, it’s important to start at the beginning. What do the words “USB-C” entail? Unsurprisingly, the answer is complicated. “USB Type-C” refers only to the physical connector and detail about how it is used, including some of the 24 pins it contains. Then there are the other terms. “USB 3.1” is the overall standard that encompasses the Type-C connector and new high-speed data busses (“USB SuperSpeed” and “SuperSpeedPlus”). In addition there is “USB Power Delivery” which describes power modes and even more pin assignments. We’re summarizing here, so go read the first post for more detail.

The second post devotes a formidable 1,200 words to providing an overview of the electrical specifications, configuration communication, and connector types for USB 3.1.

A GIF of a flipping USB Type C connector
Marketing at its finest

The third post is devoted to USB Power Delivery. Power Delivery encompasses not only the new higher power modes supported (up to 100W!), but the ways to use the extra 10 or 13 pins available on the Type-C connector. This is both the boon and bane of USB-C, allowing apparently identical ports to carry common signals like HDMI or DisplayPort, act as analog audio outputs, and provide more exotic interfaces like PCIe 3.0 (in the form of Thunderbolt 3, which is a yet another thing this connector can be used for).

It should be clear at this point that the topics touched by “USB Type-C” are exceptionally complex. Save yourself the trouble of a 90MB specification zipfile and take a pass through [jason]’s posts to understand what’s happening. For even more detail about Power Delivery, he walks through sample transactions in a separate post.

Turning Cheap WiFi Modules Into Cheap WiFi Swiss Army Knives

When the ESP8266 was released, it was sold as a simple device that would connect to a WiFi network over a UART. It was effectively a WiFi modem for any microcontroller, available for just a few bucks. That in itself is awesome, but then the hackers got their hands on it. It turns out, the ESP8266 is actually a very capable microcontroller as well, and the newest modules have tons of Flash and pins for all your embedded projects.

For [Amine]’s entry to the Hackaday Prize, he’s using the ESP8266 as the ultimate WiFi Swiss Army knife. The Kortex Xttend Lite is a tiny little WiFi repeater that’s capable of doing just about anything with a WiFi network, and with a bit of added hardware, can connect to Ethernet as well.

The hardware on this board sports an ESP8266-07S module, with two free GPIO pins for multiple functions. There’s a USB to UART in there, and a voltage regulator that’s capable of outputting 600mA for the slightly power hungry radio. There’s also an integrated battery management and charge controller, allowing this board to charge an off-the-shelf lithium cell and run for hours without any wires at all.

So, what can this board do? Just about everything you would want for a tiny little WiFi Swiss Army knife. There’s traffic shaping, port mapping, packet sniffing, and even support for mesh networking. There’s also an SMA connector on there, so grab your cantennas — this is a great way to extend a WiFi network, too.

This is a well-designed and well-executed project, and what makes this even more amazing is that this was done as one of [Amine]’s high school projects. Yes, it took about a year to finish this project, but it’s still amazing work for [Amine]’s first ‘high-complexity’ design. That makes it an excellent learning experience, and an awesome entry to this year’s Hackaday Prize.

Circuit VR: A Tale Of Two Transistors

Last time on Circuit VR, we looked at creating a very simple common emitter amplifier, but we didn’t talk about how to select the capacitor values, or much about why we wanted them. We are going to look at that this time, as well as how to use a second transistor in an emitter follower (or common collector) configuration to stiffen the amplifier’s ability to drive an output load.

Several readers wrote to point out that I’d pushed the Ic value a little high for a 2N2222. As it turns out, at least one of the calculations in the comments was a bit high. However, I’ve updated the post at the end to explore what was in the comments, and talk a bit more about how you compute power dissipation with or without LTSpice. If you read that post, you might want to jump back and pick up the update. Continue reading “Circuit VR: A Tale Of Two Transistors”

Semi-automated Winder Spins Rotors For Motors

What’s your secret evil plan? Are you looking for world domination by building a machine that can truly replicate itself? Or are you just tired of winding motor rotors and other coils by hand? Either way, this automated coil winder is something you’re probably going to need.

We jest in part, but it’s true that closing the loop on self-replicating machines means being able to make things like motors. And for either brushed or brushless motors, that means turning spools of wire into coils of some sort. [Mr Innovative]’s winder uses a 3D-printed tube to spin magnet wire around a rotor core. A stepper motor turns the spinner arm a specified number of times, pausing at the end so the operator can move the wire to make room for the next loop. The rotor then spins to the next position on its own stepper motor, and the winding continues. That manual step needs attention to make this a fully automated system, and we think the tension of the wire needs to be addressed so the windings are a bit tighter. But it’s still a nice start, and it gives us some ideas for related coil-winding projects.

Of course, not every motor needs wound coils. After all, brushless PCB motors with etched coils are a thing.

Continue reading “Semi-automated Winder Spins Rotors For Motors”