On a fused deposition modeling (FDM) 3D printer, the nozzle size dictates how small a detail you can print. Put simply, you can’t print features smaller than your nozzle for the same reason you’d have trouble signing a check with a paint roller. If the detail is smaller than the diameter of your tool, you’re just going to obliterate it. Those who’ve been around the block a few times with their desktop 3D printer may have seen this come up in practice when their slicer refused to print lines which were thinner than the installed nozzle (0.4mm on the vast majority of printers).
 Smaller nozzles exist for those looking to improve their printer’s detail on small objects, but [René Jurack] wasn’t happy with just putting a finer nozzle on a stock E3D-style hotend. In his opinion it’s still a hotend and arrangement intended for 0.4mm printing, and doesn’t quite fully realize the potential of a smaller diameter nozzle. After some experimentation, he thinks he’s found the solution by using airbrush nozzles.
As [René] sees it, the hotend is too close to the subject being printed when using nozzles finer than 0.4mm. Since you’re working on tiny objects, the radiant heat from the body of the hotend being only a few millimeters away is enough to deform what you’re working on. But using the long and tapered airbrush nozzle, the hotend is kept at a greater distance from the print. In addition, it gives more room for the part cooling fan to hit the print with cool air, which is another critical aspect of high-detail FDM printing.
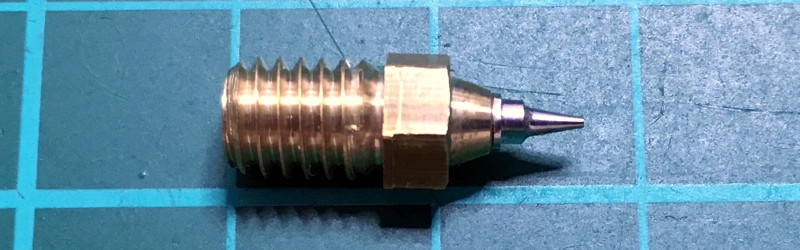
Of course, you can’t just stick an airbrush nozzle on your E3D and call it a day. As you might expect, they are tiny. So [René] designed an adapter that will let you take widely available airbrush nozzles and thread them into an M6 threaded hotend. He’s now selling the adapters, and judging by the pictures he posted, we have to say he might be onto something.
If you’re more about brute strength than finesse, you might be interested in outfitting your E3D with a ruby nozzle instead.
[Thanks to Keith for the tip.]


This is also one of the reasons that people wrap their heater block in an insulating material like cotton/cork/fiberglass/etc. Keeps the heat in and away from other parts, like the print and the extruder cool zone.
I think the point is that even with the heater block insulated, the nozzle itself represents a not-insignificant thermal mass. And by the nature of its design and function, that thermal mass is held very close to the part…normally it’s not enough to worry about, but when you’re trying to squeeze every last micron of detail out of an FDM printer, it’s like you might as well be pointing a blowtorch at the thing! (I should know, I’ve struggled with this issue quite a bit and found no adequate solution!) With this elongated nozzle, it seems that a much smaller percentage of the nozzle’s thermal mass is close enough to radiate extra heat into the print.
You want the plastic to stay hot, at the temperature you set the hot end. So you want the mass all the way down. You just want a barrier so that heat doesn’t radiate to the plastic that’s already extruded. The E3D pro sock actually covers most of the nozzle too.
+1 for the “E3D Pro sock”. My prints were terrible before I added this. And make sure you get the Pro sock because the other one does NOT cover the nozzle.
I’d be interested to see the results of a Pro sock in addition to this modified airbrush nozzle.
I think anybody didnt wondering about if the nozle hole shaped not like rount but somthing a bit more oval or very thin rectangular may have more fine details on the part.
but be avare of my messege coz it all ready an intelectual copyright idea from me.
My God man…”Put simply, you can’t print features smaller than your nozzle for the same reason you’d have trouble signing a check with a paint roller.”
I’ve never heard truer words lol. Thank you for that excellent analogy, and I hope you’re ok with me using it in the future.
Though i respect Rene in his doing and knowledge, this is very wrong. The analogy does not really help.
What do you mean? How is it wrong? Elaborate.
At core, the problem is the numeric relationship is reversed. That is, he’s saying the smallest reproducible feature/line height is no smaller than the nozzle bore diameter. But, we all know this is specifically untrue. Very often the MAXIMUM extrudate that can be put out by a nozzle is ~80-90/% of the nozzle bore diameter, and the nominal diameter is in the 40-60% range. Those values are, by definition, smaller than the bore diameter, in opposition to the comparative direction in the quote.
Unfortunately, as you try and reword the original, it all falls apart. But, the logical truth of the paint-roller does make sense. It just isn’t related to the numeric bore diameter in the manner indicated. It’s not the “nozzle size”, it’s more the “nozzle’s minimum unbroken thread diameter combined with Nyquist-style motion-system resolution (and other variables, like system flex, top-surface defects, etc.).” See…the pithy shortness kinda falls apart.
Either your wording or your facts are wrong. It’s trivial to make your maximum bead width to be double the orifice diameter. I don’t know if there’s a maximum but it’s worth swapping nozzles for something larger before you get to double.
OK I misunderstood, I misread your comment about layer height as bead width. But I’m pretty sure the original comment was about bead width. There isn’t a minimum layer height vs. orifice. The real limiting factor is really bead width and that’s what a ‘smaller nozzle’ really allows.
He said line width in the video, and he’s 100% correct. Minimum layer height is limited by your z steppers and extruder, and can generally go as low as you can smear out more plastic. In practical terms that’s about 0.1mm for a well tuned consumer grade printer. Commercial printers may perform much better than that.
Line width is constrained by the outer surface width of the nozzle for maximum width (typically about 2x stated nozzle diameter, though that won’t be the case for these airbrush nozzles), to the inner orifice diameter for minimum width.
The final print resolution is a combination of how line width and layer height. It’s not usually worth going below half the layer height of your minimum line width (i.e. nozzle diameter), because your poor x/y resolution will overshadow your good z resolution.
It takes both to make nice prints.
I wonder how much this increases the print time for a job.
This seems like a great way to make use of multiple hot ends, one for bulk printing and one for detail work if the software can be created to support it.
Using technology we already have, it might be doable. We have multimaterial support for changing tools, and variable layer height adjustments in software like S3D and Slic3r. Would be interesting to play with.
dual extruders need perfect alignment, and even then any runoff can damage, distort or dislodge a print. way more hassle than they are worth. Joe Pursia has the right idea for multi material by dumping multiple filiments into a single extruder either by multiple bowdens or by adding a switching module.
Home 3D printers will always suffer from some kind of minor misalignment, a slight knock to even the most sturdy design can introduce print killing mis-calibrations. MatterControls calibration process assumes misalignment, measures it and and offsets for it in in the g-code. they got it right.
That said a dual extruder machine needs to assume 100% perfect alignment tolletance to even hope for a sucessful print. Even Makerbot shipped their dual extruder replicatorX models as experimental without any kind of support.
If both the extruders are on the same carriage there is no room for changes in their relative alignment unless you hit it with a hammer.
According to the linked blog post, print time for the Benchy is nearly 7 hours. Off hand, I think last time I did one it was like an hour and a half or something with a .4 mm nozzle.
So…yeah, a lot.
It should scale as the reciprocal square of the nozzle diameter, shouldn’t it? Half the diameter, 4x as long to print?
Could be interesting on a dual extruder setup, use a larger nozzle for infill and a finer one for the outer surface.
+1. I would hate to print and infill an entire object with this, but if I could use a second hotend on the same printer, with a tiny nozzle and the same material to get fine details right, and do it all in the same job, that would be really slick. Or maybe use ninjaflex in the tiny nozzle to print super-smooth o-rings into the piece.
One problem you would have with normal dual extruder setup is the very hot second extruder melting your nice fine details as it runs overhead. To really keep that level of detail on all sides you would probably need a tool changer of really good accuracy. Or to spend a lot of time between infil layer print to let the infil nozzle cool.
Problem is tip cooling, that huge thermal mass is important! This will likely clog fast unless temperatures are vertmybhigh and pressures as high as possible but you can only extrude so fast.
Check out the merlin hotend, it isn’t used anymore (out of production I believe) but it used an airbrush nozzle that screwed in. Those were the best prints I’ve ever done. I’d love to go back to that design. Never had issues with the thermal mass being so small. Clogging was never an issue at the nozzle, only up above the heat block because it uses ptfe rather than aluminum.
Tip cooling would be an issue if you ran the printer really fast, pushing lots of plastic through in short timeframe. Just slow the print down some more if it happens and that will go away as the metals are good at conducting heat to the tip. More likely to get big issues with clogging for tip cooling with larger nozzles as those are pushing through a much higher mass of plastic at a time.
Yo dawg, I herd you like nozzles, so we put a nozzle in your nozzle, so you can print while you print!
I have seen this some time ago, if you search for “merlin nozzle” or “merlin hotend” you’ll find more info about airbrush nozzles for printing. The big catch is calibrating your extruder, since there is little to no flat spot at the tip for ironing the plastic, you have to extrude precisely and consistently your set width, even the standart deviation of fillament is problematic.
More to read: https://reprap.org/forum/read.php?1,613587
Soo, how is this any better than the Olsson block on the UM2+ that already has 0.25 nozzle?
I regularly swap nozzles on my printers. They have all metal hexagon hot ends and I swap the nozzle between 0.3, 0.4, 0.5, 0.6. Depending on what i want to print, how big it is and how fine a detail i want. Yes time does increase with the smaller nozzles. You just create a profile in your slicer for each size nozzle and the material you are going to use. Easy in the older Cura i use.
I tried a 0.2mm but couldn’t get anything decent out of it so stopped at 0.3mm which did most of what i wanted.
But having seen this. Id really like to try again if I can get an adaptor like that.
Need to find a friendly machinist/clockmaker who can make the adaptor.
I checked out the website and have ordered a set rather than making it myself or finding someone local to machine an adaptor. Looking forward to trying a 0.2mm nozzle again.
Will be interesting to find out how easy it is to swap the airbrush nozzles when theyve had plastic in them.
I swap the full size nozzles hot after retraction or they wont move.
Using airbrush nozzles is nothing new. Its been done for years. There is even a commercial printer and hot end that uses them, and has been for quite a few years.
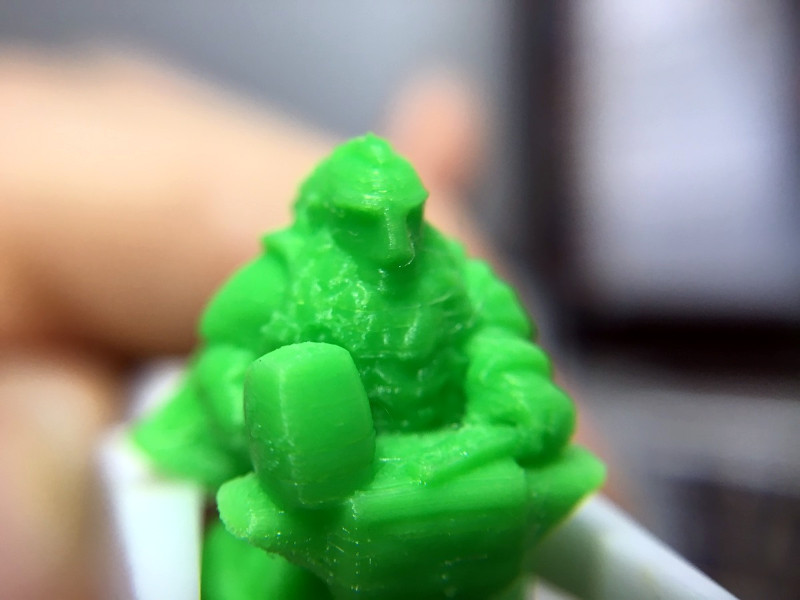
Hi, I am the one mentioned in this post. Thank you for writing about my very first product, I started my own little webshop with. You should check the awesome little prints that are possible with this: https://www.reddit.com/r/3Dprinting/comments/9h2u47/small_things_airbrush_nozzle/
best regards, René
@Rene It’s showing out of stock. Hope the inventory gets replenished soon !
I have been looking for almost the opposite (in terms of tip sharpness anyhow). My really old Mendel has a much flatter nozzle that in turn has a PTFE almost flat cone about 15mm diameter that ends up creating a wide, very slightly inclined cone around the nozzle.
This does 2 things I think.
1) helps shield some of the radiant heat from the print
2) DEFINITELY helps stop the nozzle hitting the print in regions which might curl a fraction by gently pushing it back down as the head moves
If I am trying to print with high overhang angles O often get slight curling and with the much sharper nozzles I often either dislodge the prints, or end up with skipped steps due to the nozzle getting obstructed by the curling.
The original Mendel nozzle is threaded right down its shaft so is easy to add the shield but all newer nozzles I can find are a) much steeper/sharper and b) do not have threads all the way through the shaft.
Does anyone have thoughts on sourcing nozzles which are less sharp/steep and/or threaded all down the shaft?
I did some experiments with high temperature epoxy on the tip and machining a shallower tip, but couldn’t really get what I was looking for and what I still have on my Mendel.
The Mendel still out performs my CR10S in quality due to this shield/ramp I think.
Its a pretty decent idea to make micro sized prints.One of the factors for precision of 3d prints is how flat can the melted filament be laid so that layer adhesion is not compromised. Airbrush nozzles don’t have as much flat surface at the bottom but the motion of the nozzle in Z should be adequate enough to squish the layers.I see he has done some amazing prints on his Reddit. Question is how long do these airbrush nozzles last?
Interesting,
but the idea is not new. One of the first hotend using airbrush nozzles has been sold more than 5 years ago, it is still existing as merlin hotend (http://merlin-hotend.de/). From my personal experience the main drawback is that the nozzle is easily broken if it hurts a surface defect and tends often to leak at the threaded junction. Another point is the printing time which is increased drastically due to both slower surface filling and additional layers required. This is the counterpart of increased quality. On the other hand time can be reduced using optimized slicer settings, higher temperature and higher speed but still remains an obstacle.
how is this news at all ? This has been around for ages
https://www.aliexpress.com/item/1005001359670804.html
how is this news at all ? This has been around for ages
https://www.aliexpress.com/item/1005001359670804.html