GE Record Player and TV 1600x900

VinylVideo Is Literally Video On Vinyl

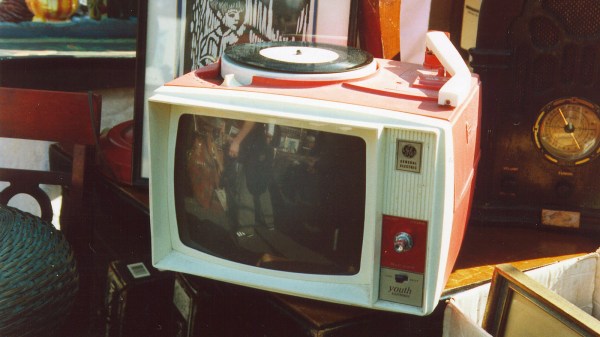
It’s often said that the music etched into a vinyl record takes on a transcendent quality that you simply can’t find in a digital recording, but does that still apply when you add motion picture? The collaboration of [Sengmüller and Diamant] sure think so, because they are offering a new experience for the turntable with the introduction of their VinylVideo pre-amplifier. No tape reels here, this project shows the extend of what is possible through analog video.

Vinyl Video Amp

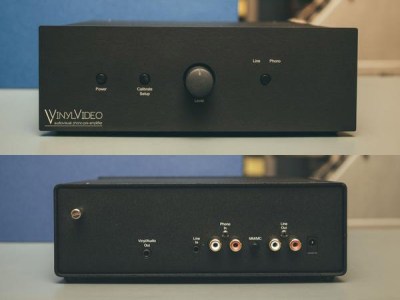
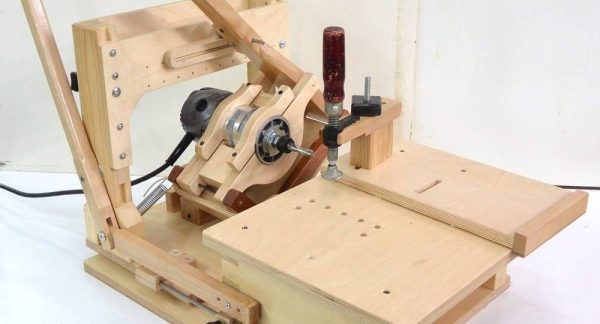
While all record players capable of playing back 7 in. 45 RPM are compatible with the system, the VinylVideo records themselves specially cut in order to generate the video signal. Each of the custom records has room for a 4-minute music video on the A-side, and the single on the B-side. Videos play back in black & white, sub-standard definition with mono audio, and run around 12 frames per second. The pre-amp takes in the analog signal from regular audio cables via RCA jacks or 3.5mm headphone jack, and then a Raspberry Pi model A+ handles the analog-to-digital conversion. Video out options include HDMI and composite video via a 3.5mm TRSS jack.

The current VinylVideo pre-amp is actually a refinement of the original project from the mid ’90s where it was a part of folk art exhibits. The legacy website (circa 1999) is still live, so you can give it a visit. However, for the most authentic experience you may want to fire-up a virtual machine with Netscape Navigator and Real Player installed.

For a more in-depth look at the VinylVideo in action there is a great video below from [Techmoan]:

Continue reading “VinylVideo Is Literally Video On Vinyl”

inside shot of a refrigerator with water bulk tank and seltzer pump

Continuous Seltzer Deployment System Solves Our Bubbly-Water Sourcing Problems

Seltzer water – that bubbly, carbonated water that disappoints sugar-craving children everywhere – has experienced a steady rise in popularity over the past few years. This is perhaps partly fueled by the availability of countertop carbonators such as the SodaStream.

Not satisfied with the tedious and pedestrian process of manually carbonating individual bottles of water, [piyoman] has instead built a tidy little tap of unlimited cold, filtered seltzer. It’s no easy gag. The build uses a commercial carbonator pump, reverse osmosis water filter, bulk tank, and a standard CO2 cylinder to create a constant source of carbonated water. Most of this setup is stuffed into a dorm-sized fridge (tetris-style) and topped with a fancy beer faucet to dispense the resulting bubblewater.

At roughly $800 for the documented system, you need to have a great reason to build your own. But [piyoman] provides detailed instructions, a parts list, and suggestions for cost savings and future improvements if you do take on a system like this for your seltzer needs.

Cheaper Carbonation Options

While looking at how DIY carbonation has been done in the past we found [Richard Kinch’s] Carbonating at Home with Improvised Equipment and Soda Fountains page which dives into many other options. His site – a wonderful, dense demonstration of the beauty of “web 1.0” – walks through the basics of carbonated water, discusses CO2 tanks and gauges, and shows how to build a simple carbonation cap for making seltzer in standard PET soda bottles.

Add Some Edge To Your Blades With Blown-Arc Plasma

If you polled science fiction fans on what piece of technology portrayed by the movies that they most desire, chances are pretty good that the lightsabers from the Star Wars franchise would be near the top of the list. There’s just something about having that much power in the palm of your hand and still needing to be up close and personal to fight with it. Plus being able to melt holes in bulkheads is pretty keen, as are the cool sounds.

Sadly, the day we can shape and contain plasma in a blade-shaped field is probably pretty far off, but that didn’t stop [Alan Pan] from trying the next best thing: a handheld plasma-projecting blade. He starts with a basic Jacob’s ladder. We’ve seen many of these before, but the basic idea is to ionize the air between two parallel, vertical conductors; the hot plasma heats the air causing it to rise until it reaches the top and snuffs itself out, starting the process over again at the bottom. His twist is to force the plasma into a sheet between the electrodes with air from a leaf blower, forming a blown-arc plasma. That’s pretty cool looking by itself, but he also stretched the electrodes along razor-sharp wood planer blades, for extra danger. We have to admit that the thing looks pretty intimidating, even if the plasma doesn’t really pack bulkhead-melting thermal power. Check out the results in the video below.

We’d love to see [Alan] make good on his promise to make the whole thing self-contained with an electric ducted fan or mini jet engine. Even as it is, it’s still pretty neat. It’s not really his first lightsaber rodeo, but at least this one doesn’t need butane.

Continue reading “Add Some Edge To Your Blades With Blown-Arc Plasma”

High Detail 3D Printing With An Airbrush Nozzle

On a fused deposition modeling (FDM) 3D printer, the nozzle size dictates how small a detail you can print. Put simply, you can’t print features smaller than your nozzle for the same reason you’d have trouble signing a check with a paint roller. If the detail is smaller than the diameter of your tool, you’re just going to obliterate it. Those who’ve been around the block a few times with their desktop 3D printer may have seen this come up in practice when their slicer refused to print lines which were thinner than the installed nozzle (0.4mm on the vast majority of printers).

Smaller nozzles exist for those looking to improve their printer’s detail on small objects, but [René Jurack] wasn’t happy with just putting a finer nozzle on a stock E3D-style hotend. In his opinion it’s still a hotend and arrangement intended for 0.4mm printing, and doesn’t quite fully realize the potential of a smaller diameter nozzle. After some experimentation, he thinks he’s found the solution by using airbrush nozzles.

As [René] sees it, the hotend is too close to the subject being printed when using nozzles finer than 0.4mm. Since you’re working on tiny objects, the radiant heat from the body of the hotend being only a few millimeters away is enough to deform what you’re working on. But using the long and tapered airbrush nozzle, the hotend is kept at a greater distance from the print. In addition, it gives more room for the part cooling fan to hit the print with cool air, which is another critical aspect of high-detail FDM printing.

Of course, you can’t just stick an airbrush nozzle on your E3D and call it a day. As you might expect, they are tiny. So [René] designed an adapter that will let you take widely available airbrush nozzles and thread them into an M6 threaded hotend. He’s now selling the adapters, and judging by the pictures he posted, we have to say he might be onto something.

If you’re more about brute strength than finesse, you might be interested in outfitting your E3D with a ruby nozzle instead.

Continue reading “High Detail 3D Printing With An Airbrush Nozzle”

The Leap Motion Makes Robots Bend To Your Will

We just wrapped up the Human Computer Interface challenge in this year’s Hackaday Prize, and this project is pushing boundaries we’ve hardly seen before. [Giovanni Leal] is using a Leap Motion controller to move a robotic arm around in space.

The robot arm in question comes from Owi, and it is by every measure not a good robot arm. It is, however, an excellent toy filled with motors and plastic linkages that serves as a good stand-in for a proper robotic arm.

Control of this toy robot arm is done through a Leap Motion controller. While the Leap Motion is a few years old at this point, it is a very effective way to ‘measure’ the position and rotation of a hand in 3D space. The only thing that’s required is the Leap Motion controller itself and a tabletop.

The end result is a robot that can be controlled by a hand. While this robot arm is really just a toy, it was fun to assemble and a little bit of hardware hacking with an Arduino turned this into a working robot arm controlled by a human. Scale this up, establish an island lair, and you’re on your way to taking over the world.

Cool Tools: The Pantorouter Turns Tracing On Its Side

Not too long ago we wrote about a small CNC tool for automating certain parts of the woodworking process. At the time it seemed unusual in its intentionally limited scope but a few commenters mentioned it reminded them of another device, [Matthias]’s Pantorouter. It didn’t take much investigation to see that the commenters were right! The MatchSticks device does feel a bit like a CNC version of the Pantorouter, and it seemed like it was more than worth of a post by itself. The Pantorouter is a fascinating example of another small manual-but-automated tool for optimized for accelerating and improving certain woodworking operations.

Continue reading “Cool Tools: The Pantorouter Turns Tracing On Its Side”

Just A Taste Of The Talks At Supercon

The Hackaday Superconference is taking on a life of its own. Speaker selection is done and invitations are on the way out. Below is a taste of the confirmed talks in store for you this November in Pasadena.

This is the Ultimate Hardware Conference and you need to be there! We’ll continue to announce speakers and workshops as final confirmations come in. Supercon will sell out so grab your ticket now before it’s too late.

Ben Krasnow
Depositing copper circuitry and optical displays onto 3D-printed parts

Producing printed circuits on plastic mechanical parts can be accomplished with a standard laser cutter and a handful of chemicals available from online retailers.

Ruth Grace Wong
Firmware From the Firehose

Practical tips for people who don’t know anything about firmware for deciphering the code and tracking down bugs.

Amie Danielle Dansby
Swords and High Voltage: Creating 3D Printing Designs for Electronics Props

You can easily bring digital video game assets to the human world with 3D printing, but what about modifying files, or adding electronics?

Sam Zeloof
Home Chip Fab: Silicon IC Fabrication in the Garage

IC and semiconductor fabrication techniques, tools, and processes that allow for mid 1970’s era device fabrication on a small budget in the home workshop.

Zach Archer
Live Coding a 40-Foot LED Sign

This is the story of how the massive 500-watt LED Toorcamp sign was designed, developed, and constructed inside of 3 weeks.

Leigh Johnson
Portable Deep Object Detection

The fundamentals of deep learning modules and object detection using Tensorflow and Keras on a Raspberry Pi.

We Want You at Supercon!

The Hackaday Superconference is a can’t-miss event for hardware hackers everywhere. Join in on three amazing days of talks and workshops focusing on hardware creation. This is your community of hardware hackers who congregate to hack on the official hardware badge and on a slew of other projects that show up for the fun. Get your ticket right away!