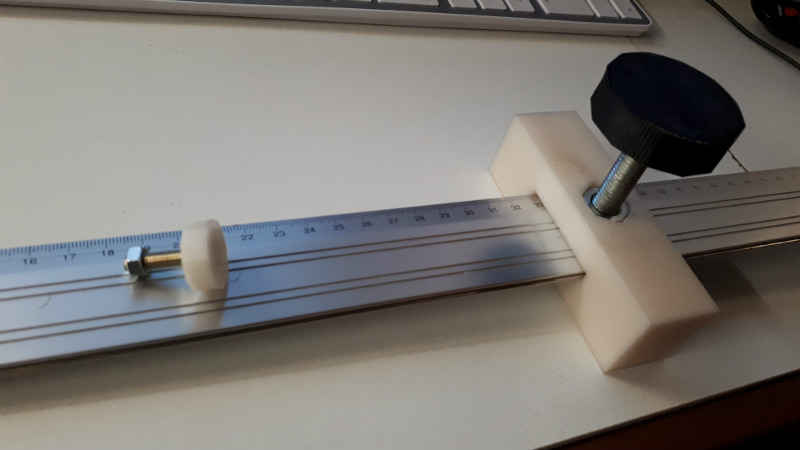
For Hackaday readers who spend more time with a soldering iron than a saw, a marking gauge is a tool used to put parallel lines on a piece of wood (and occasionally metal or plastic) for cutting. The tool is run across the edge of the piece to be marked, and an adjustment allows the user to set how far in the line will be made. As an example, if you wanted to cut a board into smaller strips, a marking gauge would be an ideal choice for laying out your lines ahead of time.
But as with many niche tools, it’s not something you’re going to use every day. For [chaosbc], this meant he wanted to see if he could come up with a DIY solution on the cheap. Plus he could have it in hand now, rather than waiting for it to take the slow boat from overseas. With the addition of a few clever 3D printed components, he was able to turn his trusty aluminum ruler into a serviceable marking gauge for the cost of filament and a few bits of hardware.
The general design of a marking gauge is fairly simple: there’s a block that rides up and down a graduated shaft (known as the headstock) which allows you to set the depth of the line, and then a piece on the end which holds your marking tool. The marking tool could be a blade if you’re working with something soft enough, but for wood is usually going to be a pencil.
[chaosbc] provides all the STL files for his DIY marking gauge, though they might need adapting as they were created for his specific ruler. Luckily the parts aren’t that complex so it shouldn’t be too difficult to get it sorted out. He also has a useful hint for anyone looking to duplicate his work: a few drops of super glue on the bolt used to lock down the headstock is enough to create a non-marring surface so you don’t tear up your ruler.
We’ve got a few other tips for woodworking on a budget, as well as a primer about this whole making stuff with dead trees concept.


Not surprised he had to make one though, marking gauges seem to have gone un(conveniently)obtanium the last decade.
I just use a vernier caliper instead. Yes it dulls the tip a bit, but I’ve been using mine in this way for 10 years and it’s still serviceable.
And that’s why we have the internet.
https://www.woodcraft.com/search?q=marking+gauge
$10 At your local Harbor Freight
https://www.harborfreight.com/6-inch-mortise-gauge-94645.html
That said, I built one of these just because it looked like a fun and easy way to spend an afternoon. Good Work
Here’s a cool (i.e. expensive) one!
http://www.leevalley.com/us/wood/page.aspx?p=59455
http://www.leevalley.com/us/wood/Page.aspx?p=61607&cat=1,43513
They have other wood working tools, too (and some of their products can be used for machinist’s work).
In response to the article: I should to point out that the pencil is a rough marking tool… marking knives are the preferred tools of craftsmen who do fine wood work.
Most saw feet/platen have an accomodation for these built in… nowadays. Old school’ers clamped each end of a ledger board, offset by the distance frm blade to foot-edge. Still best for accurracy with larger pieces.
For wood, a blade is commonly used as well because you typically need a “knife wall” on the wood. That means cutting a V-shaped notch where you’re about to saw or chisel to stop you from tearing the end grain of the corner. It makes for nicer fit and finish.
Plus, you’re not smudging graphite all over your wood.
Thanks for the tipline ! I will add the sketchup source this evening
He didn’t print another bit to go in the hole to make circles.
That would be maybe less practical than a compass but why not ! the sky is the limit ! :-D
True but when making you tube videos it looks much more impressive than a pencil and a piece of string.T
he way of the world is “less functionality and more complexity” so it is right up there with Alexa and the other pointless technological advances.
it’s a good idea, but I suspect wouldn’t do things very acurately ie
1) the ruler really has to be very square to the block he is running along the edge
2) the pencil is going to have to be exactly the right height – and it will have to be held with the ruler level – else the measurment will be the hypotenuse..
These are quite valid points. The tool has probably its limit. that being said everything is pretty square…just enough space for the part to slide around the ruler….about the point 2, this is also correct…I use it with the pencil lead outreaching the ruler …it may compromises the accuracy a little but it could probably be overcame with an additional thickness of plastic just under the ruler….This is an understatement to say there are room for improvement,.. however that is enough for my usage
The author’s point, “that is enough for my usage” is right on the mark. Do the math on the likely variations that you call out here with some real-world measuring scenarios and you’ll see that the innacuracies are well within an acceptable range for the kind of work for which a marking gauge is going to be used. For example, if the pencil extends 3mm below the level of the ruler, and you’re looking to mark a line 75mm from the edge (about 3 inches), you introduce only .06mm of error in your measurement. If you’re trying to cut to your pencil line, you’re cutting to experience more error than thay in the cutting process (after all, your trying to follow a line that’s .5mm wide if you’re using a good mechanical pencil). Squareness is a little more important to accuracy, but it’s very easy to get it square within the tolerances required for this sort of layout tool. My reply isn’t mere speculation. Woodworkers have been making and using measuring aids like this for hundreds of years and producing very finely and accurately crafted work.
I have just added the sketchup source file. Thank you again for your interest and your comments.
Why is this here? Nothing on here is “new” tech, except it ha printed parts. Big deal!
I’ve had one with wood stops for years, that I made. If a part breaks, I can make a new one in a minute or two, from wood chunks I already have. Practically free.
I think this is because it’s a hack and the website is called hackaday and not gizmodo my friend. More power to you if you did one already and are able to build one. Next time share the project so I can save time ! (ah by the way I reported your comment by (true) mistake).
next time, I will attach an arduino and steppers and a laser pointer and connect it to octoprint with a 555.