Engineers create something out of nothing, and no where is this more apparent than in the creation of customized computer hardware. To make a simple MIDI controller, you need knowledge of firmware design and computer architecture, you need knowledge of mechanical design, and you need to know electronic design. And then you need the actual working knowledge and experience to wield a tool, be it a hammer, laser cutter, or an IDE. [Mega Das] brought together all of these skill to build a MIDI controller. Sure, it’s for bleeps and bloops coming out of a speaker, but take a step back and realize just how awesome it is that any one person could imagine, then implement such a device.
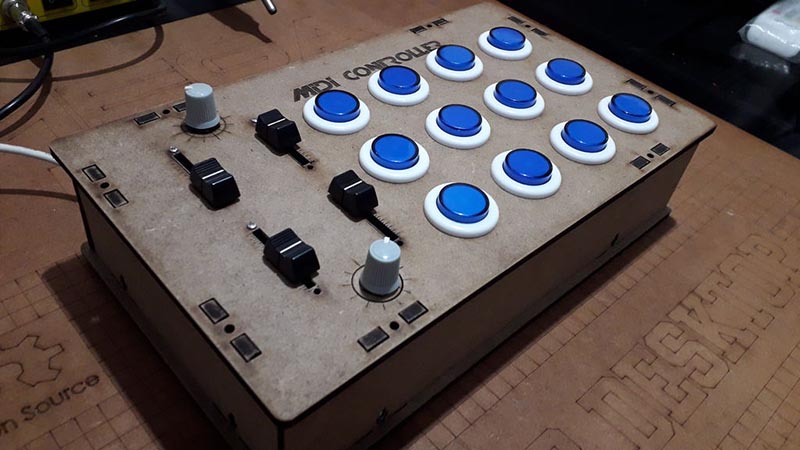
The electronics for this build include a printed circuit board that serves to break out the connections on an Arduino nano to a dozen arcade push buttons, four slide pots, two rotary pots, and a handful of screw terminals to connect everything together. Mechanically, this is a laser-cut box engraved with some fancy graphics and sized perfectly to put everything inside.
Yes, we’ve seen a lot of MIDI controllers built around the Arduino over the years, but this one is in a class by itself. This is taking off-the-shelf parts and customizing them to exactly what you want, and a prodigious example of what is possible with DIY hardware creation. You can check out the build video below.


I will have to politely disagree. This is not a midi controller in hardware or software.
This is a nice build of a box and an explanation of the serial to midi software package he used: http://projectgus.github.io/hairless-midiserial/
Do it with a Teensy, and then you could have USB Midi, or add the optocoupler and get hardware Midi.
Do it with off-rate hardware serial and an optocoupler.. and then you have actual Midi.
Do it this way, and you get the worst of both worlds. Unpredictable latency and not hardware compatible with anything.
Ball park, hou much would your recommended method cost to build? Thanks!
If all it’s doing is old school hardware midi send then about 20 cents tops. All that’s needed to meet midi spec is two 220ohm resistors. Arduino IO pins are already well buffered so while you could add a buffer there’s little reason too.
If you get a genuine Arduino UNO or board that uses a second atmel chip for USB then HIDuino is an easy option for usb midi.
Or just go all the way arcade and order one of those DIY arcade kits that come with a HID controller, cables and those buttons. Hell, add a couple trackballs and analog sticks to the mix and drop those boring knobs and slithers. Oh, and replace one of the buttons with one of them punching-bag boxing-simulator thingies!
Yes, I’m laaate….
Definitely use a Teensy
Is HaD’s calendar off by a week?
There has been a decade of these done better and more usefully. How about just reposting an earlier build of the hundreds of avr midi controllers out there?
That is all nice, but back in the day (90s), I made a 10MHz Z180 based 88 note midi keyboard project using a home made double sided PCB. https://www.znarx.com/keyboard/ I still use the keyboard today (and am looking for replacement spring based “switches”). It does proper/standard opto coupled midi and the assembled Z180 code is about 14K. Around 2003, I built a 24 pot, 5 button generalized midi controller using a 16F628 PIC (using timing of cap discharge to get pot positions). There is even a windows configuration utility (using midi exclusives to talk to the box). Again, this item did proper standard opto coupled midi. I don’t really use it now as everything is done “in the box”. Sorry, no web site as yet. I can open source if anyone is interested, but there is a plethora of cheap midi controllers these days so it is not worth the effort of building such stuff..
Huh?
He was having trouble finding an appropriate article in which to post his story, so picked on at random.
Or just go all the way arcade and order one of those DIY arcade kits that come with a HID controller, cables and those buttons. Hell, add a couple trackballs and analog sticks to the mix and drop those boring knobs and slithers. Oh, and replace one of the buttons with one of them punching-bag boxing-simulator thingies!
Yes, I’m laaate….