
There’s a new embedded hacking tool on the scene that gives you an interactive Python interface for a speedy chip on a board with oodles of GPIO, the ability to masquerade as different USB devices, and a legacy of tricks up its sleeve. This is the GreatFET, the successor to the much loved GoodFET.
I first heard this board was close to launch almost a year ago and asked for an early look. When shipping began at the end of April, they sent me one. Let’s dig in for a hands-on review of the GreatFET from Great Scott Gadgets.
Lots of Fast I/O with Direct Access From Your Computer
GreatFET is a jack-knife for embedded projects — it’s meant to stand in for multiple tools and components during development so that you can work on the problem in front of you right now and figure everything else out later on. For instance, consider testing out a new chip. You could hook it up to your favorite microcontroller, write and flash some test code, and see if the chip you’re testing works the first time. But chances are you have the I2C address wrong, or you hooked up TX/RX or MISO/MOSI backwards, or myriad other common gotchas.
At its simplest, GreatFET is designed to give you an interactive Python shell that controls oodles of IO pins on the board. You run commands and get feedback as fast as you can type them. But this is the tip of the iceberg with the GreatFET. On the more advanced side of things, this board can be used to emulate USB devices, as a data acquisition device for building custom instrumentation, for MSP430 flashing and debugging, or as automated testing gear in manufacturing environments.
Officially named the GreatFET One, this board is a giant leap forward in terms of available pins, horsepower, and software interactivity, at an MSRP of $89.99.
GreatFET Hardware Overview


The chip at the center of the GreatFET is an NXP LPC4330 in a massive LQFP-144 package. On either side of the board you can see the bulk of those 144 pins have been broken out, with 40-pin female headers. There’s also a “bonus row” SIL-20 pin header on one side. The vision here is for the ability to add hardware to the board using shields which Great Scott Gadgets are calling “Neighbors” as a hat-tip to [Travis Goodspeed] who designed the original GoodFET.
The LPC4330 is the same chip you’ll find on the HackRF One; a 32-bit ARM Cortex-M4 with a clock speed of up to 204 MHz. HackRF has made a name for itself as a go-to in the software-designed radio realm, you could think of this as a similar device without the analog radio circuitry attached. The board has a Hi-Speed USB port for interfacing with your computer, and a Full Speed USB port so it can be used as a FaceDancer to emulate USB devices, but under Python control.


I must say kudos to Great Scott Gadgets on the labeling of this board. One annoyance of prototyping with dev boards is having the thing sitting on the bench with a bunch of jumper wires already hooked up, then having to move it to read the pin labels on the bottom of the board. GreatFET pins are labeled on both sides, with top side labels on the outside edge. Frequently used signals like SDA, SCL, MISO, or MISO are individually labeled. Both USB ports are labeled with hints to tell you which one you’re looking for, and all test pads on the bottom have descriptive labels. A sticker the shape and size of the board comes with it to locate special-use pins was being handed out at KiCon and other live events.


You can easily jumper the signals you need, but for more robust applications you might want to purchase or build a Neighbor. My review kit included a Daffodil Neighbor which brings a solderless breadboard to the party. You could easily build your own Neighbor using protoboard and two double-row pin headers as the spacing is a predictable 0.1″. The bonus row of pins is optional when building Neighbors. Each GreatFET One wisely includes a “wiggler”, a simple tool made of PCB used to pry the two boards apart without bending pins, and you need it to overcome the 100 pins that make connections between the two boards.
Software Delivers Big Versatility
Yes, the hardware on this board is a beast, but the software holds the most promise for versatility. I don’t know if this is a software geeks’ hardware tool or the other way around, but it certainly blurs the line in a good way.
The current state of the software is not quite mature, and both the documentation and the APIs are being worked on. I tripped on a few gotchas out of the gate, but once they were worked out, the parts I tested were simple and the parts of the API used were straightforward.
First the gotchas. I tried installing these libraries for Python 2.7 and that was a no-go; you must use Python 3, which is fine, since Python 2.X reaches end of life six months from now. Next, I had problems connecting to the board reliably, and foolishly assumed I had udev problems when in fact I had a dodgy USB extension cable. Finally, I didn’t do a firmware upgrade, which is the first thing you should do on hardware this new. Luckily, all of these things are actually dead simple if you follow the getting started guide.
$ sudo pip3 install --upgrade greatfet

$ gf info
Found a GreatFET One!
  Board ID: 0
  Firmware version: git-2019.5.1.dev0
  Part ID: a0000a30654364
  Serial number: 000057cc67e630187657
$ gf fw --auto
Trying to find a GreatFET device...
GreatFET One found. (Serial number: 000057cc67e630187657)
Writing data to SPI flash...
Written 84812 bytes of 84812.
Write complete!
Resetting GreatFET...
Reset complete!
From here you can control the board through a command line interface, by typing commands in a live Python shell, or by writing and running your own Python scripts. There’s a bit of a learning curve here. Online documentation and tutorials are both a bit scarce right now, with the bulk of available information in the greatfet Python package itself. For instance, typing help(gf.apis.dac) is what helped me figure out which pin to probe for the DAC output.
That said, many existing features are being ported over to GreatFET, so if you’re used to using GoodFET with MSP430 or using a Facedancer for USB dev I think you’ll feel right at home. Let’s take some of this for a test drive.
Test Run: I2C, DAC, and Facedancer
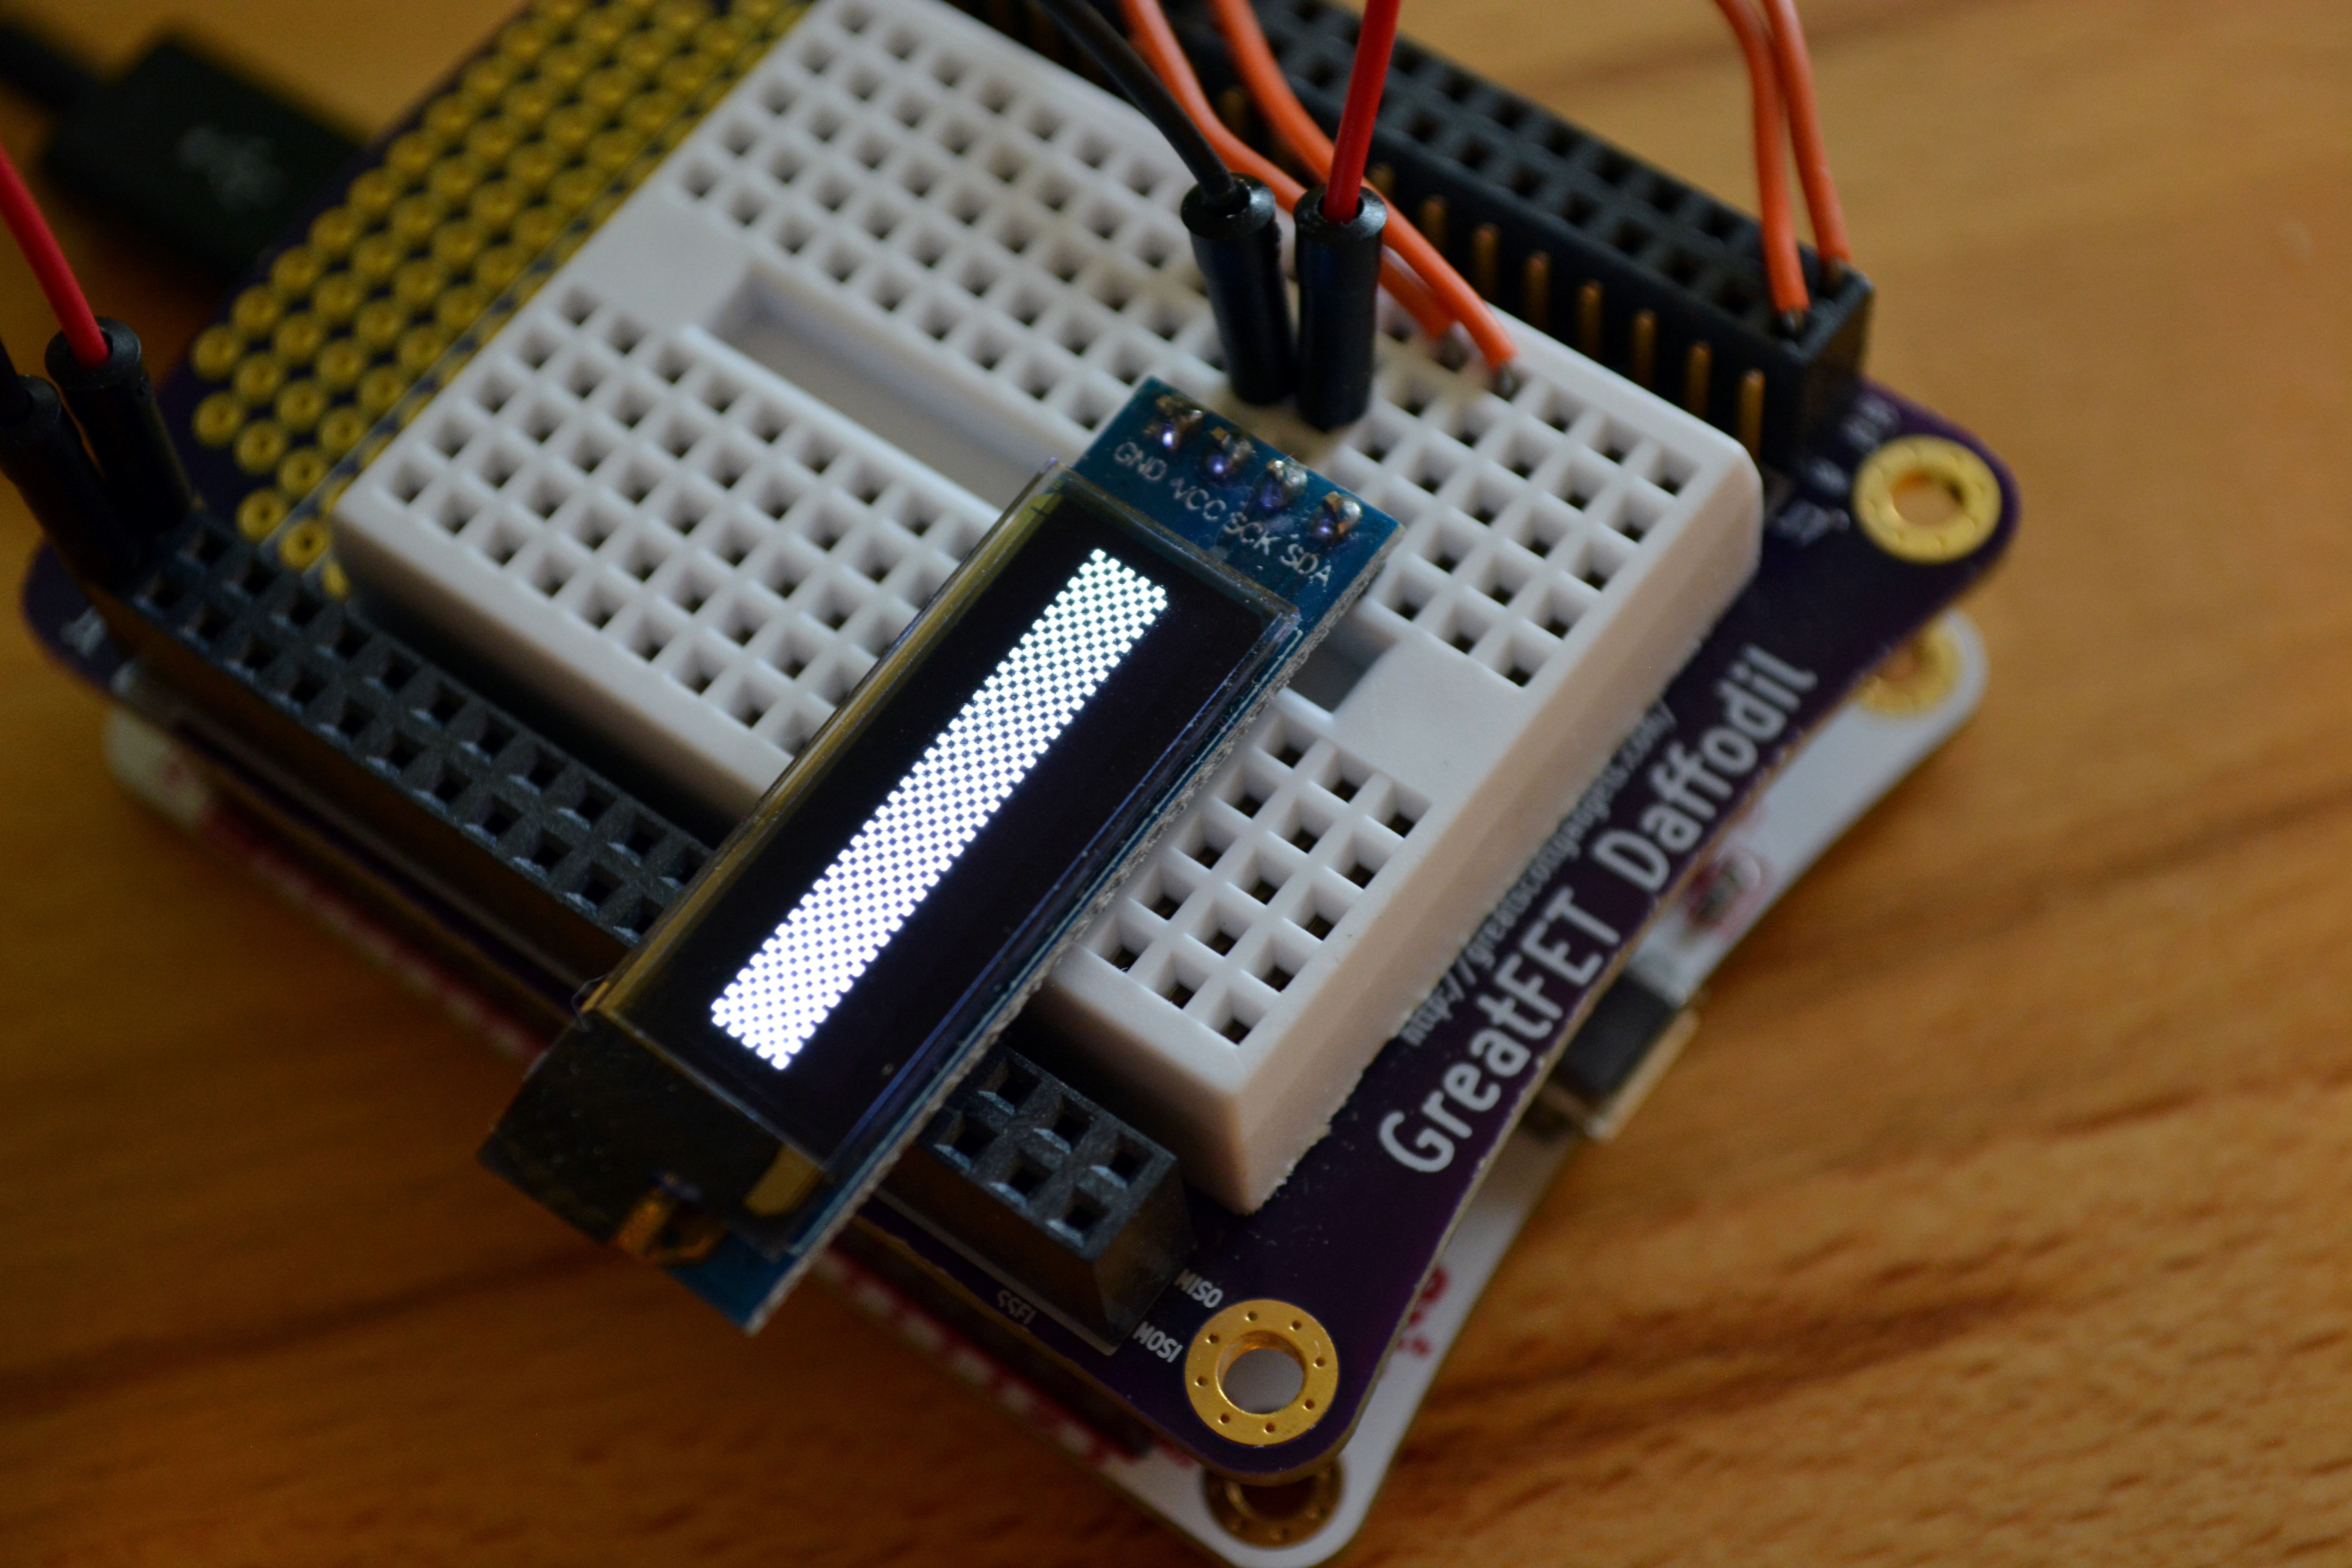
One of the places I often use interactive tools (primarily a Bus Pirate) is in trying out new screens. This is because they usually have a long string of initialization commands necessary to turn them on, and I want to make sure I have that right before I start writing and compiling code for a project.
I2C OLED Display
This turned out to be extremely easy using GreatFET. In just a few minutes I had a screen hooked up and showing a cross-hatched pattern. The board is a Python object in the greatfet library we installed above, and documentation from that library comes up when using tab completion. I used the scan feature to find the address. I2C commands can be sent by adding 0x80 or 0x40 to the beginning of the array of bytes to signify a command write or a data write.
Here’s the code I used. I really love the ability to whip up a quick script like this as it’s dead simple to commit to GitHub for me (or others) to use in the future.
from greatfet import GreatFET
ssd1306init = [0xA8, 0x1f, 0xd3, 0x00, 0x40, 0xa0, 0xc0, 0xda, 0x02, 0x81, 0x7f, 0xa4, 0xa6, 0x20, 0x00, 0x21, 0x00, 0xff, 0x22, 0x00, 0x03, 0xd5, 0x80, 0x8d, 0x14, 0xaf]
gf = GreatFET()
addrscan = gf.i2c.scan()
addr = 0
for i in range(len(addrscan)):
if addrscan[i][0] != False:
# i is both the index of the array
# and the address tested in the scan
addr = i
if addr != 0:
#Initialize the OLED
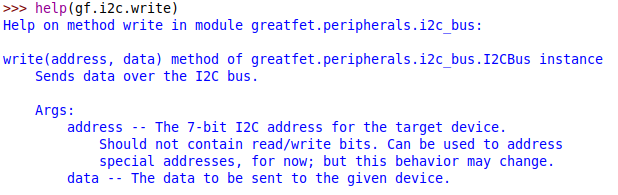
gf.i2c.write(addr, [0x80] + ssd1306init)
#Make screen buffer and fill with hash pattern
screenbuff = list()
screenbuff += 128*[0xCC,0xCC,0x33,0x33]
#Write screen buffer to OLED
gf.i2c.write(addr, [0x40] + screenbuff)
0-3.3V DAC with 10-bit Resolution
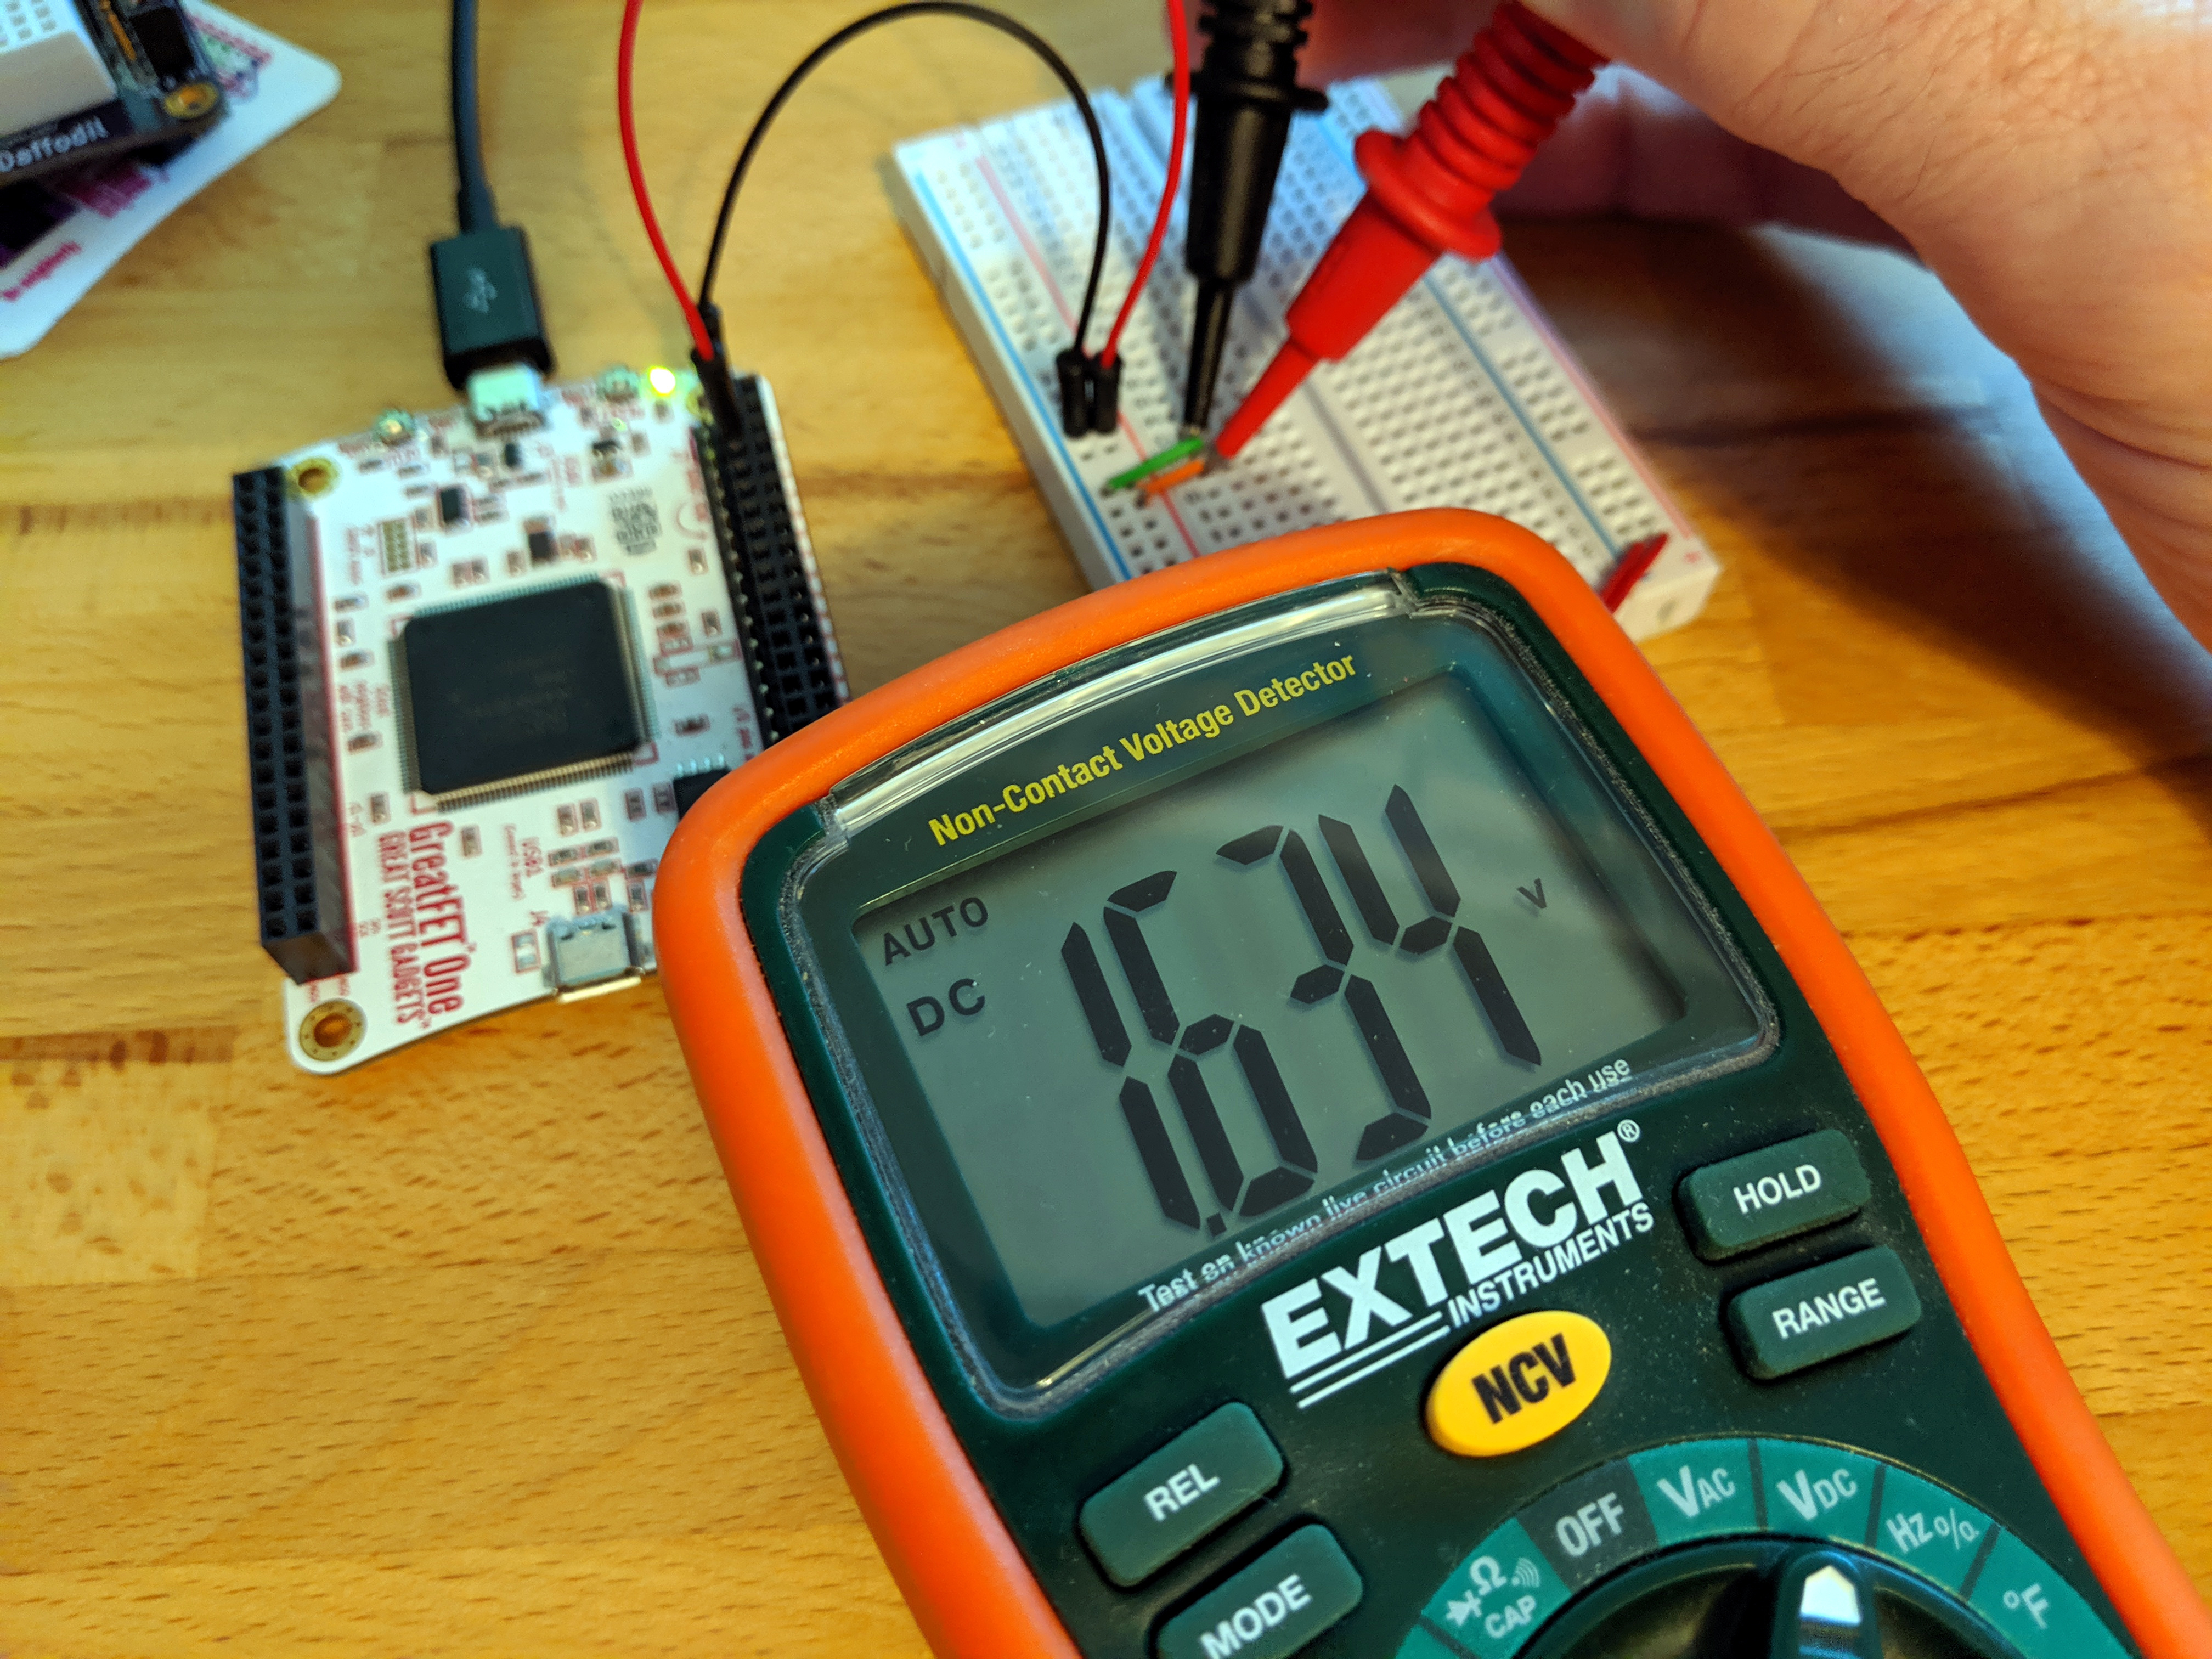
Next up I tested the DAC. Not much to report here. The Python help(gf.apis.dac) function tells us how to set the voltage and what pin is used for the output: “Sets the DAC value on ADC0_0 (0-1023)”. Looking on the huge list of pin functions on the wiki I see that J2 pin 5 maps to ADC0_0. You can see my DMM verifies that setting the value to 512 (50% of the resolution) produces 50% of the 3.3 V rail:
>>> gf.apis.dac.set(512)
Facedancer USB Emulation
The GreatFET product page links to a Facedancer repo which can be used to emulate USB devices so I decided to give this a try as well. I’ve been aware of this tool since Travis Goodspeed started showing off prototypes back in 2012 but this is my first time trying it out and it’s really neat.
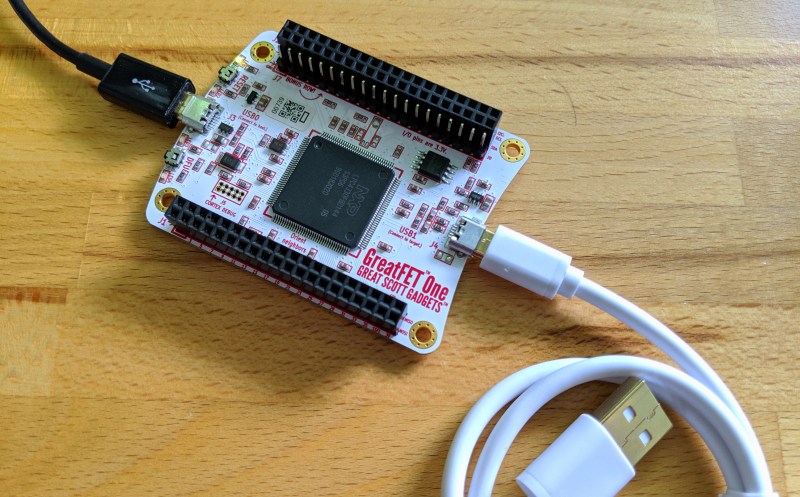
You use two USB cables, and both of them connect to the board with microUSB and to a computer (it doesn’t need to be the same one) with USB Type-A. The Facedancer software is written in Python — I also had to install pyserial — and includes a few different samples. The most straightforward I found when looking around is the ability to mount an ISO file using the board. This makes GreatFET look like a thumb drive with files on it. I had an old version of Mint on hand that I used in the test.
$ git clone git@github.com:usb-tools/Facedancer.git
$ sudo pip3 install pyserial
$ cd Facedancer
$ ./facedancer-umass.py /Marge/linuxmint-18.3-cinnamon-64bit.iso

Complete Fail: You Can Recover from This!
There’s a function of the greatfet class called onboard_flash. Do not play around with this function. I didn’t closely read the doc comments on this and just went along my merry way writing “Hackaday” to the first address space of this flash. Of course, as soon as I rebooted the board it no longer enumerated. This function allows you to overwrite the firmware programmed to the board. Looking back on this mistake, there is clearly a warning about this:

The short version of the story: there’s a DFU mode built into the greatfet Python package installed on your computer. The long version is that I compiled from source and was not able to get my binary to resurrect the board. After opening an issue on GitHub I was directed to the proper commands. First, the code you shouldn’t run:
In [46]: #Do Not Run This Code!
In [47]: arr = bytes("Hackaday",'utf-8')

In [48]: gf.onboard_flash.write(arr,address=0x00,erase_first=True)

In [49]: gf.onboard_flash.read(0x00,8)
Out[49]: array('B', [72, 97, 99, 107, 97, 100, 97, 121, 0, 0, 0, 0, 0, 0, 0, 0, 0, 0, 0, 0, 0, 0, 0, 0, 0, 0, 0, 0, 0, 0, 0, 0, 0, 0, 0, 0, 0, 0, 0, 0, 0, 0, 0, 0, 0, 0, 0, 0, 0, 0, 0, 0, 0, 0, 0, 0, 0, 0, 0, 0, 0, 0, 0, 0, 0, 0, 0, 0, 0, 0, 0, 0, 0, 0, 0, 0, 0, 0, 0, 0, 0, 0, 0, 0, 0, 0, 0, 0, 0, 0, 0, 0, 0, 0, 0, 0, 0, 0, 0, 0, 0, 0, 0, 0, 0, 0, 0, 0, 0, 0, 0, 0, 0, 0, 0, 0, 0, 0, 0, 0, 0, 0, 0, 0, 0, 0, 0, 0, 0, 0, 0, 0, 0, 0, 0, 0, 0, 0, 0, 0, 0, 0, 0, 0, 0, 0, 0, 0, 0, 0, 0, 0, 0, 0, 0, 0, 0, 0, 0, 0, 0, 0, 0, 0, 0, 0, 0, 0, 0, 0, 0, 0, 0, 0, 0, 0, 0, 0, 0, 0, 0, 0, 0, 0, 0, 0, 0, 0, 0, 0, 0, 0, 0, 0, 0, 0, 0, 0, 0, 0, 0, 0, 0, 0, 0, 0, 0, 0, 0, 0, 0, 0, 0, 0, 0, 0, 0, 0, 0, 0, 0, 0, 0, 0, 0, 0, 0, 0, 0, 0, 0, 0, 0, 0, 0, 0, 0, 0, 0, 0, 0, 0, 0, 0, 0, 0, 0, 0, 0, 0, 0, 0, 0, 0, 0, 0])
If you happen to do this, or any other foolish thing to brick your board, the NXP chip has a hardware DFU mode that’s dead simple and will have you up and and runnning again in about twenty seconds. Just hold the “DFU” button on the board, press and release the “RESET” button, then run the following command:
$ gf fw --dfu --autoflash
dfu-util 0.9
Copyright 2005-2009 Weston Schmidt, Harald Welte and OpenMoko Inc.
Copyright 2010-2016 Tormod Volden and Stefan Schmidt
This program is Free Software and has ABSOLUTELY NO WARRANTY
Please report bugs to http://sourceforge.net/p/dfu-util/tickets/

dfu-util: Invalid DFU suffix signature
dfu-util: A valid DFU suffix will be required in a future dfu-util release!!!
Opening DFU capable USB device...
ID 1fc9:000c
Run-time device DFU version 0100
Claiming USB DFU Interface...
Setting Alternate Setting #0 ...
Determining device status: state = dfuIDLE, status = 0
dfuIDLE, continuing
DFU mode device DFU version 0100
Device returned transfer size 2048
Copying data from PC to DFU device
Download [=========================] 100% 52736 bytes
Download done.
dfu-util: unable to read DFU status after completion
Trying to find a GreatFET device...
libgreat compatible board in flash-stub mode found. (Serial number: 000057cc67e630187657)
Writing data to SPI flash...
Written 84812 bytes of 84812.
Write complete!
Resetting GreatFET...
Reset complete!
This Tools Does It All, If You Choose to Use It
What’s the final verdict on the GreatFET? If you decide to go all in and make this the board you have in your kit, it will live up to its name and be a great tool.
That’s true of almost any bench tool, right? If you’re really good at using your oscilloscope, but then need to perform some advanced tricks using a friend’s scope by a different manufacturer, it’s going to take you some time to figure things out. The GreatFET has a learning curve, but if you put in the time and make this your go-to tool, the sky is the limit on what you can do with it. However, if you rarely pick it up, you’ll need to glance back at the tutorials each time.
For me, this tool makes a ton of sense because I’m a frequent user of Python on the desktop. I can commit my GreatFET scripts to a repo and look back to them as my own tutorials. This is much preferred to my previous go-to tool, the Bus Pirate, which has its own live terminal language that I have to keep relearning without the same easy ability to save and reference previous hacking sessions. And the extensibility of Python is so vast that any data processing, logging, or IO manipulation you need to do is both possible and relatively easy.
The power of the chip on this board is insane, but truthfully why wouldn’t you go for a beefy chip in terms of IO, speed, memory, etc. It’s quite possible you will never outgrow the functionality of this chip. The labelling of the board, and interface methods are well thought out and well executed. I don’t see a way the hardware could be any better on the GreatFET.
My only hesitation is the state of the documentation and API. Right now I don’t see a way to read from the ADC, and I’m not sure if there is just one ADC pin or if you can multiplex to a number of pins. This is just one example of the alpha state of the tutorials and quick start information. But I fully expect this to improve. The project is completely open source, the team is good about responding to GitHub issues, and I think a good set of user-contributed examples will grow as more people begin using the board.


put it in a box and you’ll be forced into an awkward design to avoid the microusb port being too recessed. of course, we all have 3d printers shrug
STOP!
Stop right there!
Hats, capes, shields,and so forth, are names given to peripheral interfaces attached to development boards.
NOTE: they follow a convention of being named after “something” worn by a person.
Neighbor VIOLATES said convention and must changed!
May I suggest “cufflink”?
B^)
We still need a …MASK
oh, i’m doing it with a neighbor and i’m having lots of fun…
Not “broads”, boards!
B^)
What do neighbors do? Get together, help each other out?
Silently judge you for not having kept your lawn cut from their side of the fence?
yall will have to go back in time, this has been in development for a long long time
So… it’s a bog-standard microcontroller. With the hardware accessible through libraries. I’m … amazed. Really. What a breakthrough.
I think the libraries are kind of the whole point here… :-)
We don’t publish sponsored content. This is a look at a new tool, not an advertisement. Sorry you don’t find a need for it on your bench, at least now you know it’s not for you ;-)
New ? Maybe if you have been under a rock for the past year.
If it’s not an Ad then it’s just low quality recycled content, typical for HaD these days.
on the “sponsored” note, i found a GUI for the thing, greatly simplifies it’s usage. check it out
i think i forgot the link https://github.com/dsl400/friendly-buspirate
I would like to see some experiments about the speed it can operate those gpio pins.
Liike, say, interfacint to a NAND or NOR chip ( normal variety, not the spi ones ) . Or even spi, in things that need speed
I cant say anything about this one but I have a few boards in the same power range and directly its almost faster than a toggle switch
Via program its better course now you just defeated tge point of having realtime control
The Python code snippet seems to ignore the expressiveness of the language. I would be a bit more pedantic and write it like this (please note that it is untested):
from greatfet import GreatFET

greatfet = GreatFET()

ssd1306_init = [0xa8, 0x1f, 0xd3, 0x00, 0x40, 0xa0, 0xc0, 0xda,
                0x02, 0x81, 0x7f, 0xa4, 0xa6, 0x20, 0x00, 0x21,
                0x00, 0xff, 0x22, 0x00, 0x03, 0xd5, 0x80, 0x8d,
                0x14, 0xaf]

screen_buffer = [0xcc, 0xcc, 0x33, 0x33] * 128

addresses = [address
             for address, response
             in enumerate(greatfet.i2c.scan())
             if response[0]]  # Can we change the condition to any(response)?

if addresses:
    last_address = addresses[-1]
    greatfet.i2c.write(last_address, [0x80] + ssd1306_init)
    greatfet.i2c.write(last_address, [0x40] + screen_buffer)
—
Code as Base64 to avoid formatting issues:
ZnJvbSBncmVhdGZldCBpbXBvcnQgR3JlYXRGRVQKCmdyZWF0ZmV0ID0gR3JlYXRGRVQoKQoKc3Nk
MTMwNl9pbml0ID0gWzB4YTgsIDB4MWYsIDB4ZDMsIDB4MDAsIDB4NDAsIDB4YTAsIDB4YzAsIDB4
ZGEsCiAgICAgICAgICAgICAgICAweDAyLCAweDgxLCAweDdmLCAweGE0LCAweGE2LCAweDIwLCAw
eDAwLCAweDIxLAogICAgICAgICAgICAgICAgMHgwMCwgMHhmZiwgMHgyMiwgMHgwMCwgMHgwMywg
MHhkNSwgMHg4MCwgMHg4ZCwKICAgICAgICAgICAgICAgIDB4MTQsIDB4YWZdCgpzY3JlZW5fYnVm
ZmVyID0gWzB4Y2MsIDB4Y2MsIDB4MzMsIDB4MzNdICogMTI4CgphZGRyZXNzZXMgPSBbYWRkcmVz
cwogICAgICAgICAgICAgZm9yIGFkZHJlc3MsIHJlc3BvbnNlCiAgICAgICAgICAgICBpbiBlbnVt
ZXJhdGUoZ3JlYXRmZXQuaTJjLnNjYW4oKSkKICAgICAgICAgICAgIGlmIHJlc3BvbnNlWzBdXSAg
IyBDYW4gd2UgY2hhbmdlIHRoZSBjb25kaXRpb24gdG8gYW55KHJlc3BvbnNlKT8KCmlmIGFkZHJl
c3NlczoKICAgIGxhc3RfYWRkcmVzcyA9IGFkZHJlc3Nlc1stMV0KICAgIGdyZWF0ZmV0LmkyYy53
cml0ZShsYXN0X2FkZHJlc3MsIFsweDgwXSArIHNzZDEzMDZfaW5pdCkKICAgIGdyZWF0ZmV0Lmky
Yy53cml0ZShsYXN0X2FkZHJlc3MsIFsweDQwXSArIHNjcmVlbl9idWZmZXIpCgo=
I see that the code on the article was updated to include some of my suggestions, replacing an obnoxious `while` loop by the handy multiplication operator. However, I keep missing a bit of (sane) PEP8 -the official Python code style guide, for the uninitiated- and the usage of idiomatic features like list comprehensions to replace traditional loops.
Discussing about code style is not the best way of making friends, nor the best way of making good code. Said that, I would like to know if the less expressive way of writing the original script was devised so all we could grasp it, or if that simple demonstration was made quickly to illustrate the article and doesn’t need that level of nitpicking.
Also, I would like to add that the conditional `if response[0]` in the list comprehension could be more explicit if required by expanding it to `if response[0] != False` to compare against al non-falsey types, or `if response[0] is not False` to filter all the items that are explicitly set to `False`. The idea of using `if any(response)` was to check that either write response (`response[0]`) or read response (`response[1]`) are `True`. To check for both, like if it was an `and` operator, you can use `if all(response)`.
I find that I go back and copy/paste old code often enough that it’s definitely worth the time spent to polish up my initial learning demos.
Yes, it certainly qualifies as nitpicking, but refactoring demo code is worth the effort. I add unit tests to the code while I simplify it; and those tests serve as great demos of the interface. Refactoring it also helps me look at the code from different angles so I understand it all better. And it seriously doesn’t take much time, because it’s all still fresh in my mind. (Yes, I know I should be doing TDD from the get-go, but when I’m scripting up this kind of thing, I get carried away in getting results first. The trick is to recognize early that I need to refactor and test.)
Anyway, I know that when I pick up that code two years from now I will quickly grok it, even if I ignored it in the meantime. Even if I only reuse half my demos, the payout from starting from a decently clean project results in a huge boost to the new one.
I have the same problem with the Bus Pirate (perhaps we all do). I come back to it after not using it for awhile, and immediately struggle with remembering all the syntax and nuances. So something that you can run with Python, which comparatively is hard to forget, would be a big improvement.
As for the price, certainly we’d all like to see it a bit lower. But there’s something of a premium you pay when you’re dealing an open hardware gadget produced in relatively low numbers. That said, just like with the HackRF and even Bus Pirate, it’s a good bet that we’ll see overseas “clones” before too long.
So buy it now if you want to support Great Scott Gadgets, or else take your chances on the cheaper import version down the line.
I’ve been using a SPIDriver recently, and found it really helpful exactly because I can save and annotate the Python scripts. I was mulling over a Bus Pirate to do some i2c stuff but you’re right, I’d miss that.
The GreatFET looks interesting and more flexible but pricey in comparison. Might be a bit overkill for my personal needs, but it’s a tempting option over an I2CDriver.
You can also look at the boards based on the FT232H with pyftdi. They can do a lot of similar things. The greatfet is definitely more powerful, but FT232H boards can be had for cheap from the usual sources.
Considering it costs almost as much as an Artix 7 FPGA development board with the USB 3.0 option, I would have expected something like a higher end ICE40 (if an open source toolchain is important) connected to a pair of FX2 chips and some RAM. Then add in a Python library that abstracts away the complexity of FPGA programming if the user just wants a few fast common interfaces, while allowing developers to add support for more interfaces to support more devices.
Sounds like you want a Glasgow … (I do too!)
I have to agree, ftdi board and jlink mini are under $30 and you can do more with them.
Not to mention the greatfet is over 3 years old… it even had a black hat talk in 2016. But I guess when the only research HaD writers do is browse the adafruit blog it might look “NEW NEW NEW!”
The IR capable Gladiolus Neighbor is what caught my attention and is buying me in for sure. Like HackRF capabilities to be hacked for improved performance with even better quality components reflowed as can be… I’ve already had some thoughts about improvement capabilities to hack the Gladiolus Neighbor.
https://github.com/greatscottgadgets/greatfet/wiki/Neighbors
I’m in the market to et a Shikra for dumping firmwares out of chips but the damn board isn’t available and BusPirate is too slow for that. Would the GreatFET be a good too for that ?
There are a number of equivalent boards available from AliExpress etc. You miss the neat pin labelling, etc, but it’s essentially the same board.
e.g. https://www.aliexpress.com/item/32803289122.html
Not exactly equivalent to the greatFet due to the lack of gpio, but can be used int he most common cases where a buspirate would suffice
Interesting, so it’s a Shikra 1:1 clone then ?
I’ll admit to not knowing what a Shikra is, but this board looks like a straighforward implementation of the FT232 reference design.
Or is it the ref design minus EEPROM? The EEPROM is nice for storing config stuff in.
I use such a board from time to time. It does great fast SPI and is good as an OpenOCD JTAG adapter. It’s faster/better than a Bus Pirate in every way, except that you’re left doing a lot of the work yourself. (Which I enjoy.)
But the point of the GreatFET is that a) it does even more, esp USB man-in-the-middling, and b) it’s a lot more configurable / scriptable / flexible since most everything is essentially puppetted from the computer side in Python.
Mike’s bit about whether it’s a hardware device for software folks or vice-versa is spot on.
Out of curiosity, what does “DFU” stand for? I can only think of “Dammit! Fucked Up!” but I’m pretty sure that’s not right.
Device Firmware Update
Thanks, I too, was wondering (along the same lines as [mb])
Dallas Finance University
Download Flying Units
Digitally Fixed Units
Dampen Future Umpires
Darken Fluorescent Uranium
I say “Didn’t Fux Up” because you enter DFU fix it, and say you meant to do that
I have been waiting for some kind of Bus Pirate that is actually user friendly (as in has an actual GUI) basically forever, for the same reason – life is too short to “learn” console commands you use once in a blue moon and forget before even closing the terminal window. No, having a “help” list of what is supposed to do what isn’t any better. No, having the same happen only with Python instead of console commands isn’t any better either (but is far more expensive, apparently). I can launch a GUI after two decades, and recognize _literally instantly_ “this is the ‘SPI tool’ tab, this is the text box I type my hex data to send in, this other one is where I get my reply, and this ‘Send’ button is what I click to make it happen”. NOTHING else can do that. Only a GUI. Which is of course why absolutely not a single usable one exists for any cheap Bus Pirate class device I ever heard of, naturally: nothing personal, the Universe just happens to hate your fucking guts. Luckily, it should apparently be trivial to code one myself if I don’t like this – presumably in the Python I’m failing to remember how to use at all in the first place. It’s the standard punishment for just wanting to get on with your electronics or so I’ve heard, foolishly failing to aspire to join the GUI App Coder Master Race. Because if for any reason you can’t juggle three dozen GUI frameworks / support libs requiring support libs based on support libs / build systems that set up build systems that configure build systems (different ones each week) tying it all together with something trendy and hip like Rust or Haskell in your sleep with your hands tied behind your back then you’re clearly just a waste of perfectly good oxygen. Clearly.
Do I detect just a smidgen of sarcasm in your comment?
B^)
Why not just use a cheap STM32 Nucleo with Micropython???
Okay so I’m still a novice in embedded engineering but how is this different from a standard Micropython dev board, or really any dev kit with an interpreter firmware loaded on it?
Pretty sure this is Python running on the desktop, with fast communication over USB to the board. Full desktop Python has obvious advantages over Micropython, including being able to save/do actual complicated projects, millions of Python packages, and not having to learn the quirks of a weird embedded implementation of Python.
Probably faster, too, because the implementation of microcontroller’s features are native, rather than interpreted.
How a A 32 bit arm micro-controllerb ( STM32F4) with micropython, usbs, i2c, spi, lcd etc are different from this?
Try to graph data from a sensor in real-time in a Jupyter notebook with micropython…
You can pick up chinese clones of j-link v10 jtag probes for about $40. These have a nxp lpc4330 processor and a few level shifters.