It’s never too late in life for new experiences, but there’s a new experience I had a few weeks ago that I wasn’t expecting. I probably received my first piece of test equipment – a multimeter – in the early 1980s, and since then every time I’ve received a new one, whether an oscilloscope, logic analyser, spectrum analyser or signal generator, I’ve been able to figure out how to use it. I have a good idea what it does, and I can figure out whatever its interface may be to make it do what I want it to. My new experience came when I bought a piece of test equipment, and for the first time in my life didn’t have a clue how to use it.
That instrument is a Vector Network Analyser, or VNA, and it’s worth spending a while going through the basics in case anyone else is in the same position. My VNA is not a superlative piece of high-end instrumentation that cost the GDP of a small country, it’s the popular $50 NanoVNA that has a fairly modest frequency range and performance, but is still a functional VNA that can take useful measurements. But I’m a VNA newbie, what does a VNA do?
A Quick VNA Primer

If you work with radio frequencies, it’s relatively easy to measure amplitudes, but usually very difficult to take phase and impedance measurements, especially across a wide frequency range. So for example I was able to fire a set of frequencies at a filter in a previous Hackaday article using only a Raspberry Pi and an oscilloscope, but all I could measure was its bandwidth, I knew nothing about its impedance and the phase relationships between input and output. This type of analyser is refered to as a Scalar Network Analyser, and all the measuring device knows about the signal is its frequency and amplitude. Where the scalar analyser simply has an oscillator and a sensor, the VNA mates the oscillator with a reflectometer to measure impedance, and replaces the sensor with a software defined radio receiver. Both oscillator and SDR are in perfect synchronisation so the device can keep track of phase as well as the rest of the measurements. A computer controls it all.
The NanoVNA originated a few years ago from [edy555], and has since been cloned in huge numbers by Chinese manufacturers. It’s a surprisingly simple piece of hardware, with an Si5351 clock generator providing the phase-synchronous oscillators, a brace of three balanced mixers providing the RF-to-baseband downconversion, an I2S codec digitizing the measurements, and an STM32F07 ARM Cortex M0 microcontroller doing all the math and running the show.
If a VNA is that simple, you might be asking why commercial ones are so expensive then, but the answer lies in the rather limited capabilities of the NanoVNA. It has a fundamental frequency range of 300 MHz, it uses an audio ADC, and its RF components are not of a particularly high spec. Compared with a commercial model that will have a frequency range in the GHz, a much higher specification ADC, a much lower noise figure, and a hugely more capable computing system to drive it, it becomes rapidly obvious where the extra cash goes before you have even considered matters such as calibration.
The NanoVNA is a real VNA and it’s very useful for radio amateurs and hobbyists, but it’s still something of a toy in the scheme of VNAs. So having discovered what the NanoVNA is, how do we use it? This isn’t a review of the device, instead it’s a write-up of my experiences with it as a first-time user.
Diving Into My Toy VNA
The first step this voyage of discovery is to calibrate the device, which is to say to establish its baseline for measurements. It’s shipped with a set of SMA connector loads and shorts and open-circuits, and it is here that these are required. Rather than step through the whole process pretending to be an expert it’s easiest to link to the site on which I found the calibration procedure. In short: you hook up each of the standards in order to your VNA, and run the appropriate calibration routine. The NanoVNA is controlled by a little jog switch and a not-very-responsive touch screen, so there is a bit of a learning curve in getting to know its interface. Little tricks such as finding the on-screen keyboard and then understanding that the “M”, “K”, and “G” buttons refer to megahertz, kilohertz, or gigahertz, and also function as return keys are essential.
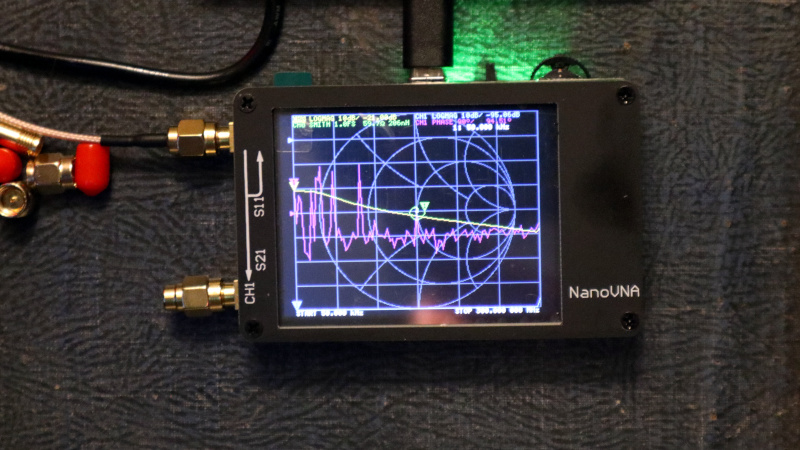
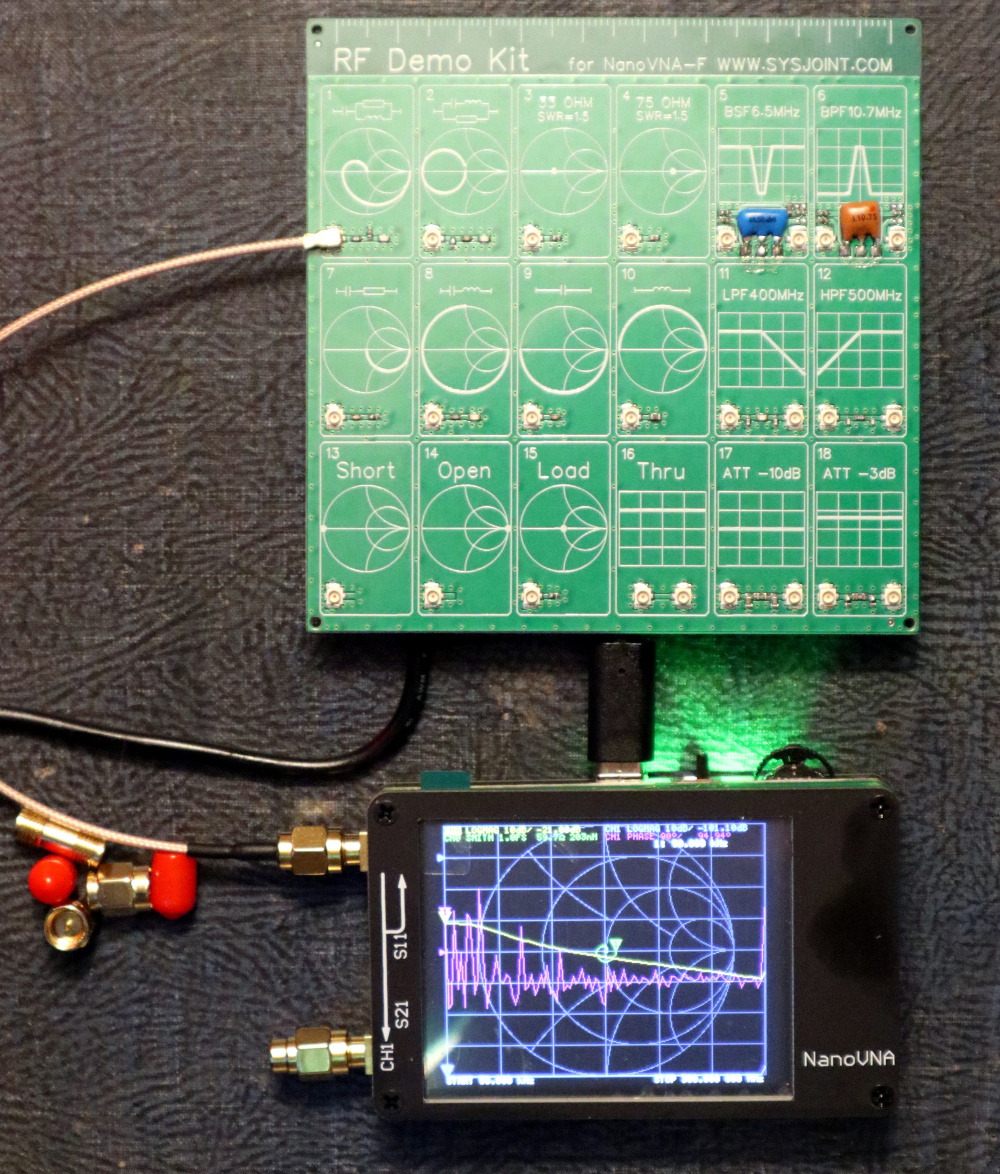
Once you have calibrated it and understood the interface, it becomes a very straightforward instrument to use. I also picked up an “RF Demo kit”, a PCB with a set of test RF networks, filters, and attenuators. This allowed me my first chance to play with it, and immediately the ease of taking readings became apparent. There are a variety of traces as well as a Smith chart, and a group of measurements at the top of the screen that correspond to a set of markers on each trace.
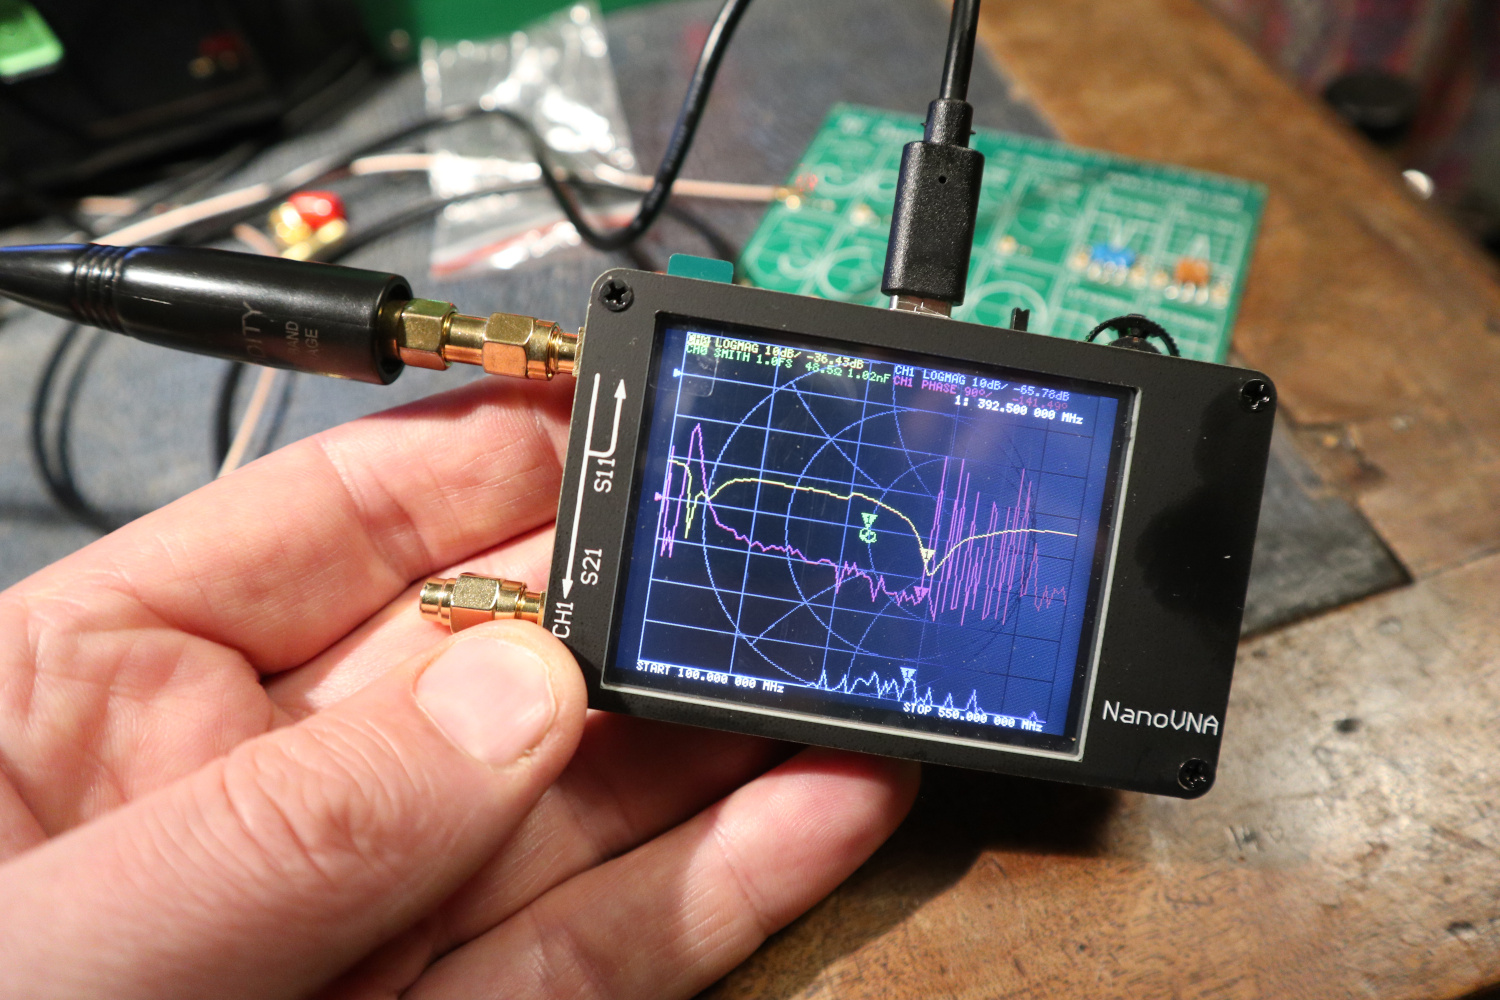
The jog switch on the NanoVNA allows paging through the frequency range, and each reading can be seen for each frequency. I could zero in on a particular frequency and see its impedance, pick out the exact cut-off point of a filter, and hook up an antenna and tell straight away whether it needs tuning. The cheap-and-nasty dual-band whip antenna on my Baofeng was revealed to be perhaps not as nasty as I’d supposed at 144 MHz, but somewhat off frequency at 430 MHz, for example. The VNA was living up to its reputation as the Holy Grail of RF test equipment, and even after only a few days of owning one I can’t quite see how I ever managed without it.
What I discovered after my initial bafflement at my NanoVNA was that a lifetime of playing with RF and also being used to figuring out new test equipment has held me in good stead. I will probably never become a VNA savant in the way that a lifetime of using all types of oscilloscopes has made me with those instruments, but I can now use it to quickly make measurements I wouldn’t have thought possible before I owned it.


VNAs are really fun tools, and the fact that you can get such a capable unit for $50 to play with is really neat. Frequency range and accuracy isn’t the same as the million dollar units from keysight, but for screwing around with rf wizardy a gigahertz is plenty. I do wish that it covered the 2.4GHz ISM band out of the box as it would make wifi experiments way simpler. But it into perspective, just a normal SMA connector cost more than that when I was first learning to use a VNA–don’t even get me started on the cost of the calibration grade parts…
There is a never variant S-A-A 2 (NanoVNA 2.0) that goes to 3GHz (usable up to 4GHz).
Amazingly awesome is the price for the NanoVNA 2.0 is almost $50 (reads like under $65 with shipping). That makes me think that, in some time, will be like the Nano VNA under $50… along with improved performance potential whether firmware or software ways. https://www.tindie.com/products/hcxqsgroup/nanovna-v2/
The NanoVNA’s are like under $40 looks like now online.
Wondering if can hack the version 2.0 into a spectrum analyzer, where looks like the prior versions won’t be so easy to do.
i have the same nanovna ,that it is the one i can say that they miss the CH 0 on it ,i have trouble seeing it firmware ,could it be a clone ,or it is real ,it is the same ,and o the pcb nothing written ,but it is well shieded .My question how do i know it firmware ,and how to update it .thanks .
edy555 design was an improwment from a previous design by a German radio amateur (forgot his call sign).
In turn a Chinese designer improved upon it and created the next revision that sparked a multitude of variants.
The newest variant (completely new hardware design) that goes to 3GHz and rivals older commercial equipment is S-A-A (NanoVNA 2.0).
There is also an interesting story behind that project. It was designed by a company with a mission statement of “intellectual communism” and the primary designer is a girl with a Gabriel Tenma White pseudonym.
Firmware, software, schematics etc at:
https://github.com/nanovna/NanoVNA-V2-firmware
https://gitlab.com/bepissneks/S-A-A
kinda like the Mega328 based ESR, LCR, Transistor, etc combi testers on eBay and such.
If I recall correctly those were originally designed in a German forum too.
Don’t go too far down the rabbit hole. Only 200+ pages of forum posts on the variants linked here.
https://www.eevblog.com/2017/09/11/eevblog-1020-is-a-7-lcr-component-tester-any-good/
You think that’s bad? You should see the original German forum link: https://www.mikrocontroller.net/topic/248078?page=1
Good news, though: it’s all summarized, in multiple languages, with useful links: https://www.mikrocontroller.net/articles/AVR_Transistortester
Andere here http://www.pa3fwm.nl/technotes/tn11b.html
Exactly and that tester project is awesome, quite a usable little device.
Do you mean EU1KY?
https://kuchura.bitbucket.io/
Just to add to the confusion “Gabriel Tenma White” is a pseudonym as well.
see https://groups.io/g/nanovna-users/message/12051?p=,,,20,0,0,0::Created,,posterid%3A1988907,20,2,0,72621610
Specifically, a reference to the main charactor of the anime “Gabriel Dropout”: https://gabdro.fandom.com/wiki/Gabriel_White_Tenma
I’ve been curious about the history of this thing, very interesting.
yeah, and OwO is a bit of a clown. You can open-source something, and you can sell it yourself, but you have no right to complain when someone else sells the same product (which you open-sourced) for less and puts you out of business.
“My new experience came when I bought a piece of test equipment, and for the first time in my life didn’t have a clue how to use it.”
I’ve experienced something similar when my Chinesium RTL-SDR arrived recently.
Software was mentioned on the sales site, but it was for Win10. So, I web searched for Linux software.
I found a promising site at https://ranous.wordpress.com/rtl-sdr4linux
I began following the instructions for v2.18.
The fun began when I tried to use cmake.
sudo apt-get install cmake
installs the version (3.5.x) that comes with my version of Mint Linux and NOT the version needed.
So, I went down a rabbit hole trying to install the most recent version of cmake from Kitware.
First I downloaded
cmake-3.17.1-Linux-x86_64.sh
when I ran that yesterday, it maxxed out the cpu on my Thinkpad for 3 hours!
And then ended in failure!
So then I downloaded
cmake-3.17.1-Linux-x86_64.tar.gz
that failed because (I guess) my laptop doesn’t have the right version of OpenSSL !
After dinking around for an hour or so, trying to get that working
I put it away for another day…
Most Linux distros allready have all the drivers and software for RTL SDR in the repositories …
I feel your pain. Not specifically about the VNA stuff, but about having to make/build the package in order to make/build some other package in order to be able to install the thing that you actually need.
There’s a reason I like projects that have as few dependencies as possible.
I put together a little procedure for the RTL-SDR’s on my first instructable. I used Ubuntu 17.04 Zesty Zapus or Lubuntu 18.04, though found other OS’s come with everything pre-installed:
https://www.instructables.com/id/How-to-Make-a-Directed-Energy-Weapon-Detection-Sys/
Scroll down to Step 3 for a reference to the procedure or you can find the blogger where I have a recently updated comment noting a better method for installing with windows.
http://dewdetectionprojects.blogspot.com/2017/11/generic-procedure-for-installation-of.html
Skywave Linux has, or at least had, a pulse audio or some sort of audio issue that crashed/hung the installation with certain makes and model laptops… so heads up regarding. Reads there are work arounds… I never got around to performing. Been a few years. Kali Linux is awesome… though I’ve only used with Live formats.
I’m planning to write another procedure or two for the HackRF and SDRPlay RSP1a as I found the HackRF easy to install though the SDRPlay RSP1a had an issue with Windows multiboot bootloaders since a specific update needs to be installed and won’t install on non windows bootloaders. Haven’t figured out a work around for that yet other than a virtual machine and I don’t use those much, yet.
Planning to invest in a Adalm Pluto since looks like a lower noise floor than the HackRF and will be able I’m thinking to put together a VNA also… or at least the Scalar Network Analyzer for up to 6GHz real easily.
I am not picking, but Linux is not for everybody, your best bet is to see if there is a prebuilt package for the version of linux you are running. If not, and you still want to run LInux, a quick google search turfed up skywave linux, you may wanna check that out. Plug and play for SDR dongles. The other option is install Win 10. Bring your phone to the dump and snap some pictures of the COA stickers of old computers with Win 7 COA’s on them and you have some good COA’s to install 10 with. Than the folks over at airspy.com can fix you up with the Windows SDR Software Package, and you should be good to go.
Check out the table of contents section for installing on Linux maybe for some more details for the command line method also:
https://b-ok.cc/book/2851766/2d49e1
The LiveUSB or with an SDcard to make like a LiveSDcard runs faster than a LiveCD/DVD in my experience also, if you’ve not use before. I forgot to note that just in case. Rufus or Unetbootin might make the job easier if the LiveOS option can’t be made with the iso of the distro burnt to a disc as I’ve found some make this process to make the LiveUSB easy. There are instructables detailing how to use also if the site isn’t clear enough.
https://rufus.ie/ (Rufus)
http://unetbootin.github.io/ (Unetbootin)
Looks like Skywave and Kali detail how to make the LiveOS without Rufus and with Rufus instructions can be found on Youtube or on the net:
https://skywavelinux.com/skywavelinux-iso-to-usb.html (Skywave LiveOS)
https://www.kali.org/docs/usb/kali-linux-live-usb-install/ (Kali LiveOS)
For those with the NanoVNA’s (great investment IMO), here’s the files section with a bunch of downloads if you join the group:
https://groups.io/g/nanovna-users/files
The first VNA I saw (but was not allowed to touch) cost many times my annual salary at the time (1981). The first I actually really used ‘only’ cost about a year’s salary in 1997. The first I bought for “myself” (at work) was the HP8713, relatively cheap at $14k in 2008. In 2015 I *almost* got a much cheaper Rigol DSA815-TG for myself that could almost make do, but returned it.
I have already been using RigExpert’s AA-30.zero, which is inexpensive and fun but only useful up to 30 MHz (and is only single port).
But the NanoVNA hit the right performance/price spec when I got it last year. Far from perfect, but an awful lot of fun and functionality for the price, especially when you give up on the awful UI and drive it from a PC using (say) Rune Broberg’s NanoVNA-Saver.
I’m happy to hear about v2.0, and I can see already it might be joining the collection.
So you are familiar with instruments that display voltage vs time (oscilloscopes), and voltage vs frequency (spectrum analysers), but what about frequency vs time?
They exist, were first called frequency time analysers, then modulation domain analysers. They can be used to measureoscillator startup behaviour, VCO transient behaviour, act as a “frequency microscope” showing the phase noise in OCXOs, and even measuring sub nanosecond rise times.
HP (who else?!) made them and did the usual stellar HP marketing; infamously HP would market sushi as cold wet dead fish. Example: hp53310a
cold wet dead fish – yep that sums up sushi nicely
Readily available today in many forms: signal analyzers, real-time signal/spectrum analyzers and even mixed domain oscilloscopes all give you the ability to look at spectrums vs time as well as RF amplitude, frequency deviation and phase deviation vs time.
As for originating with edy555, try a web search for the Austin QRP Club’s Vector Impedance Analyzer kit.
I also bought a NanoVNA and was amazed how useful it was for tuning NFC antennas.
I can recommend the NanoVNA Saver software which makes it much easier to use the device from your PC.
https://github.com/mihtjel/nanovna-saver
I highly recommend using a stylus on the screen (I use one from a Nintendo DS) – makes controlling it much easier.
If I am looking at the right trace the Bafong whip antenna is surprisingly close to right. Perhaps add a wee tad of inductance and I think you would be hard pressed to do better. On the other hand, I may be reading the traces wrong and it could be awful. I thouht I saw it at 48 ohms and a couple nf. Or am I wrong? In nay case these look like fun toys to play with.
Here you go, it’s $2.99 USD. I haven’t read it (yet):
“A guide to the NanoVNA Kindle Edition by Christoph Schwärzler (Author), Maximilian Schwärzler (Author). Format: Kindle Edition”
https://www.amazon.com/guide-NanoVNA-Christoph-Schw%C3%A4rzler-ebook/dp/B083BB82G5
Excellent article as always! I recently bought one of these as well after reading the review in QST Magazine, at this price the VNA is practically free. Would be great to learn more about the engineers who created the Nano VNA and are choosing to sell it so inexpensively thereby making this critical piece of RF test equipment ubiquitous for the first time. Not so long ago in the late 1990’s, an HP8510 (the ‘King’ of VNA’s) was going for around $250K depending on the options.
“Would be great to learn more about the engineers who created the Nano VNA and are choosing to sell it so inexpensively thereby making this critical piece of RF test equipment ubiquitous for the first time.”
There is a groups.io site or two regarding the work of I’ve found and joined:
https://groups.io/g/nanovna-users/
https://groups.io/g/HBTE/
Looks like a tinySA nanoVNA is on the way: https://groups.io/g/nanovna-users/message/12937
Hello ,i have a problem ,i have the same nanovna ,that they missed on it the CH0 ,and this is the only on e i see on the net.Could it be a clone or real one.ON the pcb there is nothing written ,only a good screening and shielding .My question o need to know what firmware is inside ,it came with no batt ,i have searched everywhee to know what firmware version is it in .And how and what i need to update it
thanks for help .