
It is pretty well-known that I’m not a big fan of the Arduino infrastructure. Granted, these days you have more options with the pro IDE and Platform IO, for example. But the original IDE always gives me heartburn. I realized just how much heartburn the other day when I wanted to something very simple: increase the receive buffer on an ATmega32 serial port. The solution I arrived at might help you do some other things, so even if you don’t need that exact feature, you still might find it useful to see what I did.
 Following this experience I am genuinely torn. On the one hand, I despise the lackluster editor for hiding too much detail from me and providing little in the way of useful tools. On the other hand, I was impressed with how extensible it was if you can dig out the details of how it works internally.
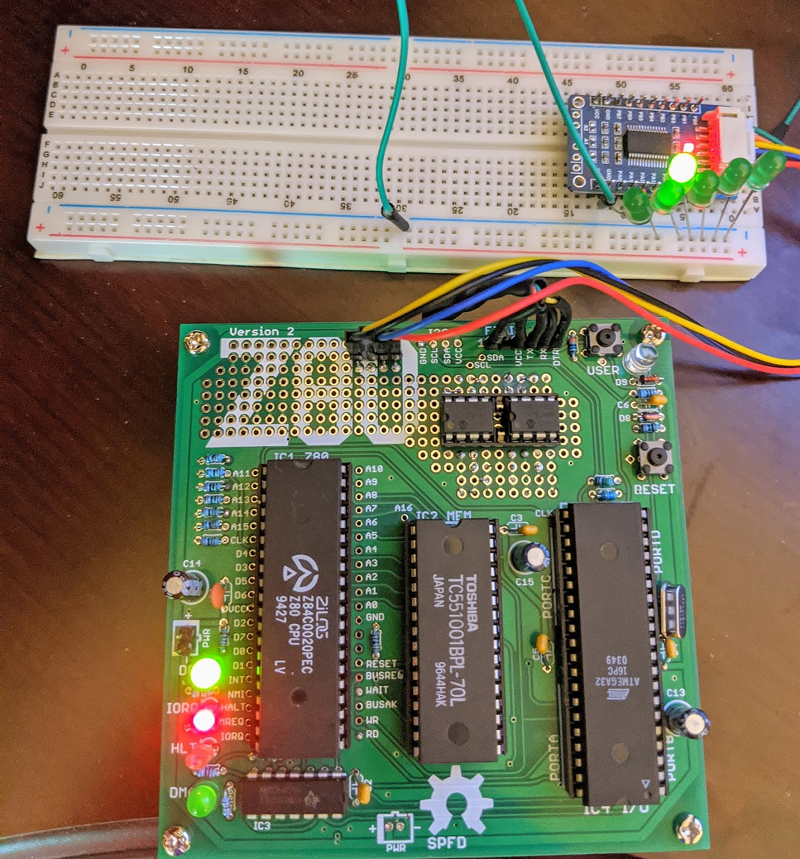
First, you might wonder why I use the IDE. The short answer is I don’t. But when you produce things for other people to use, you almost can’t ignore it. No matter how you craft your personal environment, the minute your code hits the Internet, someone will try to use it in the IDE. A while back I’d written about the $4 Z80 computer by [Just4Fun]. I rarely have time to build things I write about, but I really wanted to try this little computer. The parts sat partially assembled for a while and then a PCB came out for it. I got the PCB and — you guessed it — it sat some more, partially assembled. But I finally found time to finish it and had CP/M booted up.
The only problem was there were not many good options for transferring data back and forth to the PC. It looked like the best bet was to do Intel hex files and transfer them copy and paste across the terminal. I wanted better, and that sent me down a Saturday morning rabbit hole. What I ended up with is a way to make your own menus in the Arduino IDE to set compiler options based on the target hardware for the project. It’s a trick worth knowing as it will come in handy beyond this single problem.
The Issue: Arduino Serial Buffer Size Limit
I won’t bore you with the details about getting the board to work since you will only care if you have one. Details are available in a discussion on Hackaday.io, if you really want to follow it. But the upshot was that for XModem transfers, [Just4Fun] felt like the default Arduino serial buffer wasn’t big enough to be reliable. It did seem to work with the default 64-byte buffer, but XModem sends more data than that and it would be easy to imagine it getting overrun.
How hard can it be to update the buffer? In one way, it is trivial. In another way, it is very difficult because the tools want to help you so badly.
Tool Chain
The little computer project uses a real Z80 chip and uses an ATMega32A for almost all the support functions. It generates the clock, acts like a serial port, acts like a disk drive, and so on. However, the ATMega32 doesn’t directly have Arduino IDE support so you have to install a toolchain for it. The project called for MightyCore so that’s what I used.
The libraries for hardware serial were all set up using #define statements to allow you to adjust the buffer sizes. By default, if you haven’t set up anything, you get a default based on the amount of RAM your processor provides:
#if !defined(SERIAL_TX_BUFFER_SIZE)
#if ((RAMEND - RAMSTART) < 1023)
#define SERIAL_TX_BUFFER_SIZE 16
#else
#define SERIAL_TX_BUFFER_SIZE 64
#endif
#endif
#if !defined(SERIAL_RX_BUFFER_SIZE)
#if ((RAMEND - RAMSTART) < 1023)
#define SERIAL_RX_BUFFER_SIZE 16
#else
#define SERIAL_RX_BUFFER_SIZE 64
#endif
#endif
Making the Change
So this is easy, right? Just define those symbols before HardwareSerial.h loads. Uh oh. That file is loaded by Arduino.h. The IDE wants to add that to your program and it forces it to be first. There seems to be some IDE versions that check if you already included it so they don’t include it twice, but version 1.8.5 didn’t seem to do that. Maybe I can add some options in the preferences to pass to the compiler. Nope. Not via the IDE, anyway.
Not that I didn’t try a lot of things. It was tempting, of course, to simply change the core libraries. But that’s bad. You might want the defaults later. If you update the tool chain, you’ll lose your updates. I wanted to avoid that. Some people on the Internet suggested making a copy of the platform files and modifying those. Still not ideal.
Test Your Assumptions With Custom Error Reporting
I could tell things I tried were not working because I would put #if statements and #error statements temporarily in HardwareSerial.cpp. For example:
#if SERIAL_RX_BUFFER_SIZE==256
#error 256
#endif
Now if a compile causes an error 256, I know I was able to set the size. If not, then the system was resisting my changes.
Compromise: Adding Menu Options At the Board Level
I really wanted a way to make a change just in my project and set the serial buffer sizes. I failed at that. What I did do was make a modification to the boards.txt provided by Mighty Core. Yes, I will have to watch for upgrades overwriting my changes, but they are simple and it will be obvious that it is missing.
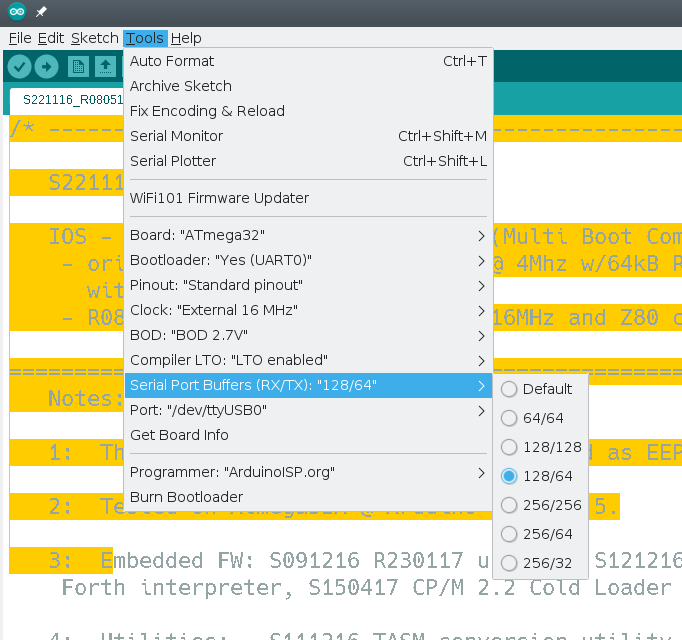
The reason it will be obvious is that I created a menu for the IDE that only appears when using ATMega32 for Mighty Core. This menu lets you select a few preset buffer sizes.
There were three parts to making this work:
- You have to tell the IDE you have a menu item and what it looks like.
- The new item needs to set some compiler options.
- Because the existing system also sets some compiler options, you have to make sure not to clobber them.
The first part is easy. The boards.txt file was (for me) in ~/.arduino15/packages/MightyCore/hardware/avr/2.0.5/boards.txt. Near the top there’s a list of menu keys and I added mine to the end:
# Menu options
menu.clock=Clock
menu.BOD=BOD
menu.LTO=Compiler LTO
menu.variant=Variant
menu.pinout=Pinout
menu.bootloader=Bootloader
menu.SerialBuf=Serial Port Buffers (RX/TX)
Next, I moved down the file and added my menu before the existing LTO menu option for the ATMega32:
32.menu.SerialBuf.disabled=Default
32.menu.SerialBuf.disabled.compilerSB.c.extra_flags=
32.menu.SerialBuf.disabled.compilerSB.cpp.extra_flags=

32.menu.SerialBuf.SB64=64/64
32.menu.SerialBuf.SB64.compilerSB.c.extra_flags=-DSERIAL_RX_BUFFER_SIZE=64 -DSERIAL_TX_BUFFER_SIZE=64
32.menu.SerialBuf.SB64.compilerSB.cpp.extra_flags=-DSERIAL_RX_BUFFER_SIZE=64 -DSERIAL_TX_BUFFER_SIZE=64

32.menu.SerialBuf.SB128=128/128
32.menu.SerialBuf.SB128.compilerSB.c.extra_flags=-DSERIAL_RX_BUFFER_SIZE=128 -DSERIAL_TX_BUFFER_SIZE=128
32.menu.SerialBuf.SB128.compilerSB.cpp.extra_flags=-DSERIAL_RX_BUFFER_SIZE=128 -DSERIAL_TX_BUFFER_SIZE=128

32.menu.SerialBuf.SB12864=128/64
32.menu.SerialBuf.SB12864.compilerSB.c.extra_flags=-DSERIAL_RX_BUFFER_SIZE=128 -DSERIAL_TX_BUFFER_SIZE=64
32.menu.SerialBuf.SB12864.compilerSB.cpp.extra_flags=-DSERIAL_RX_BUFFER_SIZE=128 -DSERIAL_TX_BUFFER_SIZE=64

32.menu.SerialBuf.SB256=256/256
32.menu.SerialBuf.SB256.compilerSB.c.extra_flags=-DSERIAL_RX_BUFFER_SIZE=256 -DSERIAL_TX_BUFFER_SIZE=256
32.menu.SerialBuf.SB256.compilerSB.cpp.extra_flags=-DSERIAL_RX_BUFFER_SIZE=256 -DSERIAL_TX_BUFFER_SIZE=256

32.menu.SerialBuf.SB25664=256/64
32.menu.SerialBuf.SB25664.compilerSB.c.extra_flags=-DSERIAL_RX_BUFFER_SIZE=256 -DSERIAL_TX_BUFFER_SIZE=64
32.menu.SerialBuf.SB25664.compilerSB.cpp.extra_flags=-DSERIAL_RX_BUFFER_SIZE=256 -DSERIAL_TX_BUFFER_SIZE=64

32.menu.SerialBuf.SB25632=256/32
32.menu.SerialBuf.SB25632.compilerSB.c.extra_flags=-DSERIAL_RX_BUFFER_SIZE=256 -DSERIAL_TX_BUFFER_SIZE=32
32.menu.SerialBuf.SB25632.compilerSB.cpp.extra_flags=-DSERIAL_RX_BUFFER_SIZE=256 -DSERIAL_TX_BUFFER_SIZE=32
Menu Structure
You can see that the 32.menu object groups all the items together for this processor. The next part is our menu key (SerialBuf). After that is a unique key for each memory item. It is important that you don’t reuse these. So, for example, if you have two SB64 keys only one is going to work.
If you stop at that key and put an equal sign you can assign the menu item the text you want to display. For example “Default” or “64/64.” You can also extend the key with a property and that property will be set if the option is active.
So, for example, if you select 256/256 then the compilerSB.c.extra_flags property will get set. I made that name up, by the way, and you’ll see why in a minute.
Peaceful Coexistence
There is no property called compilerSB.c.extra_flags. The correct property is compiler.c.extra_flags. However, the Mighty Core LTO option uses the same key. That’s why it was important that the new menu appears first and also that it sets a fake property. Then the LTO code needs a slight modification:
# Compiler link time optimization
32.menu.LTO.Os=LTO disabled
32.menu.LTO.Os.compiler.c.extra_flags={compilerSB.c.extra_flags}
32.menu.LTO.Os.compiler.c.elf.extra_flags=
32.menu.LTO.Os.compiler.cpp.extra_flags={compilerSB.cpp.extra_flags}
32.menu.LTO.Os.ltoarcmd=avr-ar

32.menu.LTO.Os_flto=LTO enabled
32.menu.LTO.Os_flto.compiler.c.extra_flags={compilerSB.c.extra_flags} -Wextra -flto -g
32.menu.LTO.Os_flto.compiler.c.elf.extra_flags=-w -flto -g
32.menu.LTO.Os_flto.compiler.cpp.extra_flags={compilerSB.cpp.extra_flags} -Wextra -flto -g
32.menu.LTO.Os_flto.ltoarcmd=avr-gcc-ar
The big change is that each set of flags adds to whatever the new menu set in its custom property. This way, all the flags get put into the correct property, compiler.c.extra_flags.
I set up error traps to catch all the cases to make sure they were being set right. In addition, after removing those traps, I could see my memory usage go up accordingly.
Customize
Of course, you can modify the parameters if you want something different. You could also use this trick to set other parameters before the Arduino.h file takes over. There’s some documentation about how to set up the platform definitions, including boards.txt.
It would have probably been better for me to make a custom boards.txt file with the same information in it but then I’d need to take the rest of Mighty Core with me. Instead, I just keep a copy of the file called boards.txt.custom and if my menu disappears, I just have to compare that file with the boards.txt file to see what changed.
Of course, if you don’t have to support people using the IDE, maybe just give it up. The Pro IDE is better, even if it does have some shortcomings. Plus there’s always Platform.io.


Thanks Al, this looks useful. Couple of designs I have in mind that I might try this in.
Why do surgery on this junk when you can get free IDE that actually has some decent IDE functionalities in it?
From the point of view of writing code Arduino IDE is just a text editor with syntax highlighting. There is no “go to definition” option, no error checking, no code linting, no split view for multiple files, no version control, no static analysis plugins. No nothing. You can’t even change the style.
Building embedded software is difficult enough with a decent editor. Why make it even more difficult by not using proper tools?
Granted it has a decent board and libraries manager and maybe it has a use if you want to write a short program and quickly upload it to the board but for any larger project it is just useless.
I guess not enough Arduino users have heard of PlatformIO. Some big maker like Great Scott or Naomi Wu needs to do a video about how to install and use PlatformIO.
And for those who don’t like VSCode because Microsoft, PlatformIO works on VSCodium as well.
Doesn’t address the dislike for vscode and similar as a general concept
I’ve been experimenting a bit with the cli of Platformio.
Just typed in some “arduino” project:
pio init –ide codeblocks
… and it adds a project file for codeblocks to the project. It “just works”, as I’ve come to expect from Platformio.
Then, in Codeblocks, you can rightclick on “digitalWrite( )” and click on
“Find Implementation of “digitalWrite” and it directly takes you to the right header file.
Platformio also has decent code completion as most IDE’s that are past 1990.
You can also adjust colors if you want, and it uses a real parser for code highlighting instead of the stupendous arduino keyword text file.
In the same manner you can also make project configuration files for a handfull of other IDE’s. Including, but not limited to Eclipse, Netbeans, Qt Creator, Vi, Emacs, CLion.
So if your IDE is your “Universal Constant” you can just Use the Platfomio CLI to generate a quite usable project configuration file for it.
If your favourite IDE is not in the list, then you can still use Platformio, to pull compilers and Frameworks from the Internet, and then make your IDE spit out some simple commands such as “pio run” and “pio run –target upload”.
https://platformio.org/install/integration
In a single morning I did blinking led projects with a “Blue Pill” (Clone which needs special programming settings) and for CMSIS, arduino, MBED, and LibOpenCM3.
The STM32 is a bit of a monster for beginners, and it’s GPIO register setup is quite a nightmare.
Blinking Led:
Size:
31kB Mbed.
10kB arduino
500b CMSIS
500b LibOpenCM3
Another thing I like about LibOpenCM3 is that the framework is based on very simple functions, which often just set a few bits in some encryptic register. The function overhead can probably be optimized by GCC itself, but I have not looked into that yet.
There are also no pre-instantiated objects in LibOpenCM3, which is why the blinking LED is so small. (It is “just” plain old C. No C++ in the framework)
I also accidentally bumped into the book:
Beginning STM32 Developing with FreeRTOS, libopencm3 and GCC
ISBN-13 (pbk): 978-1-4842-3623-9
ISBN-13 (electronic): 978-1-4842-3624-6
I can highly recommend it. Follow it and you’ll have FreeRTOS with an USBcdc (serial port emulation) running native on a Blue Pill in an afternoon (most time for reading the book, not setting up the tools).
An example for a uart & FreeRTOS compiles into 4kB.
I personally like platform IO but not everybody does. And for a lot of people the IDE is the universal constant like it or not.
https://hackaday.com/2017/04/07/platformio-and-visual-studio-take-over-the-world/
PlatformIO *also* works with CLion, and I’m sure with a little coaxing you could build a nice-enough PlatformIO centric environment using vim.
The IDE is definitely for beginners or people who don’t have a favorite editor. For all the others there’s the command line tool (arduino-cli): https://blog.arduino.cc/2020/07/06/the-three-pillars-of-the-arduino-cli/
This looks like an article from 1993 about Windows 3.1 and 9600 baud modems, apparently the knowledge of serial communications cannot be communicated from one generation to the next, Must be poor communication!
I don’t quite get your comment. I see the article double useful. Primarily, it shows what the title suggests – how to set serial buffers in an Arduino. Secondarily, it tells a way how to inject compiler options while using Arduino IDE (which by itself hides and tampers and chews and screws the source code before the compiler gets it so that the creative design students (=the primary target group for Arduino) don’t ever think such a nasty thing like they are “programming” and which in consequence obstructs other users to do what they need and would otherwise do by just a single line in the source code…)
There is plenty of things to hack in this world.
“arduino” should not be one of them. It should be a tool, but it is a big mess.
The only thing dubiously positive about arduino is that it made it trivial to make a blinking led project, and therefore accessible for beginners who have no concept of what a decent development environment environment looks like.
A brother of mine recently started with “arduino” because it is the only thing you hear all over the internet. He’s been playing with it for a month or so. One of his complaints is that it does not give any decent compiler warnings / errors. His prior experience is with basic.
Other things such as the lack of code completion, decent syntax highlighting, the complete mess with the setup of the 100.000 boards in “arduino”. And oh, It messes up my filesystem and adds weird directories all over the place. Just Yuck!
I believe such changes should be better put into boards.local.txt . There, they won’t get overridden by upgrades.
+1! :)
As the maintainer of MightyCore, I’ve encountered the issue with serial buffer sizes before. The problem is that you can’t add build flags to your Arduino project, and the IDE doesn’t remember your board settings either. It’s you, the user that has to remember (or write down) the build settings and apply them manually.
The reason why I have left this menu option out is to keep it simple. I’ve gotten requests for adding menu options for all sorts of things. Bootloader baud rates, EEPROM retain, printf with float support, TWI, and serial buffer sizes, etc. For “advanced” features like this, I’ll recommend using PlatformIO instead. It stores all your settings in the project’s platformio.ini file, and it’s pretty straight forward to set up if you follow the MightyCore + PlatformIO readme I’ve written. Compiler flags are also possible to add, and is what [Al Williams] would have used to change the serial buffer sizes if PlatformIO were used.
PlatformIO can also calculate the fuse bits and load the correct bootloader binary, so there is nothing Arduino IDE can do that PlatformIO can’t anymore. For a project like in the article above it would definitely make sense to use PlatformIO instead.
And to all the haters; MightyCore is just a package that lets you use “Arduino functions” and libraries. If you don’t want or need any Arduino functions you can just replace setup() and loop() with int main(void){}, and it will be just as if you used Atmel Studio or pain avr-gcc for that matter. However, it is convenient that Arduino libraries can be used on “unofficial hardware” such as the ATmega32.
And yes, The Arduino IDE is terrible and outdated as a coding environment, but their “PRO IDE” isn’t exactly perfect either.
Well as I’ve said, I actually like platform IO and have written about it more than once. But the Arduino IDE for better or worse is sort of the lingua franca of Arduino development. Sure there are other answers but almost everyone has at least some exposure to the IDE at some point. But all the other solutions, even platform IO which is well known in our circles, I have a subset of the user community that are either aware of them or are active users.
I sort of wonder why “arduino” is so popular.
(I do not even understand people use it at all)
Maybe 15 years ago it was a bit complicated to setup a decent development environment for microcontrollers. Now it is just because it has gained so much momentum that someone with no prior knowledge in the matter sees it as a “decent” (or maybe even the only?) option. books, youtube, websites, they’re all full of it.
I’ve been programming AVR controllers from before “arduino” existed, and have ignored it for years. Then, out of curiousity I started playing a bit with it and I was appalled by all the things missing, or not working properly beyond a blinking led, or for that sake, these Uart buffers. It is not a platform I would recommend even to my worst enemies.
It’s just as with the Raspberry Pi. There are 100+ similar boards, and 90% of the posts on Hackaday about “some Linux single board computer” are about the Raspi.
Once people “grow out of” “arduino”, they have to unlearn the bad habits and ad-hock programming that it encourages.
Take a look at the book I mentioned earlier. The first blinking led is done with a delay loop, and then immediately explain why this is a bad idea for “real” programs.
In the next chapter they go on with FreeRTOS.
It also mentions briefly that an RTOS is not really needed for small programs, but that it helps in keeping different parts of a program separated and the flow of things easier to understand.
Atmega328 has too small RAM to run FreeRTOS comfortably (Maybe ChibiOS fits), but the 32 bit ARM processors can all fit it nicely. I think it is becoming time to leave the 8-bitters behind and introduce all newbies to microcontroller boards with enough resources for something like FreeRTOS.
I’ve done years of programming without a RTOS, and It took me quite a while to get to a point to organize different task and ISR’s in a project in a way that is easy to understand, debug, etc.
I love Sigrok / Pulseview with the EUR10 LA dongles. and think these should also be introduced in the first microcontroller hands-on course. It’s a great tool for debugging firmware (checking timing in an RTOS…) and it may take years for beginners to even realize for beginners that such a tool is very useful. I tried to explain it to my brother, but he did not understand why he would need a Logic Analyzer to see his LED blinking.
This post does a pretty good job showing the less-known customization features of the Arduino IDE!
I’ll add some bits:
– As others said, you should put your custom definitions in the boards.local.txt file so that they are not overridden at update time: https://arduino.github.io/arduino-cli/platform-specification/#boardslocaltxt
– With any recent version of the Arduino IDE, if you type “#include ” it will not be automatically prepended so you can have it in any custom order
– However, adding a #define before such #include will only affect header-only libraries. HardwareSerial.cpp is a separate translation unit so it will not get the custom #define because that’s how C++ compilation works :)
While this article describes the preferred way to customize the IDE, I’d also like to mention some alternative ways that might be useful for the more advanced users:
– Quick command line workaround: arduino-cli compile –fqbn MightyCore:avr:32:clock=8MHz_internal –build-properties “build.extra_flags=-DSERIAL_TX_BUFFER_SIZE=256 -DSERIAL_RX_BUFFER_SIZE=256” (this works with MightyCore, but might not work with other platforms that already define their own build.extra_flags)
– A -D option is going to be introduced in arduino-cli just to add these compile-time flags
But the best way to customize the IDE and make it available also to other users is to use the platform extension syntax that allows to reference an existing platform and just add some bits. This way, even if MCUdude is not going to merge the additional option, it’s possible to make it available to everyone as a derived platform.
A quick example for the Z80 computer mentioned in this article is here:
https://github.com/bcmi-labs/ArduinoCore-Z80-MBC
That was an “#include ” that was parsed as HTML by Hackaday :)
Okay, no luck even with spaces. Let’s try without brackets: #include “Arduino.h”