Over the last couple of years, we’ve seen a wave of impressive rugged mobile computing devices based on the ubiquitous Raspberry Pi. Sometimes they involve repurposing an existing heavy duty enclosure, and in others the Pi takes up residence in a 3D printed case which may or may not be as strong as it appears. In either event, they usually don’t lend themselves to duplication because of the time and expense involved in tracking down or printing all the parts required.
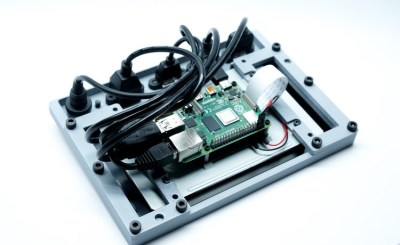
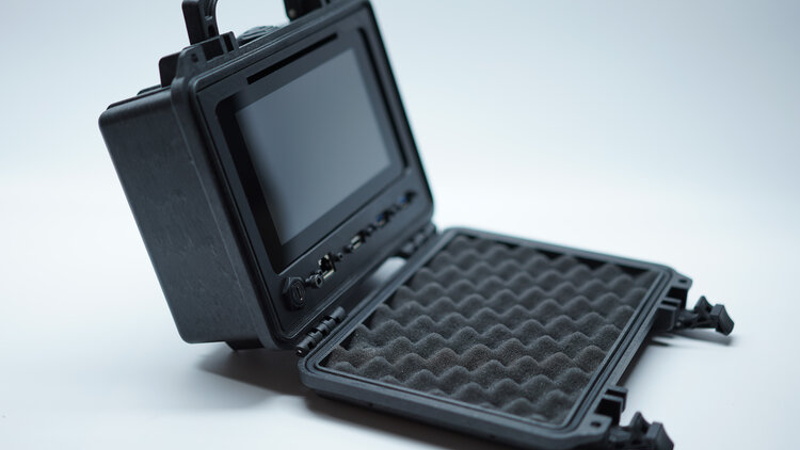
But the Raspberry Pi Quick Kit by [Jay Doscher] may change that. It represents what must surely be the simplest and fastest route to a building a rugged mobile ARM computer for your hacking adventures. Beyond the Pelican 1150 case that serves as the outer enclosure, you only need three printed parts and a handful of fasteners to complete the build. Of course you’ll need a Raspberry Pi and the official touch screen as well, but that’s sort of a given.

All of the electronics mount onto the three piece 3D printed frame, which is then press-fit into the opening of the Pelican case. Since you don’t need to pop any holes through the case itself, the assembled unit remains water and air tight. While [Jay] has recently shown off a very impressive 3D printed Pi enclosure, there’s really no beating a legitimate heavy duty storage case if you’re trying to protect the hardware.
When you want to use the Pi, just open the case and plug your power and accessories into the panel mount connectors under the display. There’s no integrated battery or keyboard on this build, but considering how small it is, that shouldn’t really come as a surprise.
[Jay] is targeting the Pi 4 for the Quick Kit, so that means WiFi and Bluetooth will come standard without the need for any external hardware. It looks like there might just be enough room to include an RTL-SDR receiver inside the case as well, but you’ll need to do a little redesigning of the 3D printed parts. If you do modify this design to pack in a few new tricks, we’d love to hear about it.
The Quick Kit is a greatly simplified version of the Raspberry Pi Recovery Kit that [Jay] unleashed on an unsuspecting world late last year. We’ve seen numerous variations on that original design sprout up since then, so we’re very interested to see what the response will be like to this much cheaper and easier to build version.


What about heat management for the Pi 4?
There’s a gap just below and just above the screen for passive cooling.
Without forced air for cooing, dead space and even a metallic heat sink would be woefully inadequate… at least for my RPi 4.
Doesn’t seem like adding a fan would be much of a challenge. Or just use the Pi 3 if you don’t need that much mobile processing power.
As the Pi is mounted vertically that may help. Probably more scientific to measure and report back than to speculate. :-)
“It’ll start getting cooler. You just watch…
I don’t think science knows, actually.”
Having vents separated by that much vertical distance pretty much guarantees convection flow, so then it’s just a matter of ensuring that the Pi’s chips are somewhere near that airflow. But everybody gets their panties in a knot over an SOC that dissipates all of 10 Watts. Which is fine – they can go ahead and put their water coolers in there. Costs me nothing.
If only the case was metal, you could install a metal heatsink bridge (i.e., a block of copper/aluminium) to the case to transfer the heat away.
Looks like someone beat me to it :) . Nice, I have a Pelican Vault case (the next size up) sitting on my desk as I write this. Also no holes in box are allowed. A similar front panel with all the electronics behind it. I bought a 7″ display and a small keyboard as a start. Keyboard/mousepad is wireless, but I have a nice bluetooth one that folds… may play with that. I wanted enough room to add whatever I might come up with for sensors, etc…. Sort of a gadget box with sound, microphone, camera, switches, a little fan for airflow, computer reset button, key switch on/off for fun (Ie. can’t supply power without a physical key), some leds for statuses to start with…. then build off of it as ideas come up. It’s a nice sturdy box to work with.
If you add on some IP67 USB connectors, you can shut the lid and have it running waterproof, with maybe a few external peripherals in the wet on the outside.
Oddly, for Pi based Time Servers, there’s actually routines that are run on cores to generate heat to provide a more stable time.
Protection from airflow prevents sudden shifts in timing.
Some insulation helps, but not too much.
Thermal mass for a consistent temperature is more important.
Buggy forum software. I clicked on, and the message clear said, “Leave a Reply to Pi Fan”.
For this post, it says “Leave a Reply to Canoe”. Wonder where it will end up
A better way to do this is to use an external oscillator. A TCXO (Temperature Compensated Crystal Oscillator) or OCXO (Oven Controlled Crystal Oscillator) will provide orders of magnitude better performance than the on-board oscillator and don’t require the R Pi itself to be in a controlled environment.
Or even better, a SiLabs MEMS oscillator. They are the dog’s!
1. how long this device work offgrid?
2. where is mouse and keyboard?
sory but this device are not usefull, nice but not usefull in emergency situation
I made something smaller from memory card case https://www.youtube.com/watch?v=nThczbf3Fy4
Nice,
I have never seen a “memory card case” like that before!
Looks cool, really needs a keyboard on that lid though. And some batteries in the back instead of that mess of wires.
That’s what always gets me about these portable pi projects, the looms and adapters usually end up taking up more volume than the electronics! It’s a shame more hasn’t been done with the compute module as that would be perfectly suited to custom back/frontplanes.
99% of DIY projects look really cool until you actually imagine using them.
Which is understandable, because making things that are actually practical is very, hard. Even in the software world. We all like to make things, but it’s usually almost impossible to make things as good as the commercial equivalents unless you put a lot of focused effort over a long time into them.
I also suspect that commercial stuff is much more use case driven, while DIYers
are more pure research driven.
I plan on using one of those ‘portable’ USB battery packs for my box. It will still plug in the front just like the main power…. At least initially. It will all be stored in the box if needed. Also the keyboard will clipped or velcro’ed to the lid for easy removal, so one can use it outside the box. Wireless keyboard so can use anywhere… By The Way, this is meant as a ‘fun’ project, not a Ultra ‘fills a basic need’ project. No need to be ‘serious’ about such projects!!!!
Try the Harbor freight brand case and an HDMI screen to make sourcing the parts cheaper/easier. I think I scored mine for $5-15, at this size I can’t see paying the Pelican premium. Screen is the same story, half price to go with a standard HDMI. Throw in a bluetooth keyboard from Goodwill and I’ll be interested.
Good idea, tough sell for me when a Tab S in an ‘otterbox’ case is less than just your screen.
Very polished product, kudos.
Looks like you only save ~$50 on parts between an HDMI screen and case going the cheaper way I said, at least in single units on Amazon/Harbor Freight
Just FYI. Another case option is the Harbor Freight Apache 1800 weatherproof case $13, probably US only.