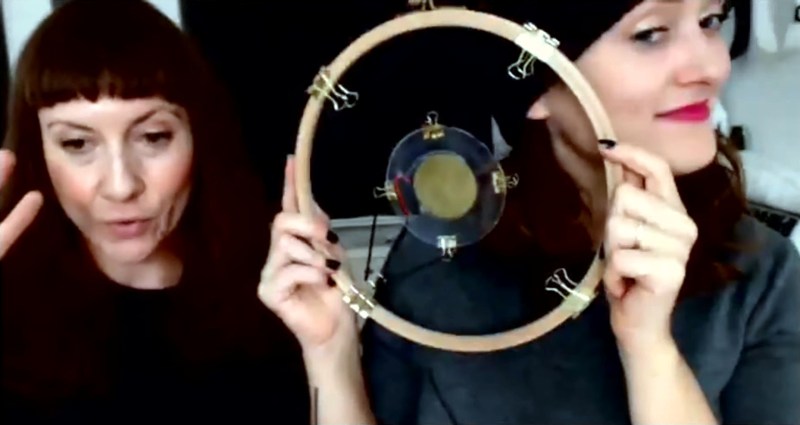
A yogurt lid and embroidery hoop are key components in building this microphone. It’s a super low tech, entry-level project to get into “found sound” and exactly what is needed to start hacking around in the audio world. This workshop presented by Helen Leigh and Robyn Hails shows you how to build a simple microphone and use it as the electronic gateway to all kinds of audio shenanigans.
Key to this build are the piezo element and an amp to process the signals it generates. All other materials are common around most households, but put them together as shown in this live hands-on seminar from the 2020 Hackaday Remoticon, and I think you’ll surprise yourself with how good the thing sounds!
Microphones pick up the tiny vibrations of audio waves moving through the air. The trick is to pick up the right vibrations and avoid the wrong ones, which is the guiding principle in this design. First, a plastic diaphragm cut from the lid of a yogurt container serves as the anchor point for the piezo element, serving as a sounding board to pick up those tiny audio vibrations that the piezo will turn into an electric signal.
This assembly is isolated from traveling through the mounting mechanism for the mic by suspending it inside of a wooden embroidery hoop using document binder clips (in a most excellent gold color) and elastic cord. There is some element of danger here as the unbalanced microphone signal has the potential to blow out your speakers so be sure to set the gain all the way down and proceed with caution as you crank up the volume.


A number of the workshop attendees posted photos of their complete mics in the public chat which you’ll find on the workshop project page. If you want to build one of these yourself you can find the materials list here.
While highly sensitive mics are in any number of electronics at our fingertips these days, boiling this concept down to its most basic feels much cooler than simply opening up a recording app on your phone. Once you’ve gotten your feet wet with piezo input, take a look around and start adding them to all kinds of eclectic objects so they can be sound sources in your next audio creation.


Near project. I have a pile of extra large piezos that I was wanting to use, maybe one will find it’s life purpose as a mic (another two might become a pair of headphones)
A number of years ago I was experimenting with a piece film bonded to a plastic film that i was testing to use as a respiration sensor for sleep studies. It didn’t work for the purpose, but it because such a sensitive microphone that it would detect footsteps of people walking outside my office.
I ended up using a piezo “sounder” (disk like used in the mic project) as my sensor. The finished image is here…
https://www.ambuusa.com/sleep/product/ambu-sleepmate-airflow-pressure-sensors
Uhm, the video is showing up private for me? Anyone else?
I just checked and works for me. Are you still having issues?
Working now.
Yeah, same problem here– private video.
That’s OK, the tl:dr version is apparent from the photo. Embroidery ring, piezo element, plastic disk.
yup, same here
Is it a Geolocation issue? The sound like Brits (lol) and since that is where I am it works for me. Also this has already shown up on my YT Subscritions as I follow the Hackaday YT channel. this is the share link from the video: https://youtu.be/ZD7eq1f0wWg
It looks like the microphones of the 1930s
It gets even more fun when you make your own rochelle salt piezoelectric crystals.
+1!
Skip to 1:43:17 if you just want to hear what it sounds like
Thanks. I stopped watching when I realized how incredibly long it was. Unfortunately, they plugged it into a seperate amp with reverb on so it’s pretty hard to say what kind of quality there is. Given the low cost of the piezos, I would not expect much. Still the suspension principle looks generalizable to almost any microphone element.
I like how the improvised suspension design is constructed and gets me thinking also about suspending a magnet like say in a bucket with a coil around the bucket… and even suspending the bucket I guess if not wanting to measure the ground so much? More for seismic or VLF or lower detection, monitoring or recording.