Printed Circuits, 1940s Style

A presentation this month by the Antique Wireless Museum brought British engineer and inventor John Sargrove (1906-1974) to our attention. If you’ve ever peeked inside old electronics from days gone by, you’ve no doubt seen point-to-point wiring and turret board construction. In the 60s and 70s these techniques eventually made way for printed circuit boards which we still use today. But Mr Sargrove was way ahead of his time, having already invented a process in the 1930s to print circuits, not just boards, onto Bakelite. After being interrupted by the war, he formed a company Electronic Circuit Making Equipment (ECME) and was building broadcast radio receivers on an impressive automatic production line.

Mr. Sargrove’s passion was making radios affordable for everyone. But to achieve this goal, he had to make large advances manufacturing technology. His technique of embedding not only circuit traces, but basic circuit elements like resistors, capacitors, and inductors directly into the substrate foresaw techniques being applied decades later in integrated circuit design.  He also developed a compact vacuum tube which could be used in all circuits of a radio, called an “All-stage Valve“. Equally important was his futuristic automatic factory, which significantly reduced the number of factory workers needed to make radios from 1500 to 50. Having completed the radio design, he was also developing a television receiver using the same concepts. Unfortunately, ECME was forced into liquidation when a large order from India was cancelled upon declaration of independence in 1947.

You really must watch the video below. There are many bits and pieces of modern factory automation which we still use today, yet their implementation using 1940s techniques and technology is fascinating. Further reading links after the video. Thanks to [Mark Erdle] for the tip.

Continue reading “Printed Circuits, 1940s Style”

Roll Your Own Tracking

The smartphone is perhaps the signature device of our modern lives. For most of the population it is never more than an arm’s length away, it’s on your person more than any other device in your life. Smartphones are packed with all sorts of radios and ways to communicate wireless. [Amine Mansouri] built an ESP8266 based tracking device that takes advantage of this.

Most WiFi-enabled devices will send out “probe requests” frames trying to search for the SSIDs they were connected to. These packets contain the device MAC address as well as the SSIDs you’ve connected to. Using about 12 components, [Amine] laid out a small board in Eagle. By putting the ESP8266 in monitor mode, the probe frames can be logged and uploaded. The code can be updated OTA making it easy to service while in the field.

With permission from his local library, eight repeater boards were scattered throughout the building to forward the probe packets to where the tracker could pick them up. A simple web interface was built that allows the library to figure out how many people are in the library and how often they frequent the premises.

While an awesome project with open-source code on Github, it is important to stress how important is it to get permission to do this kind of tracking. While some phones implement MAC randomization, there are still many out in the wild that don’t. While this is similar to another project that listens to radio signals to determine the coming and going of ships and planes, tracking people with this sort of granularity is in a different category altogether.

Thanks [Amine] for sending this one in!

Home-Crafting A Motorcycle Throttle Hold

Cruise control is a common feature on automobiles, though less so in the motorcycle market. Given that continual throttle application on long rides can be a real pain in the wrist, many riders long for such a convenience. As a cheat solution, bolt-on locks that hold the throttle at a set position are available, though quality varies and generally they need to be activated by the throttle hand anyway. [Nixie] wanted a solution that would leave the right hand entirely free, and held, rather than locked, the throttle.

The device [Nixie] came up with is essentially a brake that fits inside the throttle handle and holds it in position. This is achieved with a mechanism that presses a pair of small brake shoes into the inside of the throttle, holding it from rotating back to neutral when the rider lets go. The brake is activated by a control on the left handlebar via a Bowden cable, allowing [Nixie] to activate the throttle hold on the highway and use the right hand to check pockets or simply rest.

It’s a tidy build, and [Nixie] does a great job of explaining the various design choices and the intricacies of the Bowden cable actuated mechanism. It’s anything but a one-size-fits-all build, but other enterprising machinists could certainly duplicate the design for other motorcycles without too many problems.

For those interested in more traditional cruise control, we’ve featured a teardown of a simplistic 90s Jeep system before. Video after the break.

Continue reading “Home-Crafting A Motorcycle Throttle Hold”

DevTerm Beats Cyberdeck Builders To The Punch

What makes a cyberdeck? Looking as though it came from an alternate reality version of the 1980s is a good start, but certainly isn’t required. If you’re really trying to adhere to the cyberpunk ethos, any good deck should be modular enough that it can be easily repaired and upgraded over time. In fact, if it’s not in a constant state of evolution and flux, you’ve probably done something wrong. If you can hit those goals and make it look retro-futuristic at the same time, even better.

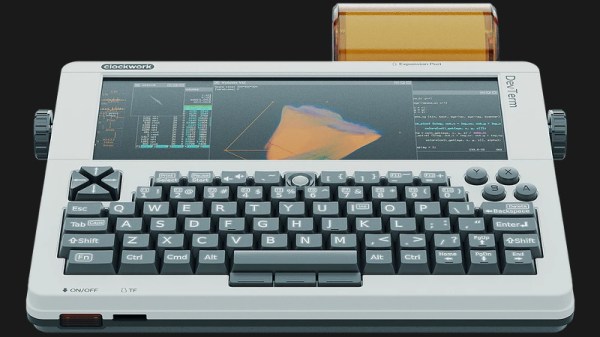
Which is why the Clockwork DevTerm is such an interesting device. It ticks off nearly every box that the custom cyberdeck builds we’ve covered over the last couple years have, while at the same time being approachable enough for a more mainstream audience. You won’t need a 3D printer, soldering iron, or hot glue gun to build your own DevTerm. Of course if you do have those tools and the skills to put them to work, then this might be the ideal platform to build on.

With a 65% QWERTY keyboard and widescreen display, the DevTerm looks a lot like early portable computers such as the TRS-80 Model 100. But unlike the machines it draws inspiration from, the display is a 6.8 inch 1280 x 480 IPS panel, and there’s no pokey Intel 8085 chip inside. The $220 USD base model is powered by the Raspberry Pi Compute Module 3, and if you need a little more punch, there are a few higher priced options that slot in a more powerful custom module. Like the Waveshare Pi CM laptop we recently looked at, there’s sadly no support for the newer CM4; but at least the DevTerm is modular enough that it doesn’t seem out of the question that Clockwork could release a new mainboard down the line. Or perhaps somebody in the community will even do it for them.

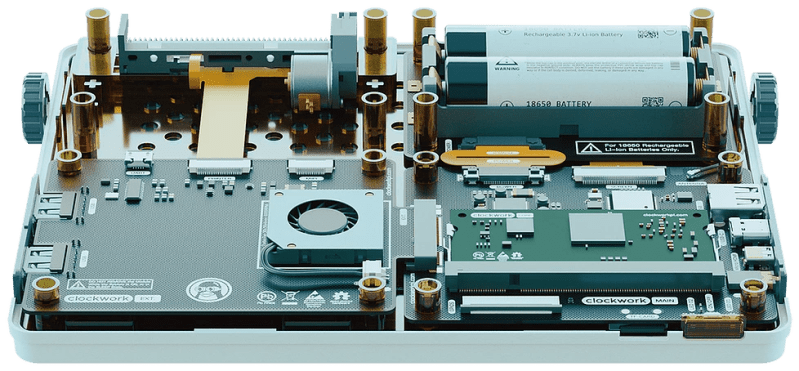
Speaking of which, the board in the DevTerm has been designed in two pieces so that “EXT Module” side can be swapped out with custom hardware without compromising the core functionality of the system. The stock board comes with extra USB ports, a micro USB UART port for debugging, a CSI camera connector, and an interface for an included thermal printer that slots into a bay on the rear of the computer. Clockwork says they hope the community really runs wild with their own EXT boards, especially since the schematics and relevant design files for the entire system are all going to be put on GitHub and released under the GPL v3.

They say that anything that sounds too good to be true probably is, and if we’re honest, we’re getting a little of that from the DevTerm. An (CPU BLOBs aside!) open hardware portable Linux computer with this kind of modularity is basically a hacker’s dream come true, and thus far the only way to get one was to build it yourself. It’s hard to believe that Clockwork will be able to put something like this out for less than the cost of a cheap laptop without cutting some serious corners somewhere, but we’d absolutely love to be proven wrong when it’s released next year.

Remoticon Video: Making Microphones And Finding Sound

A yogurt lid and embroidery hoop are key components in building this microphone. It’s a super low tech, entry-level project to get into “found sound” and exactly what is needed to start hacking around in the audio world. This workshop presented by Helen Leigh and Robyn Hails shows you how to build a simple microphone and use it as the electronic gateway to all kinds of audio shenanigans.

Key to this build are the piezo element and an amp to process the signals it generates. All other materials are common around most households, but put them together as shown in this live hands-on seminar from the 2020 Hackaday Remoticon, and I think you’ll surprise yourself with how good the thing sounds!

Continue reading “Remoticon Video: Making Microphones And Finding Sound”

Space Is Radioactive: Dealing With Cosmic Rays

Outer space is not exactly a friendly environment, which is why we go through great lengths before we boost people up there. Once you get a few hundred kilometers away from our beloved rocky planet things get uncomfortable due to the lack of oxygen, extreme cold, and high doses of radiation.

Especially the latter poses a great challenge for long-term space travel, and so people are working on various concepts to protect astronauts’ DNA from being smashed by cosmic rays. This has become ever more salient as NASA contemplates future manned missions to the Moon and Mars. So let’s learn more about the dangers posed by galactic cosmic rays and solar flares. Continue reading “Space Is Radioactive: Dealing With Cosmic Rays”

A Portable Serial Terminal That Should Be From The 1970s

The humble standalone serial terminal might be long gone from the collective computing experience, but in the ghostly form of a software virtual terminal and a serial converter it remains the most basic fall-back and essential tool of the computer hardware hacker. [Mitsuru Yamada] has created the product that should have been made in the serial terminal’s heyday, a standalone handheld terminal using a 6809 microprocessor and vintage HP dot matrix LEDs. In a die-cast box with full push-button keyboard it’s entirely ready to roll up to a DB-25 wall socket and log into the PDP/11 in the basement.

Using today’s parts we might achieve the same feat with a single-chip microcontroller and a small LCD or OLED panel, but with an older microcomputer there is more system-building required. The 6809 is a wise choice from the 1970s arsenal because it has some on-board RAM, thus there’s no need for a RAM chip. Thus the whole thing is achieved with only a 2716 EPROM for the software, a 6850 UART with MAX232 driver  for the serial port, and a few 74 chips for glue logic, chip selects, and I/O ports to handle keyboard and display. There’s no battery in the case, but no doubt that could be easily accommodated. Also there’s not much information on the keyboard itself, but in the video below we catch a glimpse of its wiring as the box is opened.

The value in a terminal using vintage parts lies not only in because you can, but also in something that can’t easily be had with a modern microcontroller. These parts come from a time when a computer system had to be assembled as a series of peripherals round the microprocessor because it had few onboard, leading to a far more in-depth understanding of a computer system. It’s not that a 6809 is a sensible choice in 2020, more that it’s an interesting one.

By comparison, here’s a terminal using technology from today.

Continue reading “A Portable Serial Terminal That Should Be From The 1970s”