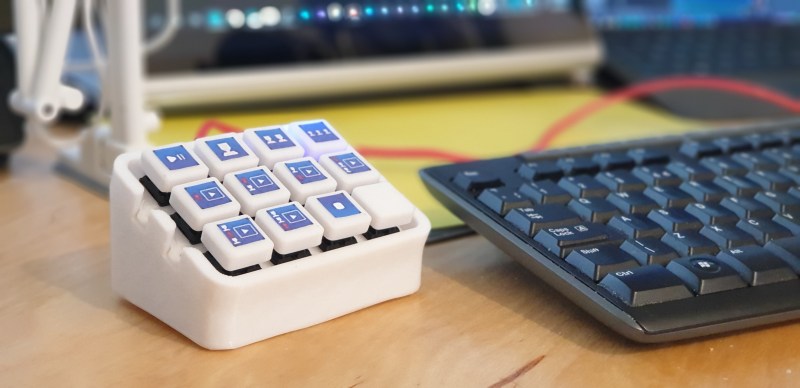
Whether it’s for work, school, fun, or profit, nearly everyone is a content-creating video producer these days. And while OBS has made it easier to run the show, commanding OBS itself takes some hotkey finesse. Fortunately, it just keeps getting easier to build macro keyboards that make presenting a breeze. That includes the newest player to the microcontroller game — the Raspberry Pi Pico, which [pete_codes] used to whip up a nice looking OBS stream deck.
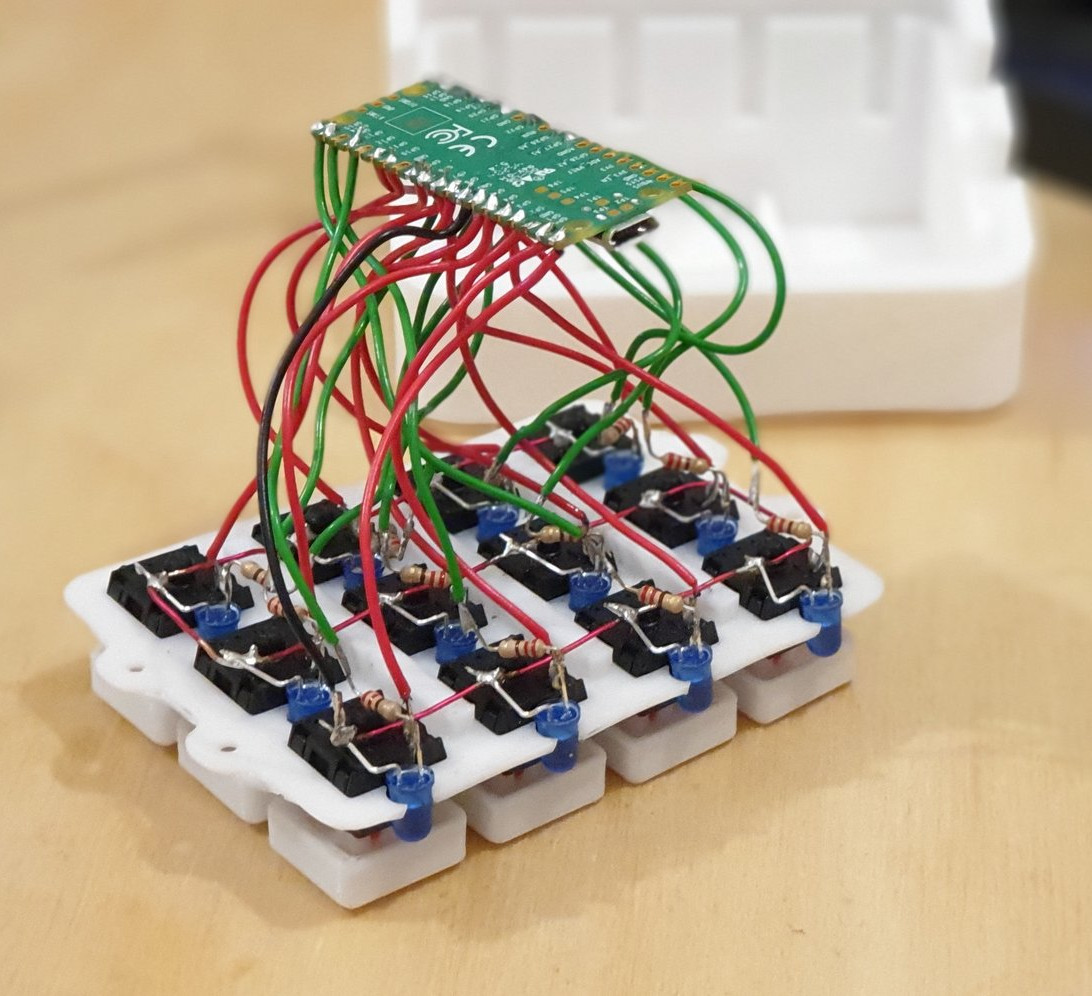 Sometimes you just need something that works without a lot of fuss — you can always save the fuss for version two. [pete_codes]’ Pico Producer takes advantage of all those I/O pins on the Pico and doesn’t use a matrix, though that is subject to change in the future. [pete_codes] likes the simplicity of this design and we do, too. You can see it in action after the break.
In reply to the Twitter thread, someone mentions re-legendable keycaps instead of the current 3D-printed-with-stickers keycaps, but laments the lack of them online. All we can offer is that re-legendable Cherry MX-compatible keycaps are definitely out there. Maybe not in white, but they’re out there.
If [pete_codes] wants to go wild in version two and make this macro keeb control much more than just OBS, he may want to leave the labeling to something dynamic, like an e-ink screen.
It's alive! The Pico Producer (new name) is assembled! 12 buttons and LEDs hooked up to a @Raspberry_Pi #RaspberryPiPico acting as a HID device using Circuit Python! pic.twitter.com/CxNGmvFdh9
— Pete Gallagher – Azure #MVPBuzz (@pete_codes) February 11, 2021


Lighted? Shouldn’t it be “lit,” “blacklit,” or use another word like “illuminated”? This feels like something you would here in the UK.
Hear here?
As a speaker of the Queens English, I’m not even sure that we’d use “lighted”!
What about “lit”? *hehehehe*
“On the lighted stage”?
Thanks so much!
I’m already working on upgrades too as it happens… I’ve designed a PCB to replace the heap of wires… That should be arriving soon!
perhaps it’s time to introduce the term: YAMK ;) although i like that’s it a PiPi one
You just want to get it lit. :P
Lighted is normal usage.
Seriously, Lit (super glowy) pigment in a resin printer. Or better: keycap printed, then resin w/lit poured in and cured for the letter/number/symbol.
Ok these OLED switches aren’t cheap but I like them https://www.mouser.com/new/nkk-switches/nkk_oled/
That is $680 for an array of 12!
Make your own!
Buy or scrounge the keyswitches that have hard clear plastic covers. The kind made to print or write your own icon etc on.
Buy the dot matrix displays that are 60×60 .
One color are fairly cheap. Tri-color and video colors are pricey…..
3D print a new core based on the old one, but modified to hold the display. You need only 3 small wires to send the data..
Use a header Jack to connect each cap to the assembly. Use one controller for the whole thing instead of trying to put everything in one keyswitch
Plug in the cap, Pop the cap onto the switch.
Fire it up.
Should be easy- cheezy….
Using HID instead of MIDI is interesting approach. We just built a 4×4 midi box for controlling Resolume. Our approach was a hack up of two Adafruit Learn projects:
– https://learn.adafruit.com/adafruit-led-arcade-button-qt/arduino uses similar button wiring eg all btn/led direct to Pico and
– https://learn.adafruit.com/adafruit-led-arcade-button-qt/arduino which greatly simplifies wiring with the i2c 1×4 STEMMA QT
These use the 30mm Button/LED, which unfortunately are only single color led (digital or pwm).
It would be pretty trivial to mod this to be an HID device instead of Midi.
We are currently working on the box to hold it (massive box for use in art installation)
The Adafruit NeoTrellis 4×4 uses RGB buttons with NeoPixels via i2c. I got 2 to play with. One to drive with a Pico and one to use a Feather M4 (for floating point effects).
https://www.adafruit.com/product/4352