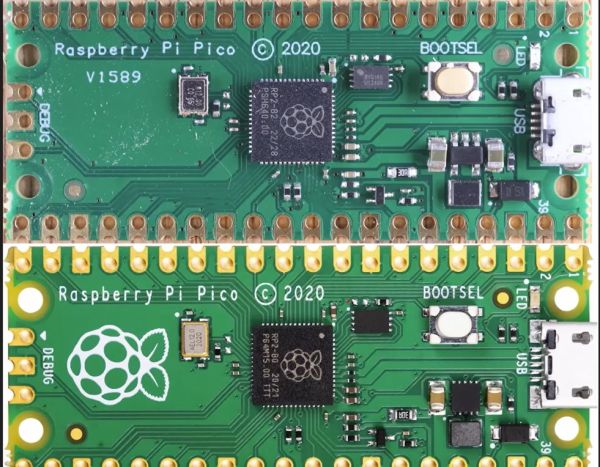
Building A Giant Boardgame Isn’t Easy

[Stevenson Streeper] is a maker, and was recently charged with a serious mission. He had to prototype, design, and build a board game. A software-controlled board game, that is, and one that was 400 square-feet in size. As you might imagine, this ended up being a tall order, and he’s been kind enough to share his tale on his blog.

His client’s idea was for a giant interactive game board akin to the glowing disco floors of old. It had to play a game approximating the rules of “The Floor Is Lava.” It had to handle up to 20 players at a time, too.

[Stevenson] runs a company that delivers “Activations”—basically big showpieces for customers willing to pay. This wasn’t his first attempt at building an immersive attraction, but it was a big job, and a challenging one at that. He explains the difficulties that came about from a limited crew, limited timeline, and a number of difficult missteps. Hurdles included surprise unusable off-the-shelf hardware and the difficulty of hand-sanding 144 tiles of polycarbonate. One weeps for the project’s plight early on – if only the AliExpress tiles were documented.

He may have bitten off more than he could chew, and yet—the project was finished and to a decent degree of functionality success. That’s to be applauded, and [Stevenson] learned a ton along the way. Big projects can be daunting and can put you in a bind. As this story demonstrates, though, perseverance often gets you somewhere okay in the end. Video after the break.

Continue reading “Building A Giant Boardgame Isn’t Easy”

KanaChord Is A Macro Pad For Japanese Input

There are various situations that warrant additional keyboards on your desk, and inputting a second language is definitely a good one. That’s the idea behind KanaChord, which generates Unicode macros to render Japanese Kana characters using chords — pressing multiple keys at once as you would on a piano.

The Japanese writing system is made up of Kanji (Chinese characters), Hirigana, and Katakana. Without going into it too much, just know that Hirigana and Katakana are collectively known as the Kana, and there’s a table that lays out the pairing of vowels and consonants. To [Mac Cody], the layout of the Kana table inspired this chording keyboard.

Continue reading “KanaChord Is A Macro Pad For Japanese Input”

The board in question, with a Pi Pico soldered on, with old PCBs for macropads being used as captouch electrodes

Give Your Pi Pico Captouch Inputs For All Your Music Needs

Unlike many modern microcontrollers, RP2040 doesn’t come with a native capacitive touch peripheral. This doesn’t mean you can’t do it – the usual software-driven way works wonderfully, and only requires an external pullup resistor! In case you wanted a demonstration or you have a capacitive touch project in mind, this lighthearted video by [Jeremy Cook] is a must watch, and he’s got a healthy amount of resources for you in store, too!

In this video, [Jeremy] presents you with a KiCad schematic and an PCB design you can use to quickly add whole 23 capacitive touch sensing inputs to a Pi Pico! The board is flexible mechanically, easy to assemble as [Jeremy] demonstrates, and all the pins involved can still be used as regular GPIOs if you’d like. Plus, it’s fully open-source, can easily be assembled on your own, and available on Tindie too!

Of course, such a board doesn’t get created for no reason – [Jeremy] has a healthy amount of musical creations and nifty ideas to show off. We quite liked the trick of using old PCBs as capacitive touch sensing, using copper fills as electrodes – which has helped create an amusing “macropad of macropads”, and, there’s quite a bit more to see.

If capacitive touch projects ever struck a chord with you and you enjoy music-related hacking, [Jeremy]’s got a whole YouTube channel you ought to check out. Oh, and if one of the musical projects in the video caught your eye, it might just be the one we’ve featured previously! Continue reading “Give Your Pi Pico Captouch Inputs For All Your Music Needs”

Illustrated Kristina with an IBM Model M keyboard floating between her hands.

Keebin’ With Kristina: The One With The Pickle Pi

Image by [jefmer] via Hackaday.IO
The unstoppable [jefmer] wrote in to alert me to Pickle Pi, their latest Keebin’-friendly creation. Why “Pickle Pi”? Well, the Pi part should be obvious, but the rest comes from the Gherkin 30% ortholinear keyboard [jefmer] built with Gateron Yellows and, unfortunately, second-choice XDA keycaps, as the first batch were stolen off of the porch.

If you’re wondering where the rest of the keys are, they are accessible by holding various keys rather than tapping them. Shift is Shift when tapped held, but becomes Enter when tapped. [jefmer] wrote out their entire project description on the thing in order to break in the Gherkin.

The brains of this acrylic sandwich tablet is a Pi Zero 2, with a Pro Micro for the keyboard controller. Although programs like Ghostwriter and Thonny work fine, Chromium is “painfully slow” due to the RAM limitations of the Pi Zero 2. On the upside, battery life is 7-8 hours depending on usage. Even so, [jefmer] might replace it with a Pi 4 — the current battery pack won’t support a Pi 5.
Continue reading “Keebin’ With Kristina: The One With The Pickle Pi”

Left: a DIY chording keyboard with seven keys Right: the guts of said keyboard

Chording Keyboard Leaves Your Mouse Hand Free

[akmnos22] was getting tired of moving one hand to the mouse and back to the keyboard. Rather than integrating mouse controls into a keyboard, they decided to really lean in and create a chording keyboard — one that creates characters with combinations of key presses, like playing chords on a piano.

This project was inspired in part by the Infogrip BAT, which has graced these pages before. Much like the BAT, this uses a total of seven Cherry MX switches: one for each finger, and three for the thumb. In order to get the placement just right for you, [akmnos22] suggests laying your hand in a comfortable position on a piece of paper and marking where your fingers naturally rest, then importing these markings into CAD software to decide where the key switch holes should be.

The brains of this operation is a Raspberry Pi Pico, which provides more than enough GPIO pins to do the job. [akmnos22] does a nice job of explaining exactly how to put one of these together, from the design concept through the programming process and how to actually chord on the thing.

Would you rather chord with two hands? It might be even faster.

Thumbs Up To This Pico MIDI Kalimba

The kalimba, or thumb piano, is an easy way to make some music even if you have next to no idea what you’re doing. The only real downside is that they are limited to the twinkly sounds of metal tines being plucked by thumbs.

[Jeremy Cook] broke the sonic possibilities wide open by converting a couple of kalimbas into capacitive-touch MIDI instruments using the Raspberry Pi Pico. He started with a small one that is curiously made of solid wood. Usually these instruments are at least partially hollow to allow air to resonate inside the body.

After soldering up all the 1 MΩ resistors necessary to utilize the capacitive touch capabilities of the Pico, [Jeremy] found it a bit difficult to play individual notes on such a small instrument, so he made version two out of a much larger specimen.

This time, [Jeremy] cooked up a custom PCB which he is calling the Pico Touch 2, which adds the necessary resistors at the SMD level for capacitive touch sensing and in turn cleans up the wiring a bit. Be sure to check it out in action after the break.

Okay, so you don’t have an iota of musical talent. You could always build a kalimba that plays itself.

Continue reading “Thumbs Up To This Pico MIDI Kalimba”

The Pi Pico replacement board in question, assembled, held diagonally in some type of holder

ProPico For Your Pro Pico Needs

Ever feel like the Pi Pico board could be doing way more given its footprint? Does it bother you that the RP2040’s ADC quality is even further decreased because of the noisy onboard switching regulator? Miffed about decisions like the MicroUSB socket, the 2MB flash, or lack of the reset button? [Dmytro] brings us an open-source Pi Pico design, sporting the same RP2040 and a fully compatible footprint, but adding a number of improvements to its surroundings.

There’s a good few additions, all of them hacker-friendly – [Dmytro] adds comfortably-spaced reset and boot buttons, a USB-C socket, a dedicated low-noise voltage reference for the ADC, one more LED, and an I2C EEPROM footprint socket that is compatible with FRAM chips. Everything worth preserving is preserved – the pinout stays the same, including the SWD connector, which now sports an extra RESET pin. The bottom side USB testpoints remain, with only the four testpoints changed for more useful signals. Last but not least, the switching regulator is replaced by the venerable 1117 – you lose the ability to power your Pico from two AAs, and the capacitor series resistor requirement isn’t great, but you can easily put one of the drop-in 1117 replacement regulators on there.

What’s great is that the design is fully open-source, with KiCad files available. Want to design your own Pi Pico footprint board, improve upon this one even further, or maybe make a more tailored one? Treat yourself to the GitHub repository! There’s also a pinout diagram and a KiCanvas schematic for all your tinkering needs. We’ve covered drop-in replacements for classic drawer-inhabiting parts like the Pi Zero, for the 7805 (twice!), the 6502 CPU, and even for the DE9 serial port connector. No matter the purpose, they’re always a joy to see.