I couldn’t write very much without a computer. Early in my career, I wrote with a typewriter. Unless you are pretty close to perfect — I’m not — it is very frustrating to make edits on typewritten stuff. The equivalent in the real world, for me, has been 3D printers and CNC machines. I can visualize a lot of things that I’m not careful enough to build with normal tools. Despite my 7th-grade shop teacher’s best efforts, everything I did turned out to be a toothpick or a number 7. But I can get my ideas into CAD and from there the machines do the rest. That’s why I was excited to get a laser cutter this past Christmas. You might wonder why I’d need a laser cutter if I have the other tools. Then again, if you read Hackaday, you probably don’t need me to explain why you need a new gadget. I’ve had my eye on a laser for a good long time, but recent developments made it more attractive. I thought I’d share with you some of what I’ve found getting started with the Ortur laser cutter. The cutter is easy to put together and costs somewhere in the $200-$400 range depending on what you get with it. I thought I’d take some time to share what I’ve learned about it.
Why a Laser?
If you haven’t had experience with a laser cutter or engraver before, you might think it is a very specific instrument. Sure, the Ortur is good at engraving some things (but not all things). It can cut some things, too, but not as many things as a big serious laser cutter. However, creative people find lots of ways to use cutting and engraving to produce things you might not expect.
For example, if you surf YouTube, you’ll find people who put spray paint on either a ceramic tile or a canvas and then burn some or all of the paint away to make really interesting artwork. Sometimes they’ll even use multiple layers of paint to create different colors by burning different depths into the artwork. Another multicolor technique is to cut what amounts to a custom stencil in masking tape that is already applied to the part. You can then spray paint, remove the tape, apply fresh tape, and cut a new stencil for another color. Some people etch the backs of mirrors. It is also surprisingly handy to be able to precision cut paper and cardboard. However, with some practice and technique, you can even cut some thicknesses of plywood.
I’m very interested in creating PC boards either directly or by cutting resist and then using conventional etching techniques. People are doing that, too. Depending on the power of your laser, you can cut quite a few things, although with a visible laser, you can’t cut things that are transparent. You can engrave more things, and even metal if you use some additional chemicals (like mustard). In addition to line art and text, you can do halftone images from pictures. If you have a powerful enough laser, you can even make glass, sort of.
Of course, in addition to all the artsy things, you can just cut material too, which is surprisingly handy. [Electronoobs] did a video last year experimenting with different materials with a 15W laser so that will give you some idea of what you can and can’t cut with this type of laser.
There are some things you shouldn’t cut because they emit noxious fumes like ABS or vinyl products. Leather engraves and cuts well but boy does it stink! I understand that you should be careful working with chrome tanned leather, too, because the tanning chemicals could emit bad fumes. Some materials are also too prone to bursting into flames like styrofoam.
About the Ortur
If you want a laser, your next problem is which one to buy. There are carbon dioxide lasers that are commonly available, but they are pretty pricey and are known to need a lot of effort — including a bucket of ice of water and ventilation — to use. Semiconductor lasers are cheap and much easier to use. These are generally visible which, as I mentioned, means you can’t use them to cut some things like clear acrylic. You can get some very inexpensive laser engravers, but many of them are probably not going to cut much.
Then again, power isn’t everything. Broadly speaking, you can trade time for power with a laser. That is, a cut that might take a 10 watt laser a few seconds in a single pass might take a 1 watt laser four or five 30-second passes. It isn’t always simple because as the laser chars material it creates a barrier that prevents you from getting as much energy underneath. Still, you can sometimes do the same job with lower power if you are willing to take longer per pass and repeat the pass.
The Ortur Laser Master 2 is reasonably priced and has three choices in laser power: 7W, 15W, and 20W. This is a little deceptive because the power is actually the input power to the module. The 15W unit, for example, produces less than 5W of output power, but that’s still able to do a lot more than you might think.
The device is made to work with a free piece of Windows software called LaserGRBL that talks to the onboard GRBL controller. In theory, anything that would send G-code could work. I use Linux, so I opted for LightBurn which is excellent and well worth the $40 you’ll pay for it. It runs on multiple platforms, too, but sadly not on the Raspberry Pi, so I’ve had to drag a laptop out to work with the Ortur. You might also check out LaserWeb.
There are other cheap laser engravers and cutters, but I was impressed with the Ortur’s size and capabilities. There’s also a lot of add on designs available for it and good support in software.
Assembly
The unit requires some assembly, although much of it is preassembled. You build a frame of aluminum extrusions and then slip the X carriage on. There’s a 32-bit controller board and some stepper motors. The 32-bit board is a big selling point. Some of the work you do with the laser requires PWM to modulate the beam’s power. Most 8-bit boards will allow you to step power from 0-255 so each step is about 0.4% of full strength. A 32-bit board will let you do around 1,000 divisions of full scale which gives you about 0.1% on each step.
The mechanism is like a plotter or a 3D printer with no Z-axis. Since the laser doesn’t touch anything, it doesn’t need the robustness of a CNC setup. Of course, you can also mount a laser to a 3D printer or a CNC machine if you already have one and that’s not necessarily a bad option, although most of those setups have some limitations (for example, no modulation of beam intensity).
The best way to see how to build the machine is to watch the company’s video instructions (see below). There are a few things unclear in the video and I made some notes that might help you. There are also plenty of 3rd party build videos on YouTube.
First Cuts
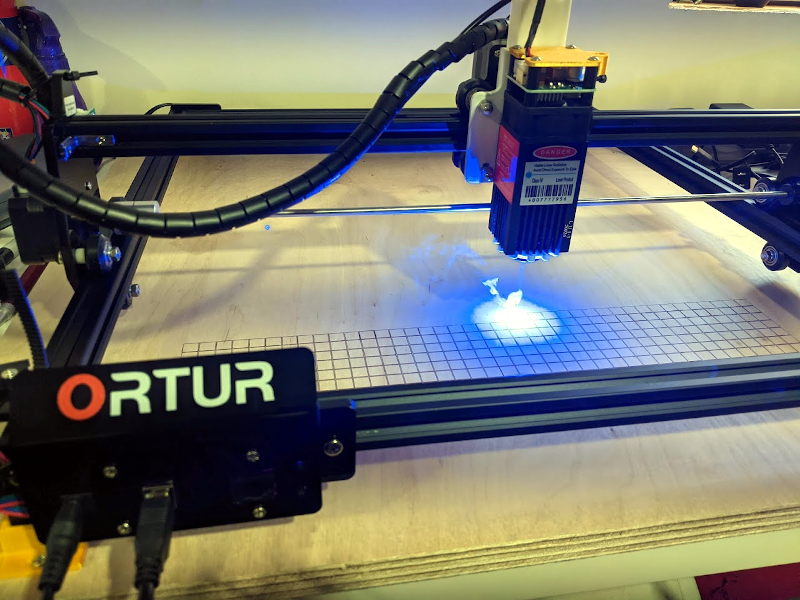
The urge to cut something is overwhelming when you get the unit complete. However, be sure you have eye protection and plenty of ventilation. You should probably have a spray bottle of water and a fire extinguisher, too (you can see one of my fire extinguishers in the video below). Things do catch on fire under a laser, so be prepared. If you do get a little flame, try the water first since the extinguisher will make a huge mess.
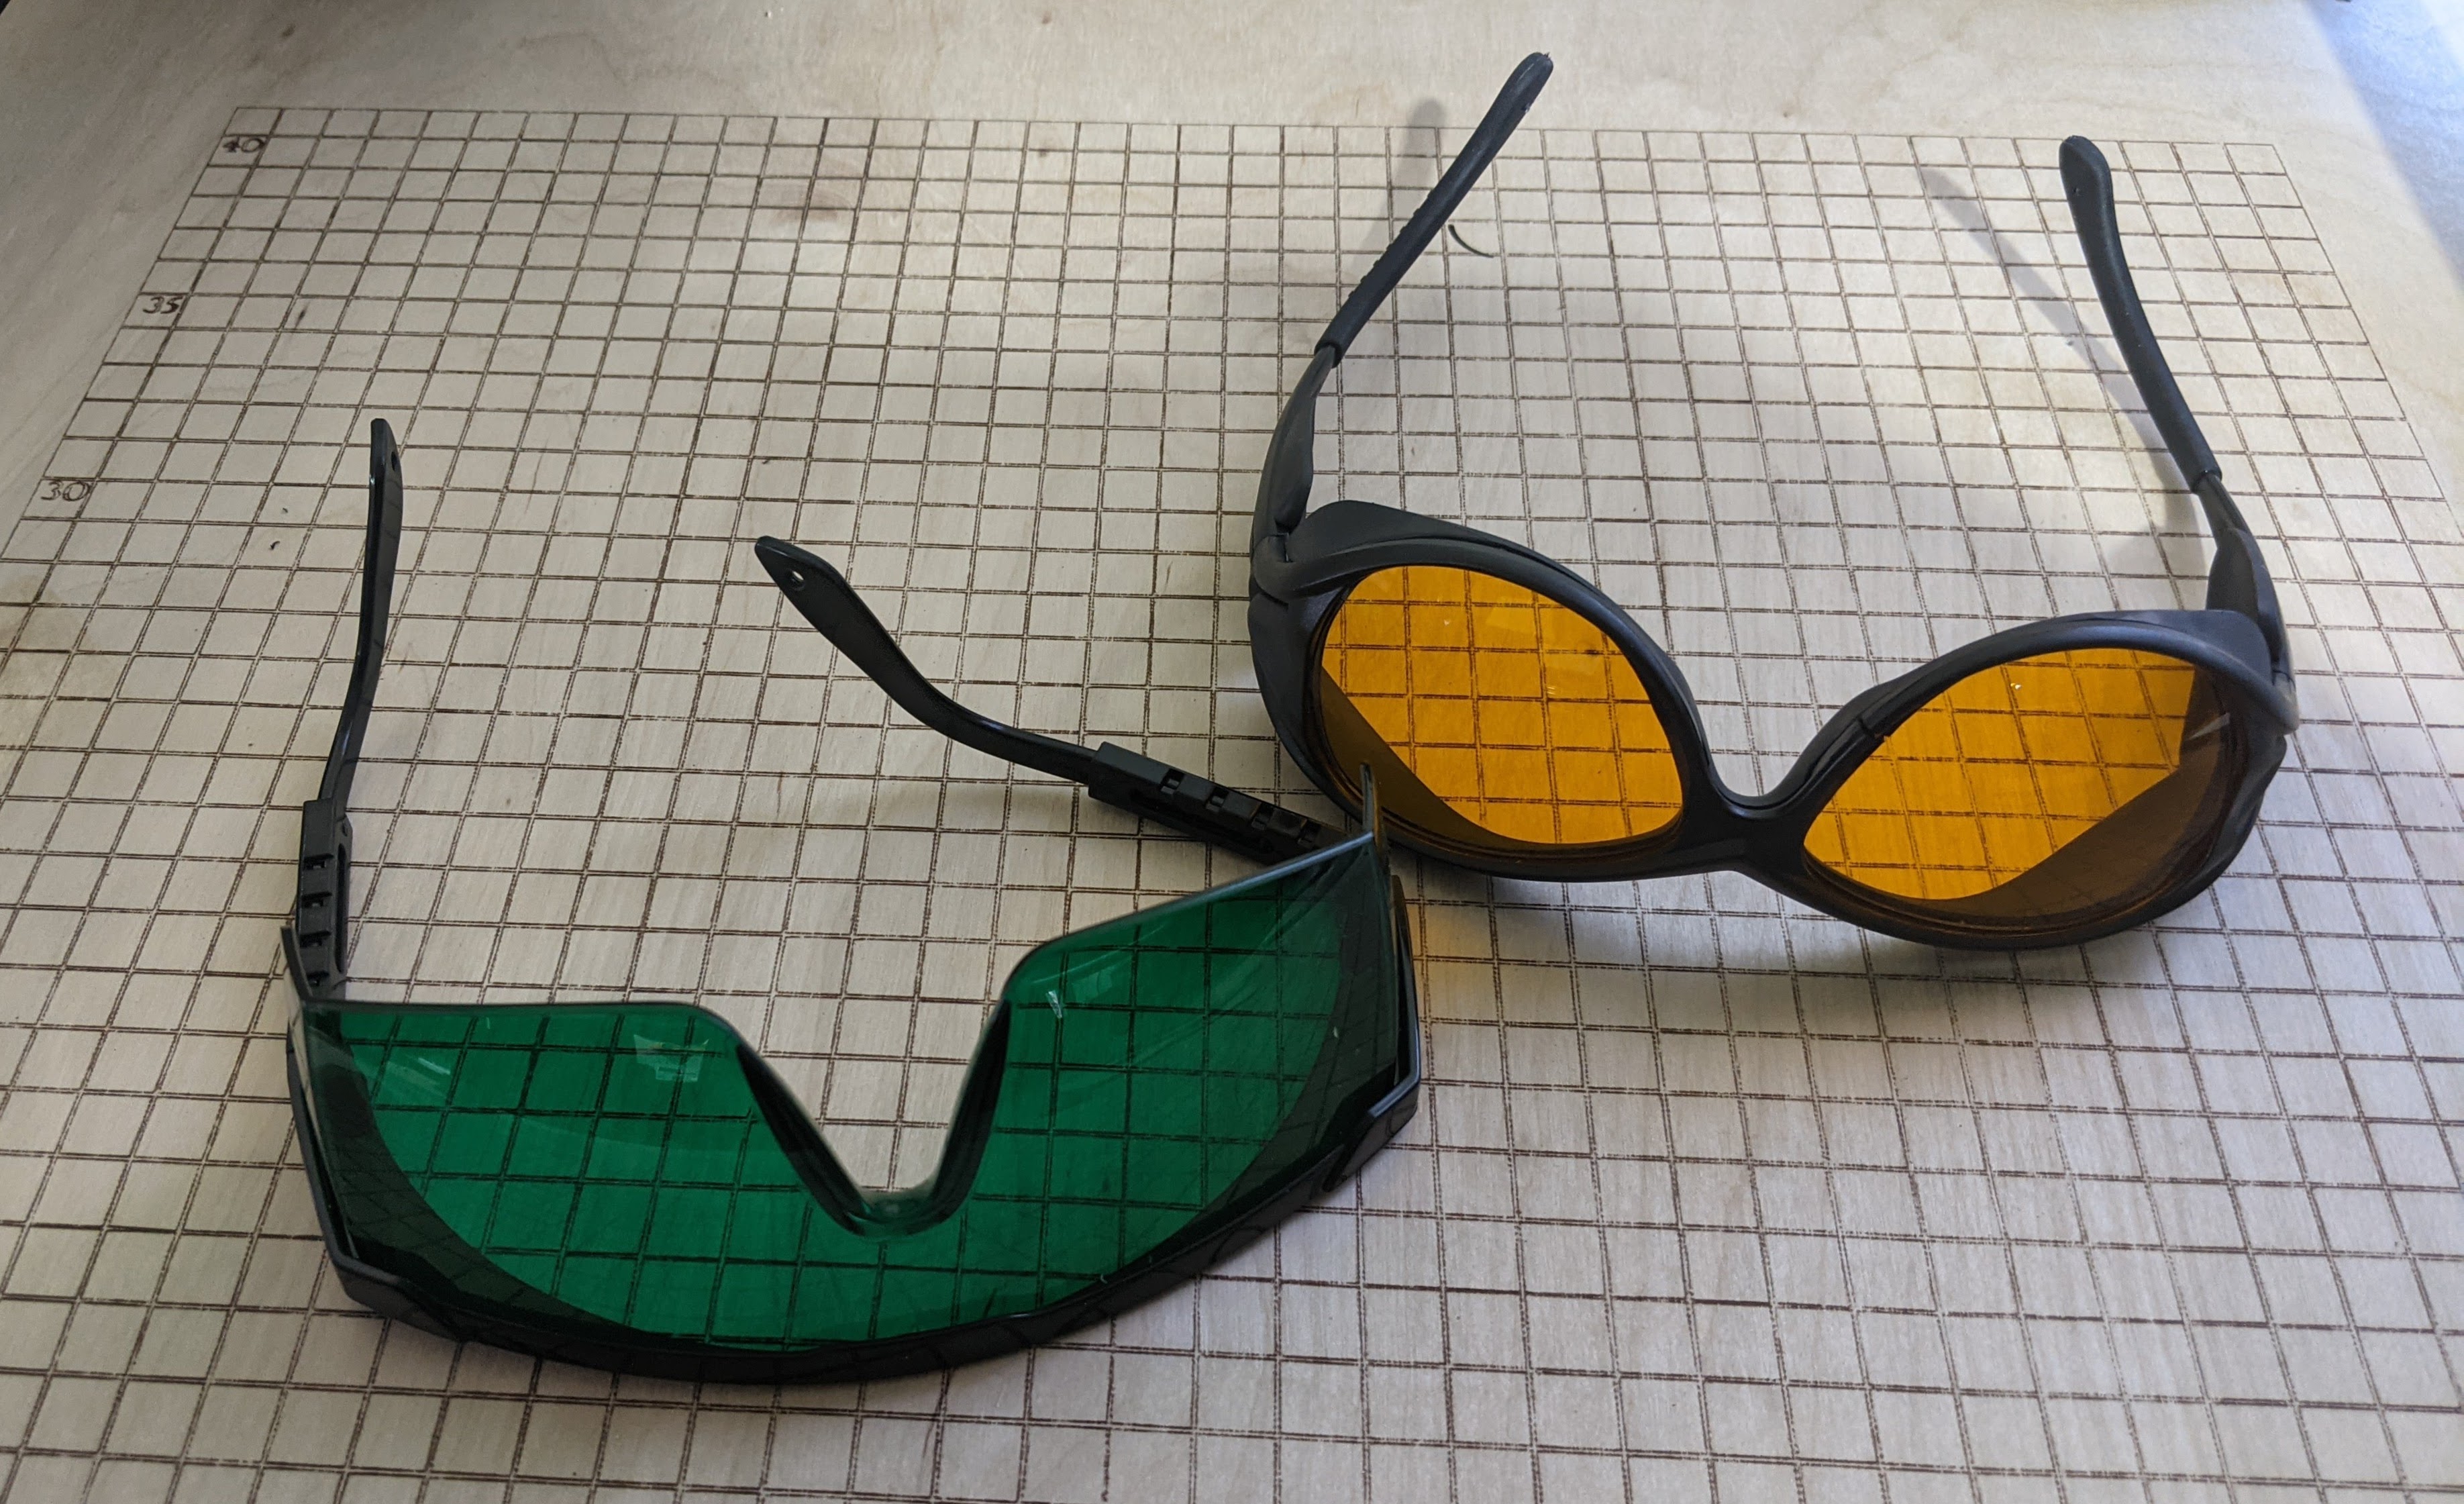 The glasses that come with the cutter seem to be adequate and some people have tested them by firing the laser through them. However, I opted for some better-quality glasses. Your eyes are worth more than a few bucks you can save with cheap glasses.
Be sure you have the latest firmware. My unit predated the January 2021 update and the fan did not run unless the laser was also running. I would guess this would shorten the laser diode’s life. With the updated firmware, there is smarter fan management along with some other fixes. The update is as simple as dragging and dropping a file, but for some reason, it only works under Windows. Linux sees the USB drive and will do the copy but it doesn’t stick. At least it didn’t brick the cutter.
Regardless of firmware, before you can cut, you’ll need to set the focus correctly. If you are like me, you are probably thinking: “Focus? You don’t focus a laser.” Well, turns out you do focus a cheap laser.
Focus is Everything
To get the required energy to the workpiece, the semiconductor laser passes through a lens that focuses the beam to — more or less — a point. That point is what does all the cutting or engraving. That means the piece you want to work with has to be at that focal point. After the lens, the beam will look like an hourglass and the further you are from the pinch in the hourglass, the less cutting you’ll do.
The Ortur’s laser doesn’t move up and down but the lens can either screw in and out a few millimeters or push in and out, depending on which one you have. Once you have something under the cutter, you can put some black construction paper over it and use that to visualize the focus. The software you are using will have a button to turn the laser on at low power. Using the glasses will help reduce the spillover and you’ll be able to see the main part of the beam easily on the black paper.
Some people use a USB microscope or other magnification to get the best focus. However, I didn’t like the stock method for focusing. The lens ring is hard to turn and even if you 3D print your own ring, it is awkward to spin the lens around. It also doesn’t afford you much range.
Luckily, there are many 3D printed solutions to create a moving laser head on the Ortur. I’ll show you the one I’m using next time. For now, assume you are going to focus the lens yourself. That limits the height of things you can cut or engrave, too, although some people put the machine on blocks to make more room underneath. A tight focus will let you cut or engrave quicker and make the cut line finer, too. However, even if you are a little off, you can usually get some result. It is a good idea to tape your work down or clamp it so if you need to you can do a second pass without moving anything.
There are different lenses you can get for the laser. The one the 15W machine comes with has a focal length of about 55 mm. However, there are other lenses — the G8 is popular — that have different focal lengths. Each lens has different characteristics as far as how tight they can focus and how many elements they have (more elements means less overall power).
The power delivered to your part is a combination of the beam power, the quality of the focus, and the time spent. Even the time it takes for the laser to change direction can cause a deeper burn or cut which is why most software offers an overscan function that keeps the laser off and away from the cut line when it changes direction.
If you are careful about focusing, you should be able to get a pretty good engraving on a piece of cardboard. Be sure to have something under it since you might cut through and leave a permanent mark. I mounted my cutter on a piece of plywood and I deliberately marked a grid on the board. I’ll tell you more about those additions next time.
Sometimes, you deliberately want to defocus a little to get wider lines. [Geordie_h] talks about this trick, along with some other pro tips that are aimed for a more commercial cutter, but still apply to the Ortur and other similar lasers.
Next Time
Speaking of next time, there’s a lot more to talk about. In addition to mounting the device and making the laser head move, I wanted to add air assist — something I’m still working on. This clear smoke from the cut as well as fine ash, allowing the laser to hit fresh material while cutting.
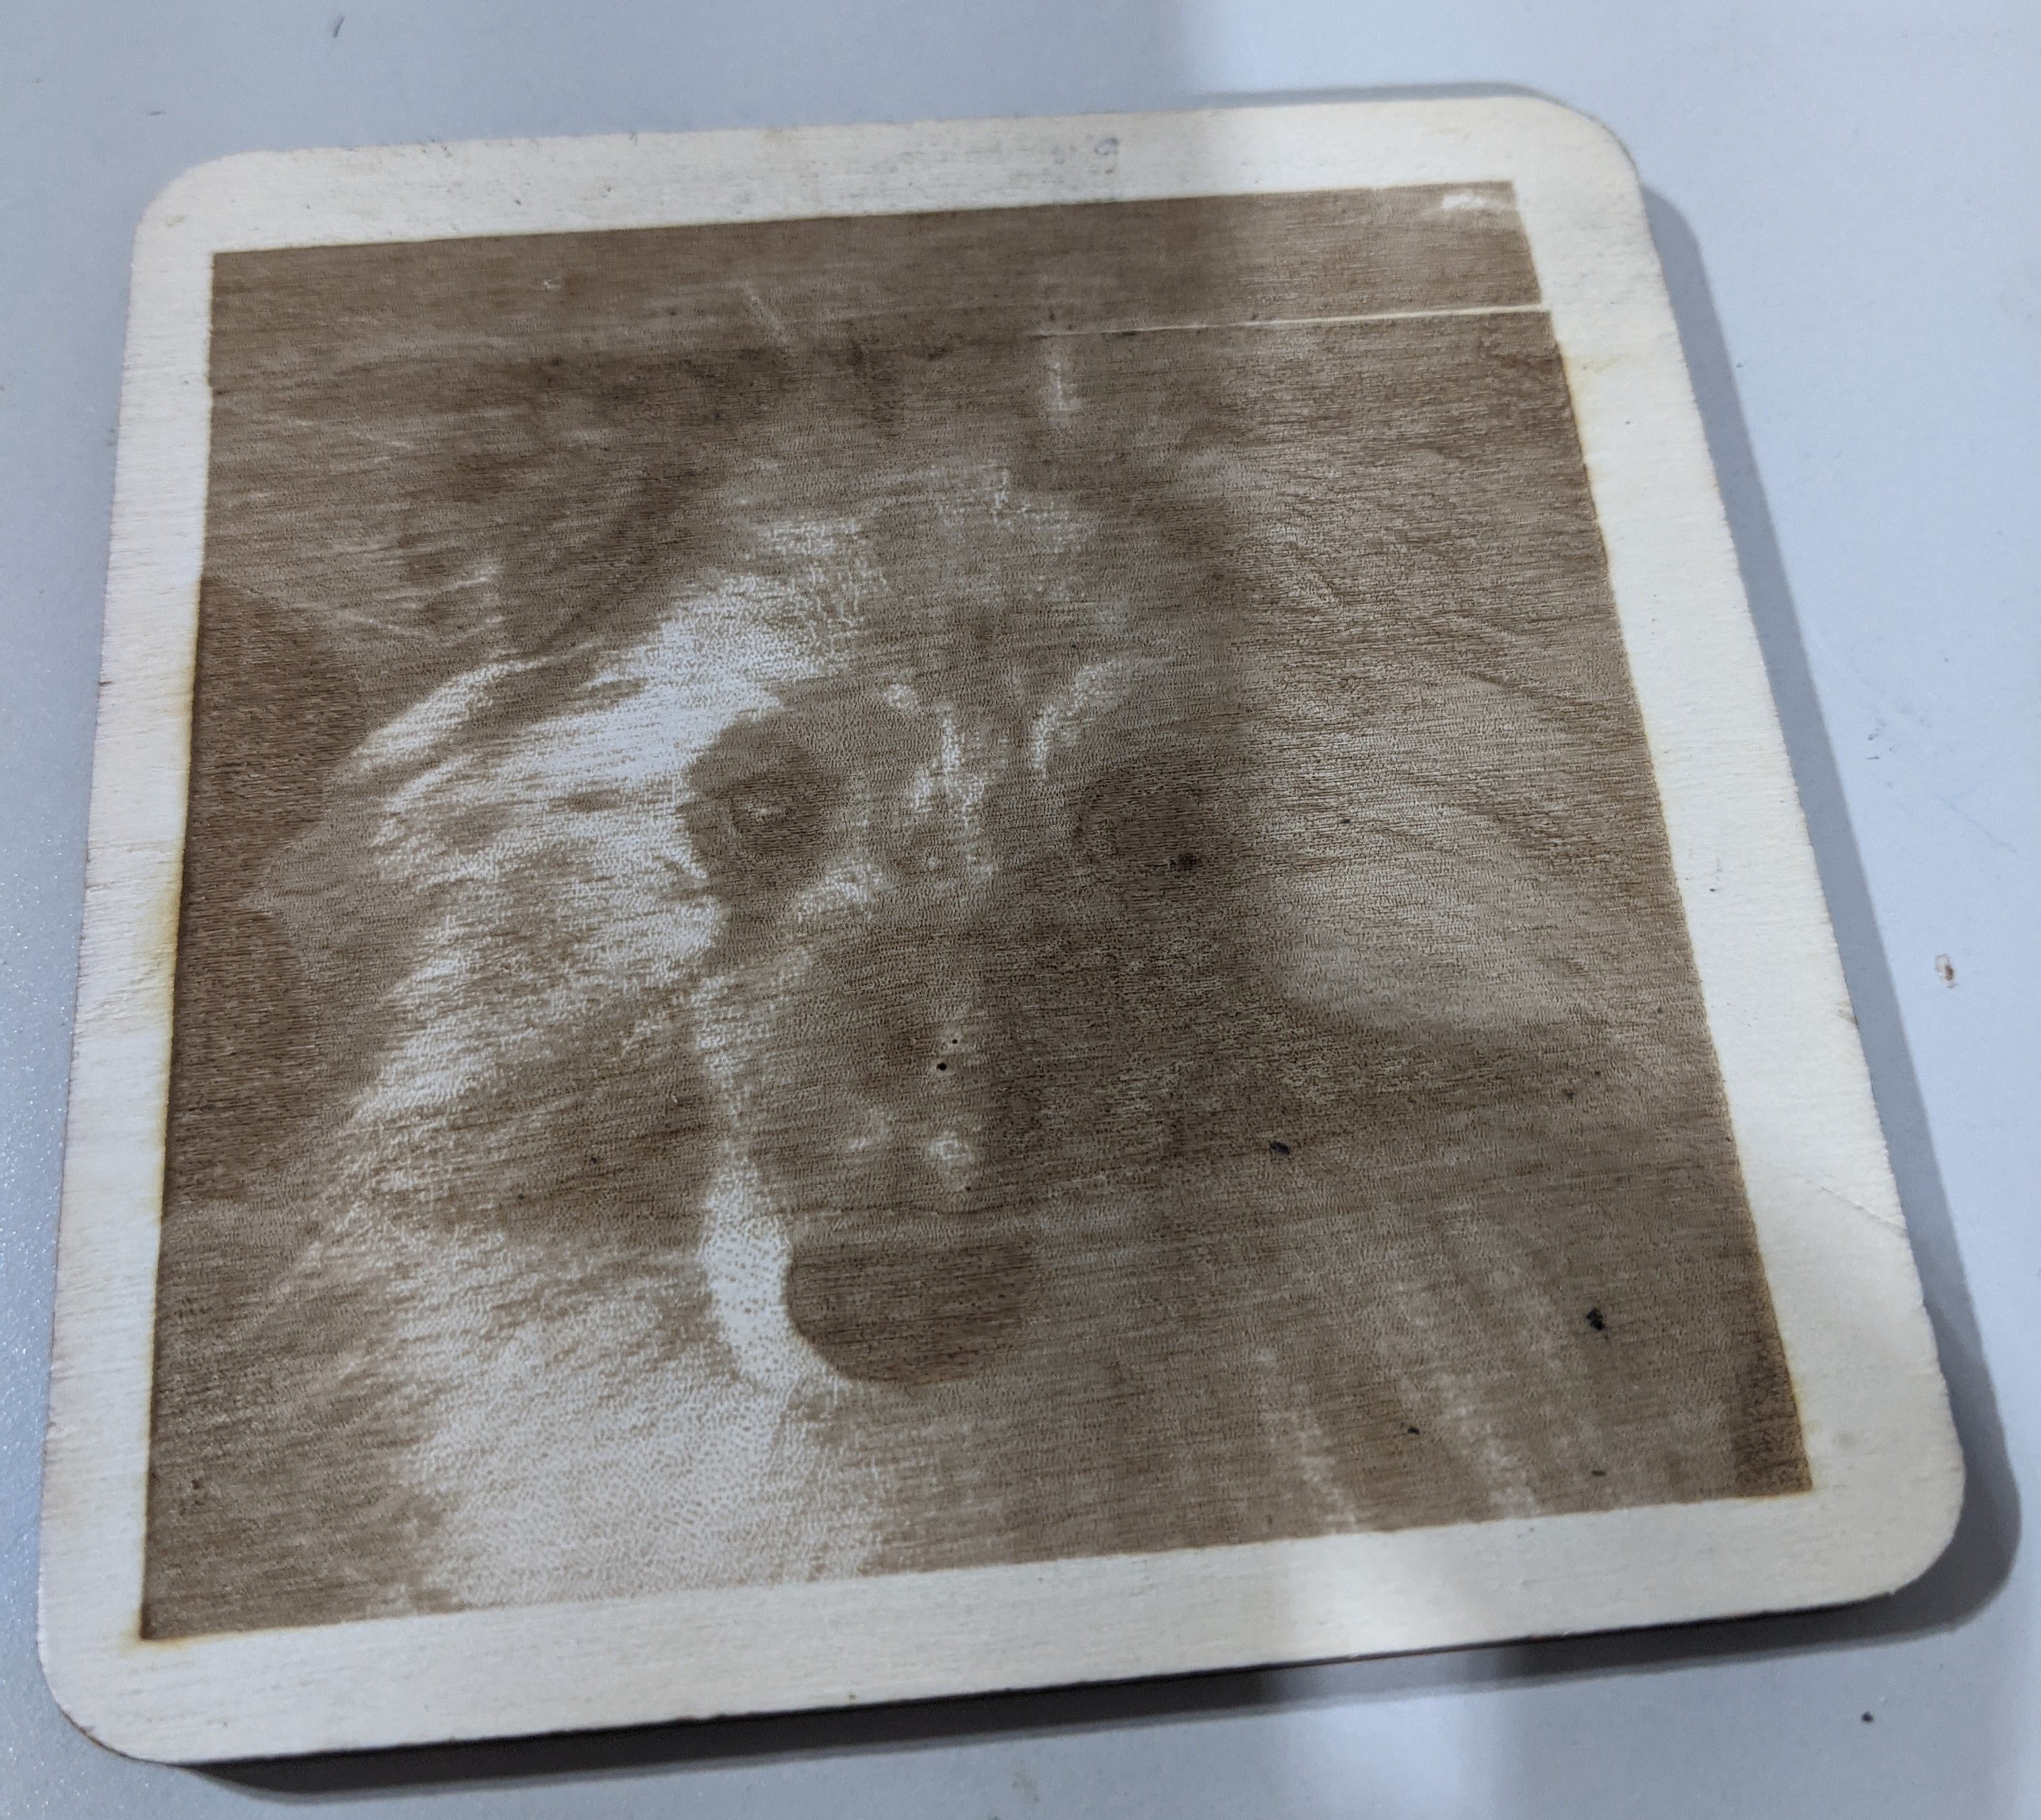 For some reason my machine will often stall on long cuts, and from reading the Internet, I’m not alone. Changing USB cables seemed to help. It may need a slightly beefier power supply or grounding on the frame. Then again, it could be power settings on my laptop. Time will tell. This has been particularly a problem when doing images that require a lot of time. You can see my picture of Rocky has a little misalignment at the top where I restarted after a failure like this and didn’t quite get it lined up right.
The Ortur reminds me of early 3D printers. It works, but it needs some work to get it to work well. But, for me at least, that’s the fun part anyway.


“Then again, if you read Hackaday, you probably don’t need me to explain why you need a new gadget.”
Help support the economy? :-p
nice paid ad. less ads and more genuine articles woudl be even better
Hackaday doesn’t run sponsored content. Al purchased this tool because he was interested in it and shares his findings here. When we do receive review units from companies we clearly disclose that.
HaD commenters don’t care about things like facts when there’s accusations to make!
Your closing instinct about air assist is a good one. I’ve used a couple variously cheap China-export diode laser setups with various sorts of crappy air-assist rigged up, and it makes a _huge_ difference in cutting power. Even taping a blower fan to the back of the carriage gets you noticeably improved behavior – everything a laser cutter does is combustion, and combustion loves oxygen.
The other good hack I’ve played with on basic design of laser is enclosing the whole beam path to make it [more] more eye-safe. Basically just adding a sleeve that comes down around the laser housing to just above the focus depth so there isn’t a bunch of exposed beam and reflection. Several attempts at making decent covers have included a window made out of layered pieces of filter gels to make a observation window that notches out the actual laser frequency as best we could cobble.
My understanding is that it is not combustion but ablation. The air is not to feed the fire but blow the ablated material out of the beam path.
Yes. smoke will reduce the effectiveness of the laser beam. Sometimes dramatically. In addition, sometimes the smoke can contaminate the material and air assist helps to reduce that.
I did rig a nice system up using parts from 3 different other designs. Stay tuned…
With the dangers here, I’d consider total blackout. Maybe a similar thing to a cnc dust shoe with airflow removing any smoke
Air assist actively inhibits combustion; if I see a flame I know the air needs to be turned up. It doesn’t actually matter if oxygen is present in the gas flow at all.
Proper laser class enclosure, not just a pair of appropriate wavelength glasses. Seriously.
+1. I feel a sales pitch slogan coming on here- “..And if the unthinkable happens, you’ve still got your ORTUR eye!”
+1 Most important of all. Even looking at the dot on the material could be dangerous. Besides enclosures makes it a lot easier to build ventilation.
Having an enclosure also gives you an excuse to line it with LEDs and put a webcam inside. I stream with:
cvlc -v -v -v v4l2:///dev/video0 :v4l2-standard= :v4l2-use-libv4l2= :live-caching=100 :sout=”#transcode{vcodec=mpgv,vb=1900,acodec=none,scodec=none}:std{access=http,mux=ts,dst=0.0.0.0:8080/stream.avi” :no-sout-all :sout-keep
..then connect with:
vlc http://cnc:8080/stream.avi
I have spent tens of hours reading reviews of affordable diode lasers and they seem to vary from garbage to not-quite-good enough. Has ANYONE seen a laser that will cut 3mm plywood and acrylic in 1 to 3 passes and not chargrill the edges like a steak? I want to pay $200 or less. I already own a K40 CO2 laser, but the work area is too small. I also own a large CNC router, but with routers the workholding is a bitch and it can’t do tight internal corners. If I could strap a diode laser to my router I I’d be golden. Any ideas?
Laser diodes? Not a chance. Try setting your K40 to 20% (8W sort of equivalent) as a quick test. Doubt you’d get clean one pass cuts in 3mm ply. Also, some plywood adhesives are resistant to blue lasers.
point taken – thanks
My K40 will do 3mm ply. May e your needs a clean or new tube?
Set to 20% power? That was the point. Diode lasers (at least at near sensible prices) are a fraction of the power of even a K40.
You’re not going to get far on that kind of budget. It’s lower powered diode lasers only at that point, and limited cutting of acrylic (CO2 lasers are infrared and chew through acrylics of all colours quite happily, laser diodes are predominantly blue and thus not good at light, clear and blue material). Have you considered upgrading the work area of the K40?
You can buy laser diodes ranging from 375nm to 12820nm without difficulty, and there are plenty of engravers and cutters on the market using 808nm and 1064nm diodes
I said predominantly because BlueRay writers have brought high power blue diodes down to sensible prices. What kind of price are your 808 and 1064nm devices?
Sweeney – I had not considered that. It took me 8 weeks to get the damned thing working at all so once I’d put in some air assist and water system I felt I never wanted to open that cupboard again. If you can point me to a proven work=area expansion project I’s love to take a look.
You could take a look here:
https://openbuilds.com/threads/k40-12x24in-rebuild-in-original-case.13691/
You need at least 200W CO2 to make somewhat straight edge in 6mm acrylic or even plywood. Single diode module cannot be called “cutter” at all. Disposable toy engraver – yeah, sure.
Well, my OMT 50W (really 40W…) easily cuts 5mm birch veneer plywood in one pass @ 3mm/sec and 85% power. As to charring, well that’s expected. If I used a cutting torch I’d also expect charring… As to the original question regarding a laser “upgrade” for the CNC, beyone my paygrade.
Try putting paper masking tape over the cut line before you cut. Some of the char you see is really smoke stains and good air assist will help with that, too. You should be able to cut the paper easily and the paper protects the surface during cutting and you usually wind up with a cleaner looking surface after you take the tape off.
I’ve had great success with blue painter’s tape, but make sure you have good ventilation before doing it on K40!
charring: I should have been more clear in my comment. I was referring to the exposed edge, not surface scorching. I’ve played with several ways to eliminate scorching on the finished surface. I’ve used various paper transfer tapes, rustoleum spray lacquer (very light coat) which works surprisingly well and post-engraving clean-up can be a quick pass with cotton cloth and IPA (acetone will completely remove the lacquer), and if I’m not cutting shapes (jigsaw puzzles for my granddaughter), even just very low power with 2 – 3 passes can work very nicely. Further, if just looking to brown the wood, defocusing the laser can work as well, though definition degrades the further the laser out of focus.
I think the important point of EG’s comment is “straight edge.” I know from my experience with a K40, the edges on clear acrylic look great, but they’re not straight. They’re always a little slanted. Makes butting ends together for gluing a pain.
Yeah, no.
50w co2 is enough.
Sure it is. I have no trouble with 6mm acrylic even on my ropey K40 . The holes may be a little cone shaped but as I’m making house signs not engineering products it’s all good. Just want to make them bigger!
I used to run a laser engraver back in the 90’s, and to do engraving on acrylic we would smear dishwashing soap on the surface to act as a target for the energy to dump into, then wipe it off afterward. No char, clean lines. Wither that will help with cutting your sheets, well, it’s experiment time!
With uv laser at least black acrylic engraves to wite with out additives.
How tight do the corners need to be? A 1.0mm carbide cutter should be able to do 3mm plywood. Maybe add a second tool path just for the small tool and run a slow feed rate?
You are right, Bob, and thanks. I can do that, but there’s a big penalty in time for setting up the job and the workholding, especially with small cut-out parts. And more time-money for tool changes. If my job featured, say, a letter Q 1 inch high, a 1mm bit would make an adequate shape, but the small islands of waste would break free and spin and get chewed in the work. Similarly, small cut out parts would break free. Yes, I can use tabs and I can maintain enough flatness to control depth and leave 0,3mm uncut at the bottom so the waste does not fly off, then post-process, but this is all work and uncertainty that you can sidestep with a laser.
I’ve not looked into it, but industrial lasers use shielding gas
You could strap the K40 mirrors to the router. Depending on the size of it, alignment might be a bitch and if the router is not enclosed it will be pretty dangerous!
Thanks, UC. I have a 60W spare laser tube and power supply and I have considered exactly your solution. But I still need to use the router as a router a lot of the time. Imagine having to maybe mount and dismount and realign the mirrors all the time and run a long open optical path in the dusty realm of a woodwork shop!
I have a Neje 15w output. Combines two diodes. Seems to be a serious player. Nice build quality. Seems to do a lot of testing. Not the cheapest but i think they have the highest output of the amatuer lasers at the moment. Sure beats my last diode (7w) by a country mile.
Make sure you build an enclosure and good ventilation. There will be alot of smoke and vapour while cuting and engraving. And basicly any thing over ,5w is an eye hazard even if you just look at the dot on the workpice with out eye protection.
>And basicly any thing over 5mw is an eye hazard
ftfy
The first safety measure to take with these chinese laser is to ditche the “protective” glasses and buy real ones (yes, it will cost $20 – $50, so sometime half the price of the laser. But hey, being blind is not funny)
Glasses are not good enough. One day you might forget or put them on. Or some one unknowingly walks in to the room. Enclosure is the only safe way to go.
Sure real glasses are a must. But they are only complement…
Plywood no. I tried with a 7.5W laser (equivalent to the 20W ortur) and I have issues getting across the cheaper wood and glues. Pure wood is possible, but lighter tones will diffract the light, making the cuts blurry. MDF is impossible, but looks great for engraving.
Acrylic is certainly possible, but only had luck with black acrylic. I can cut 2mm without issue and ordered 3 and 4mm to try. Acrylic evaporates nice without leaving much of a residue so is just an excercise of patience. White and transparent won’t work but maybe other colors may do – but they will certainly be slower than black.
Looks like a good way to burn your house down and/or loose an eye ball or two.
I’d be surprised if these are legal to sell in the EU (and UK for now). I don’t believe it would meet the regulatory standards like the machine directive. Anyone know any better? Are they using a loophole of some sort? Does the machinery directive not apply as it is classed as a household appliance perhaps?
They likely aren’t, but it’s hard to regulate ebay, aliexpress and amazon from selling dangerous goods.
Also sold as Kits I have a vauge memory of being different legally – so they wouldn’t be at all legal being sold like a normal household appliance, but as a kit of parts it is on you to build it with the additional hardware etc to make it safe and legal for the use you want to put it to, unless one of the component isn’t legal the kit should be fine legally.. Assuming I recall correctly, and somewhere in the daft legalese there isn’t something that means everything else doesn’t actually apply afterall…
As long as one stick to selling a pile of components and not a fully assembled product, it is all good. No CE-marking required, that only applies to products!
a lot of the otur type clones are now shipping with a “DK4.0 controller (wireless dual mode)”. These do not seem to be compatible with most of the alternative software (like LaserGRBL et al) right now, so you’re stuck with the excretaware that ships with it.
Can one calculate the power of the laser by using a barometer?
Sure, use it to bribe the right engineer.
No but you can measure the height of the building by dropping the barometer from the roof and timing the fall…
Yes, you can. Enclose your barometer in tight box with one side painted black, target slightly defocused beam at that wall and observe how much pressure changed from heating. From that you can get temperature change, from which you can calculate how much energy laser deposits on that painted wall.
I’ve found that when engraving plywood setting the scan direction to a 45° offset offers a dramatic improvement to the quality of the finished piece. my CO2 laser offers the ability to vary between max and min power while engraving, but it appears that works best when moving in an X-Y (or Y-X) direction. Defautling to a 0° x-axis burn is typically horrible. Seems the ability of the laser to adjust power while traveling in an x-axis orientation is limited to non-existent. Very pleased overall with Lightburn – well worth the price.
Speaking of cutter, I’ve always wondered about worker exposure on small solar panel manufacturing lines in China.
Here is a worker, cutting broken cell to smaller size, with what’s looking like a fiber laser, no glasses nor cover on the machine:
https://youtu.be/-NYENZZb6GU?t=78
“I’ve had my eye on a laser for a good long time”
Phrasing!
Try reading the name of this product backwards in a Scooby Do voice. Oddly appropriate.
Scooby imitating Astro?
I have a vigotec 20w version which I’ve had reasonable success with. Cutting 2-3mm wood and foam, and engraving these and plastics.
I was looking to purchase one of these https://www.aliexpress.com/i/1005001785467030.html
It claims 40w output but then says 25w focus power, a bit ambiguous, but the interesting bit is where it says it can engrave stainless steel at low power settings.
If anyone has any experience with these, I’d be interested. No opinions or guesses please, just valid facts based on experience
It’s suspicious that they specify a suppy of 4A at 12 V – that only makes for 48W of input power, which can not realistically result in 40W of output power. 25W is more realistic.
A typical laser has an efficiency of 30%. Best laser are 40%. So with a 48W input power, at best, you’d get 16W of actual light power. Then you have the efficiency of the lens to account for and the material albedo. I’d say that you’d probably get around 10W out of the focusing system, and probably 6 or 7W on the part.
The main issue with this, if that you never know how much power per area you need to ablate it, so you test empirically. But I’m sure some clever sensor could measure this to avoid all this tedious work.
If you want an open schematic, made in the USA laser cutter, try the L-Cheapo (featured here in 2014 when it was an indiegogo project) at http://www.robots-everywhere.com and note that we tell people the actual output power, not the electrical input :)
Even our competitor ended up giving us a positive review.
Your website makes my eyes hurt.
It sounds like there a lot of moving parts to laser operations. My warehouse needs new laser cutters. I’ll have to find out which ones are best and order them online.