Dual extrusion systems for 3D printers have been around for quite a few years, but the additional cost, complexity, and hassle of printing with them have kept them off the workbenches of most hackers. [Jón Schone] from Proper Printing has now thrown his own hat in the ring, with a custom dual extrusion rocker system that can swap extruders without any additional actuators.
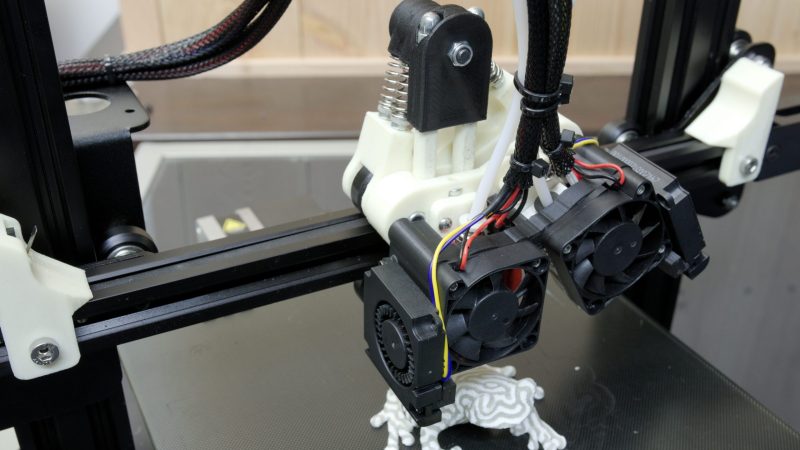
The two extruders are mounted on a spring-loaded rocker mechanism, which holds the inactive extruder up and away from the printing surface. Extruders are swapped by moving the carriage to either end of the x-axis, where the v-wheel rolls a ramp and pops the rocker over, putting the new extruder in the center line of the carriage. There are 3 wheels at the top of the carriage, but only two are in contact with the rail at any time. While this system is more complex than simply mounting two extruders side-by-side, it reduces the chances of the inactive nozzle oozing onto the parts or scraping across the surface. The height of each extruder can be adjusted with a screw, and any horizontal offset between the nozzles is checked with a calibration procedure and corrected in the firmware. See the full video after the break.
[Jón] is offering the design files and modified firmware to perform this mod on your own Ender 3 Pro (though he notes other Creality printers should be compatible), but you’ll still need to source a control board with the additional stepper driver and heater output for the second extruder. This is yet another in a long list of hacks he’s performed on this popular entry-level printer, such as a modification that allows you to fold the machine up and take it on the go.
Thanks for the tip [BaldPower]!


It’s really cool, but I do not see how that is lowering the “additional complexity” part
I’d say its lower than many other methods – all down to what criteria you want to measure against.
Will certainly be less of a headache to use than two always in place extruders – with those you have to spend ages screwing the nozzle in and out so they are perfectly on plane with each other to have any hope of the inactive nozzle not hitting the print (trust me it is not fun, and only gets worse the smaller your layer height setting)… And with the small warping prints can do even then its not certain to be safe, plus the ooze factor is a bit of nightmare then too.
Looks like a really nice bistable mechanism that needs no additional control electronics – which is really cool – having to do a tool changer and use the extra stepper motor to grab/release adds costs and complexity this doesn’t have.. Its just a normal printer, that gave up a tiny bit of print area (or so it looks at least) to allow it to toggle ‘tools’, while getting the inactive tool well out of the way.
i wonder if the toggling would be possible in the other plane (y-plane) so that it wouldn’t deminish the printable surface area?
No reason I can see you couldn’t do it in y, though I don’t think you can avoid loosing a little print area no matter which way you do it – unless the bed is rather undersized to the maximum motion of the machine – as that little ramp that makes it toggle always takes up some space the head could otherwise move over usefully.
That would just reduce the Y axis instead of the X.
Possibly add a ballpoint pen style clicky nub on top to change heads and have the z axis move up to press it against a bit on the top of the printer. Of course then you’d just lose some max z height but that’s usually not a problem given how tall something like the ender 3 is. Oh and a bigger downside though would be leadscrew driven z printers would be slow as heck driving the gantry up and down again just to change heads.
This is a great example of keeping things simple. It minimizes wiring and requires no servos or weird configuration. It is probably the most reliable way to switch extruders and it guarantees that the second nozzle can’t bang into the print. I might even try this on my printer.
I took a similar approach to making layer synchronized time lapse videos of prints. I mounted a bluetooth shutter button on my printer and at the end of each layer, I bump the button with a pusher mounted on one of the Y axis bearing blocks. I snap very high resolution photos with an old cell phone mounted on the printer.
Very elegant!
Nope. I still prefer IDEX.
Thanks for the link. I didn’t know them.
The stratasys uprint machine I used to use worked in a similar manner. Although they were only using one extruder motor mounted on the head.
Not sure it’ll be durable. It seems like the spring will fatigue with time & use and the relative distance of the hotends will change.
These sort of bistable mechanisms should last very well, even in the compressed state between changes the spring should not be pushed near its limit. Obviously it will fail in the end, but as all the spring looks to be doing to toggling between the two it won’t change the hotend position – it doesn’t define where the hotend stops, just keeps it hard over on one side of the pivot (which is where wear sneaking in will change the position), at least until the spring has fatigued to the point it just lets them flap around with the movement of the head.
As an example when was the last time you saw a broken spring in the really cheap clicky pens? – Unless you screw up the design badly this sort of mechanism is good for thousands upon thousands of cycles..
With at least 2 cycles per layer, it’s not that high. in fact.
Well I’ve never yet seen a bistable mechanism that the spring has actually failed without chemical assault… So unless you design it such that the spring is pushed far beyond its limit on every cycle… If keep a spring away from its mechanical limits and they last basically forever, and this doesn’t come close to pushing the springs that hard, if it did the rest of the structure would fail under the load, as those are some pretty hefty springs, with long travel…
A spring really can be a bloody durable mechanism… Just look at old cars and train rolling stock etc – under constant load, but never deformed a great distance so the springs are still good after decades, in some cases 100 odd years…
There’s a reason we make springs out of steel and not aluminium – steel has a fatigue limit such that if you stay below the limit the material can go through an indefinite number of cycles without failing.
Holy print head mass, Batman! You could go so much faster! I would love to see this with Mosquitos. Stratasys as some have also said use this method. It may be under patent still, hence the lack of adoption beyond DIY. Anybody know?