
Desiccant is common in 3D printing because the drier plastic filament is, the better it prints. Beads of silica gel are great for controlling humidity, but finding a porous container for them that is a convenient size is a little harder. 3D printing is a generally useful solution for custom containers, but suffers from a slight drawback in this case: printing dense grills or hole patterns is not very efficient for filament-based printers. Dense hole patterns means lots of stopping and starting for the extruder, which means a lot of filament retractions and longer print times in general.
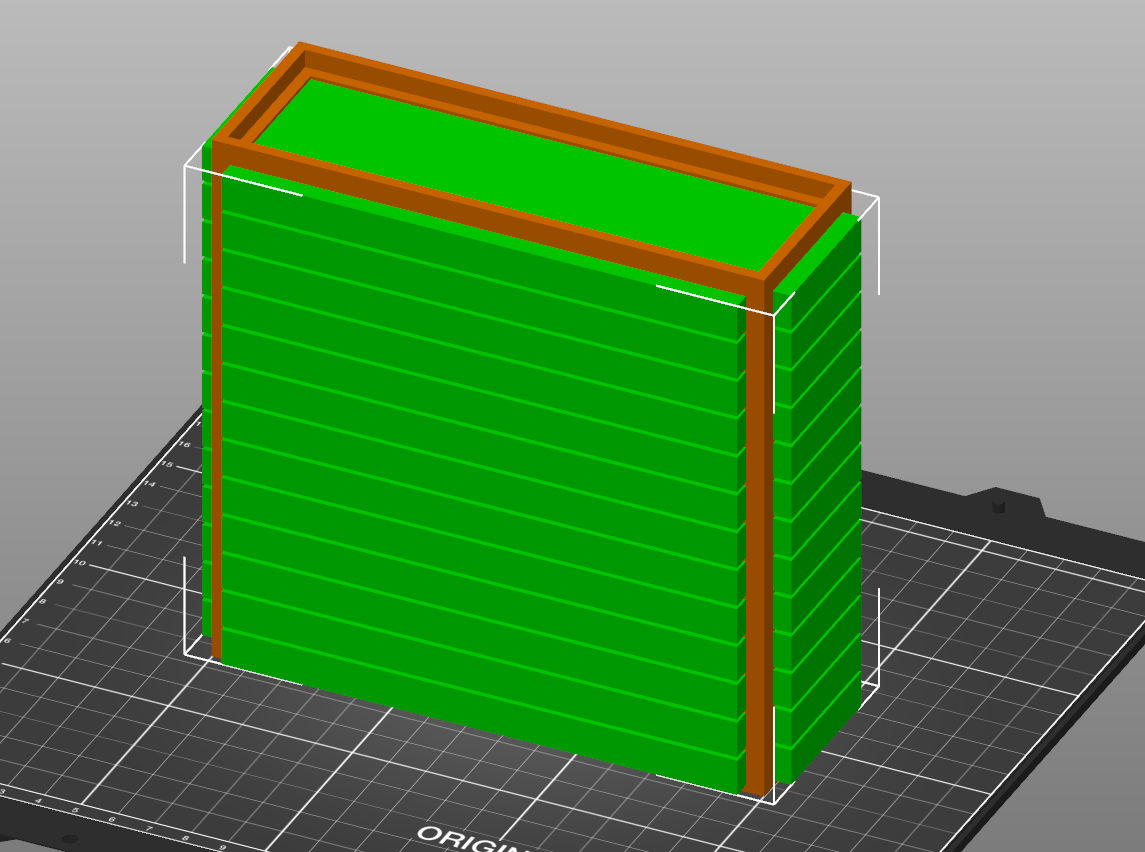
[The_Redcoat]’s solution to this is to avoid hole patterns or grills altogether, and instead print large wall sections of the container as infill-only, with no perimeter layers at all. The exposed infill pattern is dense enough to prevent small beads of desiccant from falling through, while allowing ample airflow at the same time. The big advantage here is that infill patterns are also quite efficient for the printer to lay down. Instead of the loads of stops and starts and retractions needed to print a network of holes, infill patterns are mostly extruded in layers of unbroken lines. This translates to faster print speeds and an overall more reliable outcome, even on printers that might not be as well tuned or calibrated as they could be.
To get this result, [The_Redcoat] modeled a normal, flat-walled container then used OpenSCAD to create a stack of segments to use as a modifier in PrusaSlicer. The container is printed as normal, except where it intersects with the modifier, in which case those areas get printed with infill only and no walls. The result is what you see here: enough airflow for the desiccant to do its job, while not allowing any of the beads to escape. It’s a clever use of both a high infill as well as the ability to use a 3D model as a slicing modifier.
There’s also another approach to avoiding having to print a dense pattern of holes, though it is for light-duty applications only: embedding a material like tulle into a 3D print, for example, can make a pretty great fan filter.


Neat. Though I find just tipping the beads into the bottom of a vacuum pot and placing stuff on top works well also. May well try a wall free print to see what happens.
I just fill a pantyhose leg with them, tie it off, and then yeet it into my air tight storage bin.
Which makes much more sense in my opinion. As a 3D printed article is only going to add moisture from the inherent nature of a hydroscopic material.
Actually non of these are perfect, because you cannot put them in the oven to dry out the balls.
Should be some metal mesh.
or even paper for 70C
a nice printing hack to leave out the walls!
but i found a much easier solution…i just use ‘formfutura easyfil pla’. i’m sure most of the other high-end pla is just as good. the filament that isn’t being used goes in a rubbermaid with a little can of silica but whatever’s on the printer just sits for months in my extremely humid basement and never has any problems. i only had problems when i was using cheap pla.
i’m sure everyone else has reasons for using more temperamental filament or maybe even noticing smaller scale imperfections. but it was a huge relief for me to find a setup where i don’t have to worry about that sort of thing
“Easy, just spend more money!”
I understand where you’re coming from, but sometimes people want to save a little money, especially if they print a ton. Of course, there are far simpler solutions than this, such as any airtight container with a bag of silica in the center of the reel, but it could have its applications.
Using PLA often isn’t a solution for hygroscopic material woes. I had issues with my setups until I realized that vacuum storage bags, a cheap hand pump that came with my bags, and a handful of “rechargeable” desiccant packs solved them all. All of them.
Now I grab a bag, crack it open, use spool. Put spool back in bag when done with spool. Pump air out of bag. Bake desiccant packs in oven overnight if they read lavender at 10% RH, maybe every other month. No expensive storage solutions, easily replaceable, and I can use the material I need to… rather than what I’m forced to.
That aside, I’m willing to bet your premium filament will look and perform even better if you took care of it.
Interesting I may have to try making a flat container like this to place in the bottom of my container. I always have just used an old tube sock filled with desiccant and tied a knot in the top. It makes it easy to jam in the voids of the storage container and cotton is pretty heat resistant when drying.
The technique is interesting, and adds a useful tool to the maker’s growing list.
I researched filament storage a bit when I got my 3-d printer. (Wanting a tool and not another hobby, spending money was more useful than tinkering – your goals may differ.)
Air-tight totes are a more expensive than normal totes and you can’t get them locally (probably), but if you’re already using totes they make a good drop-in solution for filament storage.
Then a small renewable mini-dehumidifier that has built-in dessicant that changes color when full (of humidity) and can be reformed by plugging it in for a couple of hours. My tote has been full of filament for 6 months now (and counting), with no appreciable color change on the dehumidifier.
I got an extra set to use for copper-pipe coils, because copper oxidizes from moisture in the air more than just oxygen.
https://www.amazon.com/IRIS-Quart-WEATHERTIGHT-Storage-Clear/dp/B00I3943X0/ref=sr_1_1?dchild=1&keywords=airtight+tote&qid=1620753663&sr=8-1
https://www.amazon.com/Improved-Eva-dry-500-Renewable-Dehumidifier/dp/B00BD0FN8A/ref=sr_1_7?dchild=1&keywords=small+dessicant+dehumidifier&qid=1620753585&sr=8-7
I tried the weather seal in the lid containers before. Now I prefer to flip the lid over on any storage container with good latches and pour some silicone mold making liquid you can get in small amounts from major crafts stores.
Do not forget to label, DO NOT EAT.
Or buy a $1 reusable drawstring cotton bag from any craft store or Amazon…
Does any slicer do open cell infill, designed so that it has no bubble traps in any orientation? That would be great for filling prints with resin then putting them in a pressure tank to cure.
Dessicating kitty litter granules in a sock works for me.