Play Your Favorite Nokia Game On The Raspberry Pi Pico

In many people’s memories, Snake lived and breathed on Nokia handsets from the late 90s and early 2000s. However, the game has been around for much longer than that, and will continue to live on in the future. That’s at least in part thanks to people like [Hari Wiguna] keeping it alive by implementing it on new platforms.

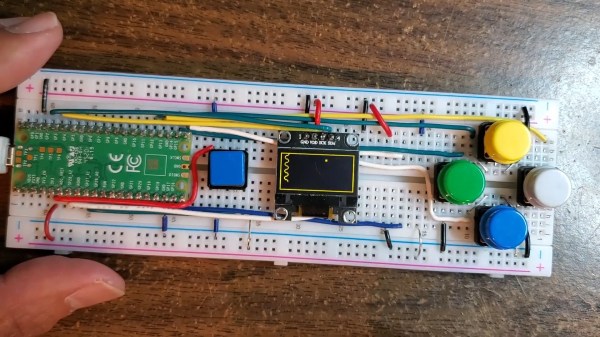
[Hari] set about writing Snake in MicroPython for the Raspberry Pi Pico. The hardware side of things is simple enough – five buttons hooked up to the Pico, along with an 128×64 I2C OLED screen to display the game on. On the software side of things, [Hari] pushed the boat out, deciding that his version of Snake had to have the player character slither like the real thing. This took a little effort to get right, particularly when navigating corners in different directions. However, perseverance paid off and [Hari] got the job done.

Code is on GitHub for those that want to tinker at home. It’s a tidy piece of work, though not the weirdest place we’ve seen the game appear – we’ve actually seen it run within PCB routing software before thanks to some nifty scripting. Video after the break. Continue reading “Play Your Favorite Nokia Game On The Raspberry Pi Pico”

Simple GUI Menus In Micropython

Love ’em or hate ’em, sometimes your embedded project needs a menu system. Rather than reimplement things each and every time, [sgall17a] put together a simple GUI menu system in Micropython that can be reused in all sorts of projects. The approach uses tables to define the menus and actions, and the demo program comes with a pretty good assortment of examples. Getting up to speed using this module should be fairly easy.

The hardware that [sgall17a] chose to demonstrate the concept couldn’t have been much smaller — it’s a Raspberry Pi Pico development board, an OLED 128 x 64 pixel display, and a rotary encoder with built-in push-button switch (it’s also been tested on ESP32 and ESP8266 boards). The widget under control is one of the commonly available Neopixel development boards. The program is hosted on GitHub, but beware that it’s under development so there may be frequent updates.

This is a good approach to making menus, but is often rejected or not even considered because of the overhead cost of developing the infrastructure. Well, [sgall17a] has done the hard work already — if you have an embedded project requiring local user setup, check out this module.

The Coffee Must Flow: Replacing A Spent Lithium Cell In A Coffee Machine

When [hacky] bought a used Douwe Egberts Gallery 200 all-in-one coffee maker, the machine was known to have a ’empty battery’. Being one of those fancy coffee makers that handle everything from the grinding of coffee beans to the application of hot water and steam, it relies on instructions for each coffee recipe. Unfortunately, it turns out that this machine stores these on battery-backed SRAM, as [hacky] found out with help from friendly folk over at the Dutch Tweakers forum.

The Douwe Egberts Gallery 200 is a rebranded machine that’s also sold in Scandinavia as the Wittenborg FB 5100. These machines have an ST M48T58 TimeKeeper module that combines 8 kB of persistent SRAM with a real-time clock. Being powered from a single coin cell (lithium carbon monofluoride chemistry), their lifespan is limited.

Replacing the coin cell in an M48T58 TimeKeeper module with AA cells.

Fortunatley, a DE-9 connector is provided on the back to provide service/maintenance access to to the hardware. Using a conveniently available programming guide for the hardware, it was easy to figure out the pinout and baud rate (9600, 8 bit, ignore parity, no flow control). This allows for reprogramming the SRAM, but without replacing the battery this data would be gone again on the next start.

Based on the ST M48T58 datasheet, it’s not clear that the clip-on module containing the coin cell and crystal can be replaced, though one could simply plug in a new M48T58 module. Or, as [hacky] did, it’s also possible to cut open the ‘SNAPHAT’ top section and wire in a replacement battery module. With two 1.5V AA cells providing the 3V to the module, it was operational again.

Next up: working out what to write to the SRAM to make the coffee flow again.

Guitar With Hot-Swappable Pickups Lights Our Fire

There’s a story that goes something like this: Chet Atkins was playing his guitar when someone remarked, ‘that guitar sounds great!’ Mr. Atkins immediately stopped playing and asked, ‘how does it sound now?’ While it’s true that the sound ultimately comes from you and your attention to expression, we feel that different pickups on the same guitar can sound, well, different from each other.

However, this is merely speculation on our part, because changing pickups is pretty serious surgery, and there’s only one company out there making guitars with hot-swappable pickups. Since their low-end model is out of most people’s price range, [Mike Lyons] took one for the team and decided to build a guitar from scratch to test out various pickups of any size, from lipstick to humbucker. [Mike] can swap them out in under a minute, and doesn’t need any tools to do it.

[Mike] modeled the swapping system on that one company’s way of doing things, because why reinvent the wheel? The pickups are inserted through the back and held in place with magnets and a pair of cleverly-designed printed pieces — one to mount the pickup to, and the other inside the pickup cavity.

As far as actually connecting the things up, [Mike] went with a commercially-available quick-connect pickup solution that uses a mini four-conductor audio plug and jack. The body is based on the Telecaster, while the headstock is more Stratocaster — the perfect visual combination, if you ask us.

We are particularly fond of [Mike]’s list of caveats for this project, especially the requirement that it had to be built using only hand tools and a 3D printer. Although a drill press would have been nice to use, [Mike] did a fantastic job on this guitar. Whether you’re into guitars or not, this is a great story of an awesome build.

What, you don’t even have hand tools? You could just print the whole guitar instead.

DIN Rails For… Everything

Cross-section of a 35mm top hat DIN rail.

One of the great things about the Internet is it lets people find out what other people are doing even if they normally wouldn’t have much exposure to each other. For example, in some businesses DIN rails are a part of everyday life. But for a long time, they were not very common in hobby electronics. Although rails are cheap, boxes for rails aren’t always easy or cheap to obtain, but 3D printing offers a solution for that.

So while the industrial world has been using these handy rails for decades, we are starting to see hobby projects incorporate them more often and people like [Makers Mashup] are discovering them and finding ways to use them in projects and demonstrating them in this video, also embedded below.

If you haven’t encountered them yet, DIN rails are a strip of metal, bent into a particular shape with the purpose of mounting equipment like circuit breakers. A typical rail is 35 mm wide and has a hat-like cross-section which leads to the name “top hat” rail. A 25 mm channel lets you hide wiring and the surface has holes to allow you to mount the rail to a wall or a cabinet. These are sometimes called type O or type Ω rails or sections.

There are other profiles, too. A C-rail is shaped like a letter C and you can guess what a G section looks like, too. Rails do come in different heights, as well, but the 35 mm is overwhelmingly common. However, there are 15 mm rails and 75 mm rails, too.

Continue reading “DIN Rails For… Everything”

The Mysterious Wobble Of Muons

You might think that particle physicists would be sad when an experiment comes up with different results than their theory would predict, but nothing brightens up a field like unexplained phenomena.  Indeed, particle physicists have been feverishly looking for deviations from the Standard Model. This year, there have been tantalizing signs that a long unresolved discrepancy between theory and experiment will be confirmed by new experimental results.

In particular, the quest to measure the magnetic moment of muons started more than 60 years ago, and this has been measured ever more precisely since. From an experiment in 1959 at CERN in Switzerland, to the turn of the century at Brookhaven, to this year’s result at Fermilab, the magnetic moment of the muon seems to be at odds with theoretical predictions.

Although a statistical fluke is basically excluded, this value also relies on complex theoretical calculations that are not all in agreement. Instead of heralding a new era of physics, it might just be another headline too good to be true. But some physicists are mumbling “new particle” in hushed tones. Let’s see what all the fuss is about.

Continue reading “The Mysterious Wobble Of Muons”

3D-Printed Desiccant Container Exploits Infill

Desiccant is common in 3D printing because the drier plastic filament is, the better it prints. Beads of silica gel are great for controlling humidity, but finding a porous container for them that is a convenient size is a little harder. 3D printing is a generally useful solution for custom containers, but suffers from a slight drawback in this case: printing dense grills or hole patterns is not very efficient for filament-based printers. Dense hole patterns means lots of stopping and starting for the extruder, which means a lot of filament retractions and longer print times in general.

The green model is used as a modifier to the orange container (of which only the corners are left visible here)

[The_Redcoat]’s solution to this is to avoid hole patterns or grills altogether, and instead print large wall sections of the container as infill-only, with no perimeter layers at all. The exposed infill pattern is dense enough to prevent small beads of desiccant from falling through, while allowing ample airflow at the same time. The big advantage here is that infill patterns are also quite efficient for the printer to lay down. Instead of the loads of stops and starts and retractions needed to print a network of holes, infill patterns are mostly extruded in layers of unbroken lines. This translates to faster print speeds and an overall more reliable outcome, even on printers that might not be as well tuned or calibrated as they could be.

To get this result, [The_Redcoat] modeled a normal, flat-walled container then used OpenSCAD to create a stack of segments to use as a modifier in PrusaSlicer. The container is printed as normal, except where it intersects with the modifier, in which case those areas get printed with infill only and no walls. The result is what you see here: enough airflow for the desiccant to do its job, while not allowing any of the beads to escape. It’s a clever use of both a high infill as well as the ability to use a 3D model as a slicing modifier.

There’s also another approach to avoiding having to print a dense pattern of holes, though it is for light-duty applications only: embedding a material like tulle into a 3D print, for example, can make a pretty great fan filter.