3D printing with plastics and resins is great for quickly prototyping parts with all manner of geometries, but strength and durability of the parts produced is often limited. One way around this is to use your 3D printed parts as patterns for casting in something tougher like aluminium. That’s precisely what [Brian Oltrogge] did to produce an attractive wall hook from a 3D printed design.
The process starts with the design and printing of a wall hook, with [Brian] taking care to include the proper draft angles to allow the pattern to be properly removed from the mold. The print is carefully sanded down and post-processed to be highly smooth, so that it doesn’t spoil the mold when its removed for the casting process. From there, a sand casting mold is built around the pattern using sodium silicate in a 3-4% mix by weight with fine masonry sand. Once ready, the pattern is removed, and the mold is assembled, ready for the pour.
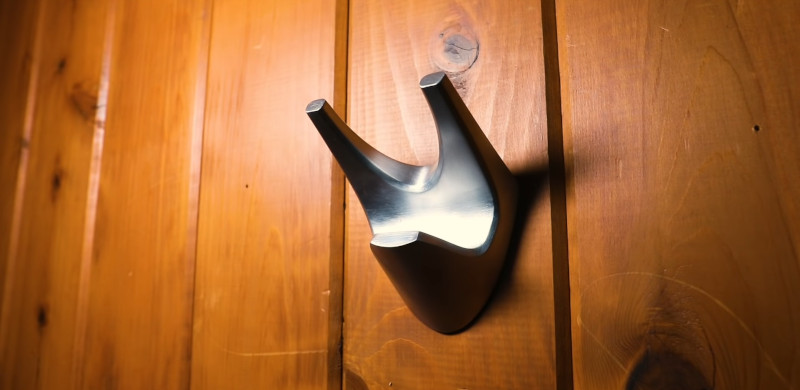
[Brian] completes the process with a simple gravity casting method using molten aluminium. The part is then removed from the mold, and filed down to improve the surface finish from the sand casting process. It’s then polished up to a nice shine and hung on the wall.
[Brian] does a great job of explaining the basics of what it takes to get gravity casting right; draft angles in particular are something often ignored by beginners, yet are crucial to getting good results. You needn’t just settle for casting inanimate objects though; we’ve featured DIY casting processes for gears before, too. Video after the break.


Nice demonstration of casting and interesting that he shows the importance of draft angles, only then to go on to show they weren’t important in this casting.
Just a stupid casting related casting question. The cast came out with a fairly rough surface that retained (I assume) the texture of the sand so why don’t casters use a finer grain sand, like talcum powder fine, to reduce the need to smooth the surface? (I ask you since you seem to know something about casting.)
Plaster molds are often used and they give a finer texture.
The pattern may also get coated in a thin shell, like liquid clay which is allowed to dry and then surrounded by the casting sand, which can reproduce very fine surface textures.
The point of using coarse sand is the porosity, which lets the air escape the mold easily without the risk of bubbles getting trapped under overhanging features.
If that’s what you got, you didn’t understand it.
The draft angles were for removing the pattern cleanly, not for removing the final part.
I use PLA, and heat the mold to the softening point, then gently fish the glob of PLA out of the investment mold. If you use a sand mold only that won’t work but a sand and resin mix mold will hold up to a little abuse.
Alas it’ll be a while before I un-see drunk octopus and hungry snail even though it did come out looking very nice.
Great band names though !
Hmmm … Young Crustacean, ???
:)
Very nice results, casting is much harder than it seems. You only know if you’ve already tried a few castings.
You have to be suspicious by the furnace, that the guy is a professional.
do you? its a pretty standard keg furnace with cast refractory. Theyre not uncommon second or third builds after you outgrow the 5 gallon bucket version
Casting a simple 3D print in a not short amount of time.
A plaster of Paris mold properly dried out (i.e. 24-48 hrs at 250 F) before the pour will provide excellent surface finish, much better than a sand casting. They are used to make dies for stamping prototype car panels.
I have a book by Alcoa or Kaiser that shows a plaster mold for a die for stamping a car door at the start of the chapter. They use zinc alloy for the dies, but it’s also usable for aluminum. Cast zinc alloy dies are commonly used for aircraft parts. Die life stamping steel sheet is typically 10-20 thousand units. That is often more than the number of planes built to that design.
Draft *always* matters unless you are doing lost wax.
As far as I’m concerned, making patterns is by far the best use of a 3D printer whether you use cast metal or injection molded plastic for the final product.
If casting is so difficult, why were equipment kits for casting tin soldiers so popular as a gift for 12-13 year old boys for *very* many years? “Tin soldiers” was something you made, not bought.
I made and sold a lot of “peace symbols” cast in lead using a mold hand carved with a ground down triangular file in a piece of 1/2″ aluminum plate when I was a teenager 50 years ago.
Casting in my experience really is a challenging art, but how hard seems to vary hugely on materials you are using with ‘tin’ meaning probably a leaded pewter being rather easy by all accounts (not that I’m an expert – mostly done resin castings in silicon).
lead free tin bismuth alloys
Why use CA glue as a primer when there are any number of spray primers, etch primers and spray putty primers available in rattle cans.
Breathing CA vapors can’t be good, especially as it looks like he’s doing it indoors.
Taking the print outside and spending literally seconds to spray that sized object with primer (and have plenty in the can for more coats after sanding) – now that is the right tool for the job.
Usually because it’s there, and the rattle can of special stuff isn’t.
Because spray cans are sooo good to breathe….
CA is a perfectly good thing to use for this, more controllable than the spray’s, with some practice and some extra filling materials like Bicarb, sawdust etc as needed. As always wear the right safety gear for what you are working on and use things like fume hoods when its needed, but taking a little longer to get a really good single coat of CA vs having to do probably 3 or 4 passes with sprays for the same level of result.
Not that I’m saying the spray cans are terrible – great stuff (but better on consistent and shallow imperfections (so can be good for 3d prints) than deeper more irregular flaws (which can also apply to 3d prints – especially faster prints) but that doesn’t make them the only valid tool.
Plaster makes a lot more sense than this lost wax stuff. If you use plaster, burn out the pattern, you can make any geometry you can print. No need to add draft angles etc.
There are some casting alloys that can be melted on the stovetop.
What would really be interesting is exploring possibilities like this, simpler, lower cost yet higher performance. This method shown is too expensive and too crappy to be useful for much.
I was trained in industry bronze and iron casting where we occasionally used aluminum. Plaster doesn’t always do well in high temperatures. You can use the plaster like dip coatings for making investment shells but those are NOT plaster of Paris.
I regularly cast object from 3D prints with non-leaded pewter, which can be bought from Rio Grande jewelry supply as pellets, or you can fudge it with lead free pipe solder from home depot.
I have a metal measuring cup, put it on the stove and watch it, run the stove fan to pull vapors.
I make plaster of Paris molds, since plaster can easily handle low melt pewter, or Wood’s metal, or similar super low melting point alloys.
I use a hair dryer to soften the PLA and fish it out of the mold soft and gummy, allowing the mold to retrain overhangs and texture.
After it is solid, I dry the plaster investment mold in the oven at 300-400 F for half an hour to make sure there is no steam coming off it (think explosion of liquid metal) and to keep the mold hot so the metal gets into all the details.
Then, I pour the liquid metal into the mold. Bump it a few times to get air out and metal in and conforming to the mold. If I’m impatient, then quench the whole thing in a bucket of water and hammer open.
Along with what the other commenters said, I believe there’s a trade off in the stability of the mold with finer grains, since they are smaller and generally smoother they’ll not bind as well so it may take more expensive sands and additives to get a good result. So a cheaper sand with a rough finish might be preferable from a time and cost perspective since you’ll still need to do some clean up anyway.