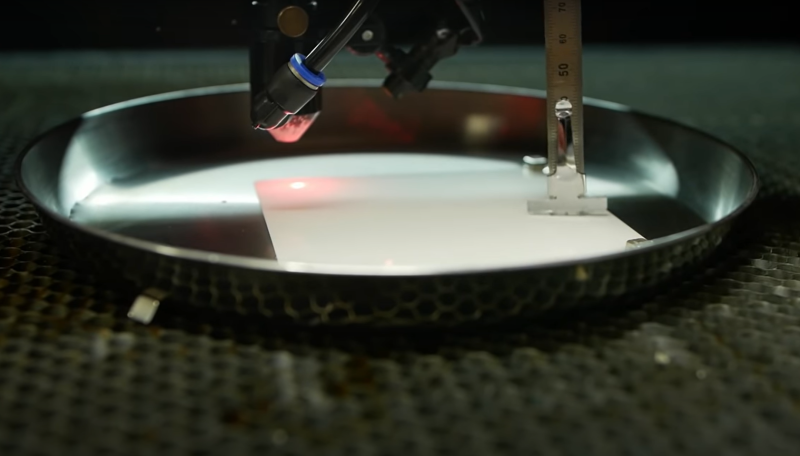
[Ben Krasnow] over at Applied Science was experimenting with cutting inexpensive ceramic sheets with his cheap CO2 laser cutter when he found that (just as expected) the thermal shock of the CO2 beam would cause cracking and breaking of the workpiece. After much experimentation, he stumbled upon a simple solution: submersion under a thin layer of water was sufficient to remove excess heat, keeping thermal shock at bay, and eventually cutting the material. Some prior art was uncovered, which we believe is this PHD thesis (PDF) from Manchester University in the UK. This is a great read for anyone wanting to dig into this technique a little deeper.
The CO2 laser cutter is a very versatile tool, capable of cutting and etching a wide range of materials, many of natural origin, such as cardboard, leather and wood, as well as certain plastics and other synthetic materials. But, there are also materials that are generally a no-go, such as metals, ceramics and anything that does not absorb the laser wavelength adequately or is too reflective, so having another string in one’s bow is a good thing. After all, not everyone has access to a fibre laser.
After dispensing with the problem of how to cut ceramic, it got even more interesting. He proceeded to deposit conductive traces sufficiently robust to solder to. A mask was made from vinyl sheet and a squeegee used to deposit a thick layer of silver and glass particles 1 um or less in size. This was then sintered in a small kiln, which was controlled with a Raspberry Pi running PicoReFlow, and after a little bit of scrubbing, the surface resistance was a very usable 2 mΩ/square. Holes cut with the laser, together with some silver material being pushed through with the squeegee formed through holes with no additional effort. That’s pretty neat!
Some solder paste and parts were added to the demo board, and with an added flare for no real reason other than he could, reflowed by simply applying power direct to the board. A heater trace had been applied to the bottom surface, rendering the board capable of self-reflowing. Now that is cool!
Thanks [Baldpower] for the tip!


That’s very cool. Can he do the most beautiful solder masks ever with ceramic glazes?
With his little kiln setup I see no reason why not, might I guess need a finishing pass to remove excess glaze – not sure personally how free flowing it becomes – it might flow over the pads more than ideal…
Also, I agree I saw that and was suitably impressed.. I mean I already wanted to find a conveniently located laser to use, or have my own, this is yet one more great use for it.
Back in 1980, I worked for a company that was experimenting with cutting ceramics with a Nd:YAG laser. Since the ceramic was reflective, cutting was difficult until we discovered that coating it with milk of magnesia (Yes, the laxitive).
Smooth
The interesting thing about this is that since its only a coating the laser should remove it after each pass… Did you keep reapplying the coating during the operation, or did the mark from the previous pass allowed the laser to work on the next pass and so on?
I’m pretty sure that a pulsed fiber laser would do the trick too. It works on rocks and mugs too
Back in ’98 I was at Diskcon in San Jose where I saw the product of a company trying to interest wafer manufacturers and temp them away from cutting by grinding.
They used a laser as the cutter with a lower pressure water saw as a wave guide. With it they were able to cut wafers with a 20 micron kerf instead of the 80 microns obtained by grinding. I reckon that would do the trick here too.
There are two startups from Switzerland that are making a machine like that, if you search for “avionsys” on youtube there are videos of it. The water cools the cutting zone and also eliminates the taper that is present when laser cutting thick parts. It’s kinda like a faster EDM machine.
Synova is their competition. They are a class of machine called a laser waterjet (really, it’s a waterjet guided laser beam that’s fully colminated for a 4 inch length).
Think actual lightsaber, and this is as close as you’ll get to that in real life, but on small scale, but using water instead of plasma to reflect and focus the beam.
It’s bleeding edge stuff in machining, and very worth a Hackaday article if it didn’t get one already. Can cut nearly any material with almost imperceptible taper- basically micron straight cuts through 4″ thick material.
Wow. I hadn’t heard of this. I’m looking into it!
About the final finish, the scratching away of the thin layer of glass covering the traces…
You don’t need to scratch away the glass from *all* of the traces, right? Only need to scratch the glass from the places where you want to solder. It would actually work like a solder mask.
Maybe even can burn the glass layer off with the laser? The silver is reflective, so it probably won’t be affected. The glass seems to be opaque, maybe because of the mold release stuff, but that shouldn’t matter much. It would probably absorb the heat fine and be blown off.
Or you might be able to do it with a small mill?
I’m wondering. Scratching the glass off with scotch brite will probably also disperse the silver, helping to increase it’s conductivity. So maybe having a final process with a mill having a rotating brush, that simply follows all the traces and scratches off the glass (and buffs the silver) would work. You already have gerbers, so hardly any extra work.
I highly recommend all of the Applied Science videos on YouTube by Ben Krasnow. His videos are always interesting, and I rarely don’t learn something, and I have been a Nuclear Engineer for 30 years. While some of his projects are out of the range of standard garage shop, most are not, and even my 11 year old can follow his explanations.
I learned in the early 90’s that if you need to laser engraver a clear material (plexiglass in our case) smear an opaque substance on the surface, like Dawn dish soap, and then wipe clean.
Minor correction: The software is called picoReflow, not PicoFlow
Quite right, it is corrected. Much obliged kind sir.
Ahaha, this is lovely! I believe I’m the first one that adopted/modified picoReflow to fire a kiln years ago. I reached out to chron0, creator of picoReflow, and the kiln screenshot on his site is mine :)
I’ve now since not maintained my website with details, but I’ve seen dozens of people do the same with picoReflow. Incidentally, I’ve been finishing up a cleaned up and revamped setup and I’ve been hoping to share and republish the basic how to.
Does this mean sometime next year I’ll be able to buy a lithium battery powered ceramic coffee cup that has a cascading multi-colored LED lighting kit installed on it?
Why lithium battery – use one of those thermal voltaic cells type setups – peltier coolers run in reverse (probably with a joule thief type circuit as they are not that great power output wise) and then its powered by your beverage of choice (at least as long its hot, I don’t think those cells will achieve much with chilled)
“the surface resistance was a very usable 2 mΩ/square” square WHAT ?
Just square.
The way it works, if you have a copper square on a pcb, the resistance between two diagonally opposed corners of the square will be the same no matter the size the square is. That interesting property arises because on a larger square the two points are further away, but there’s also more space for the current to flow. These two parameters exactly cancel out.
its like comparing a single 1k resistor to 2 parallel lines that each have two 1k resistors. Those 2 circuits have the same resistance, but the second one can handle 4 times as much current before burning out because there are 4 resistors sharing the thermal load.
Yes, it’s a dimensionless property. Weird huh? It’s looks wrong, but it aint.
Have a read about sheet resistance: https://en.wikipedia.org/wiki/Sheet_resistance#Measurement