As long as 3D printers have been around, it seems as though many of us have dreamed about nozzle-sharing solutions for multicolor 3D prints. Just because Prusa’s MMU has had the spotlight for some time doesn’t mean that there’s no space to design something original. If you’re craving something new to feast your eyes upon, look no further than the EnragedRabbitProject by [EtteGit]. Built for Voron 3D printers, it’s a scalable filament changing solution designed from the ground up that expands to accommodate up to 9 filaments.
EnragedRabbitProject is broken into four main components. First comes the Enraged Rabbit Carrot Feeder (ERCF), the system that handles filament selection, retraction, and loading. Next, comes the Carrot Patch (ERCP), a spool holder/buffer combo that’s needed per spool. For those unfamiliar with filament changers, unspooling filament is easy, but rewinding it back onto the spool is hard. And since the nozzle will retract a significant length of filament when it switches between filaments, it’s important to manage all this extra loose filament to prevent tangles. A filament buffer is the solution; it’s a clever mechanical addition to the spool holder that will manage the extra filament that gets unwound during these filament changes. Beyond these two systems is the King’s Seat (ERKS) a Voron-2 setup that purges extra filament into beads instead of purge blocks, and finally, the filament sensor, which detects filament presence for filament changes.
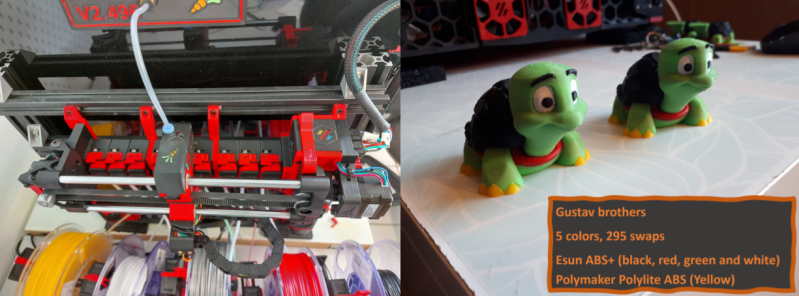
It’s sometimes hard to appreciate the reliability of these sorts of CNC systems. On that note, keep in mind that the prints on the project’s landing page are the results of hundreds if not thousands of filament swaps — truly an astonishing feat. Beyond reliability is the project’s presentation. [EtteGit] has kindly posted STEP and STL files for all mechanical components, the Klipper configuration files, and a bill-of-materials that will scale according to the number of filaments you’re installing.
We’re thrilled to see folks continue to innovate on the concept of what it means to be a multi-color or multi-material 3D printer. For other takes on multi-filament setups, have a look at [Paul Paukstelis’] microscope-inspired head changer, and [MihaiDesigns’] removable tool head concept.


I have one of these and even while still in development this is one of the most fully complete solutions out there today.
Ette has a stunning design and 1.1 was just released and is even better than before.
ERCF can accommodate more than 9 filament spools, it is just not tested and verified beyond that number. The BOM is structured so you enter how many “channels” you want to support and it will calculate the length and material counts.
Filament changing is awesome. But.. it can still only get you as many colors as you have filament. Whatever happened to those diamond hotends that mixed R G and B filament? I understood that they didn’t always mix perfectly. But I remember seeing pictures that made it look like it wasn’t that bad. Were the pictures a lie? Did that never work?
CMY or RBY, not RGB ;-)
oh.. i hate those know-it alls!
My new solution for full color 3d printing is the “double i3” In theory this can print millions of different colors.
I find it exciting (especially in 3D printing) how quickly ideas and innovations are implemented. It reminds me a lot of real printers, which got better and better or more complicated almost every year. I was toying with a similar idea because I just bought a 3D printer, but this project is a hundred times better than my idea.
Hmm, how about a filament changer that takes the material purged from the hot-end and transforms it into new filament? I suppose there will be challenges in keeping the diameter consistent when the operation is always stopping and restarting (while waiting for the next purge). Perhaps multiple processing steps may be required; but the idea is to automate it more compared to traditional shredding, melting, and re-extruding. Also, by avoiding shredding, you should reduce the need to introduce new virgin material (due to polymer chains being shortened).
Alternately, one could go after a mechanism to back out the molten filament completely as the filament is retracted. This seems even more challenging, however.
Yet another alternative is to find an easy way to change the nozzle in addition to the material, since that’s where the material to be purged generally resides (in lined hot-ends, at least). Of course, by the time you get here, you might as well consider changing the entire hot-end.
Hmm ‘docking’ the hot end at a catch tank with a bypass nozzle so you can extrude at filament thicknesses (or probably thicker, so you can then use the filament extruding machine to join all the purges and thin to consistent thickness) could work I guess, it probably wouldn’t manage to pull all the previous filament out of the depths of the primary nozzle, but certainly purge enough out of the melt zone to make a fairly quick transition.
Seems to me though the only sane way of doing material switching is to have multiple hot-ends one per material so you don’t spend lots of filament and half of forever purging. The change filament and have the transition ‘purge’ in the infill of the real print can work, sometimes – you might not have enough infill to actually complete the purge, but at least you didn’t waste all that plastic on the purge towers, just a little…
There are already 3d printers that work with granulate and no longer need filament at all
I assume you are suggesting that if you can purge into granule shapes, you’ll solve the waste problem. True, but now you’ll need to solve the problem of how you switch granule feeders. Most granulate printers that I’ve seen have a big auger that goes into a melting pipe with a long heat zone. Swapping would involve swapping all of that, which is a lot of stuff to duplicate and move around.
Or, I suppose you can just avoid the problem by using a filament-based printer for the multiple feeds, but take the “waste” granules and use them on a different granulate-based printer.
Here’s what I’ve come up with so far for purging into new filament:
Have a short piece of PTFE tube (with inside diameter close to actual 1.75mm vs. the 2mm stuff that is usually used) that then feeds into an extruder gear. This is all placed to the side of the usual print area, with the top of the tube level with the bottom of the nozzle. This should always be at nozzle level (ie, decoupled from the Z axis). To purge, the printer moves over to the tube and “prints” 1.75mm discs of material, with the extra extruder lowering the new filament down as each disc is printed.
To get started, you’ll have to prime this unit by inserting a piece of filament that goes from the top of the tube to the new extruder gear. That distance will also need to be long enough that the just-printed filament is cool enough that the extruder gear doesn’t mash it up. An extra fan may help with that.
This will work for printers with an X/Y gantry that doesn’t move in Z. For bed-slingers, you could attach the tube to the X axis, but then it will be missing the usual Y-axis control. A servo could be added to move the tube in the Y direction. For other printers where the head moves in Z, you may have add an extra Z movement to keep the top of the tube level with the head as it prints. For printers can that move quickly in Z (deltas), then you could also just place the tube near the Z-max of the printer.
Ideally it would be part of the print. For prints with a larger infill to shell ratio maybe all or most of the color transition could go into the infill.
This. Why waste time and filament purging when you can just put it somewhere it won’t be seen?
Take a look at Swapper3D. Swapping out the entire nozzle in lue of purging is their plan (works in conjunction with a filament changer like Enraged Rabbit, Prusa MMU, etc).
Those enraged rabbits look a lot like contented turtles to me.
Impressive.
Impressive!
But your Engaged Rabbit shall be no match for my Betrothed Hand Grenade Mu Ha Ha!
Where are the printed parts download located ?